Vulnerability Scanning
Topics Discussed
Product Overview
The Vulnerability Scanning service provides for continuous vulnerability scanning. For Virtual Machines, the service is facilitated by a vulnerability scanning agent that is deployed with the Armor Agent (the "Scan Agent"). For container images, the service is facilitated by a container sensor deployed to a container host (the "Sensor").
Both the Scan Agent and Sensor collect instance-level data, including basic asset identification, Windows registry details (for Windows systems), and file version and package information. This data is securely transmitted to Armor’s scanning platform, which analyzes it to identify vulnerabilities. The results are then made available to customers through Nexus.
The Scan Agent and Sensor perform these collections periodically throughout the day, ensuring timely updates. Vulnerability information is posted in Nexus on a daily and weekly basis, reflecting the state of each instance as of the most recent scan.
Vulnerability information is available through Nexus, with reports published on a weekly basis. Each report includes detailed insights into identified vulnerabilities, such as the name and description, affected assets, CVSS score, and criticality rating (Critical, High, Medium, Low, or Informational). Customers can review results by vulnerability across virtual machines and container images, and filter findings by criticality rating.
Armor's vulnerability scanning service puts our customers in control of their network. Keeping them ahead of the next threat through increased visibility, preparedness, and protection. Armor's service scans internal and external networks for technical vulnerabilities, patching, and compliance issues—providing clients with the ability to mitigate risk and ensure compliance.
To fully use this screen, you must add the following permissions to your account:
View Vulnerability Scans
Write New Vulnerability Report
View Vulnerability Exclusions
Write Vulnerability Exclusions
Once the Scan Agent or Sensor is installed, the initial scan starts immediately. Subsequent scans take place daily (every 4 hours for virtual machines, every 24 hours for container images) and the data displayed on the Vulnerabilities page is refreshed every day at 22:00 GMT (6pm CST or 7pm CST) depending on day light savings.
Weekly reports are generated at 22:00 GMT every Sunday. Weekly reports are available for 13 months. When a report is complete, it will be available in the Reports screen. Weekly Reports reflect imported data and does not initiate scans. Based on your data's location and your environment, your report's availability in the system may vary.
Vulnerabilities
You can use the Vulnerabilities screen to view information for a specific vulnerability scanning report within an interactive table.
Users can manually refresh the table data using the refresh data link at the top of the table, but the data displayed will only reflect the state of the environment at the time of the last interval scan. For example, if your next scheduled scan occurs at 4pm, refreshing the data will show the state of your environment at noon and not reflect any patching you did at 3:30pm.
This screen also displays severity levels for each detected vulnerability, along with the quantity of vulnerabilities detected for each severity level. A severity is assigned to a vulnerability based on the Common Vulnerability Scoring System (CVSS). CVSS is the accepted system to rate the severity status of a vulnerability. Armor uses NVD CVSS v3.0 to score vulnerabilities. To learn more, please see the National Vulnerability Database website.
You can use this information to prioritize how to troubleshoot these vulnerabilities, as well as understand how these vulnerabilities can affect your environment.
A user concerned with patching vulnerabilities will be primarily focused on the information in the Vulnerabilities tab.
Even though a vulnerability is patched, it should be expected that the Vulnerabilities screen will not immediately reflect any updates as scans occur at 4 hour intervals. Even when manually refreshing the data, expect patched vulnerabilities to remain visible. Patched vulnerabilities should disappear from the Vulnerabilities tab after the 22:00 GMT daily refresh.
In the Nexus, in the left-side navigation, click Security.
Click Vulnerability Scanning.
Column | Description |
|---|---|
Vulnerability Name | This column displays the name of the vulnerability scan report. |
Affected Assets | This column displays the number of assets affected by the vulnerability, regardless of asset type (virtual machines and/or container images). |
Excluded Assets | This column displays the number of assets excluded from the scan for the vulnerability. |
CVSS Score | This columns displays the Common Vulnerability Scoring System (CVSS) score assigned to the vulnerability. The breakdown of CVSS Scores aligns with the Severity types. |
Severity | This column displays the severity level of the vulnerability. There are four severity types, based on the vulnerability's CVSS:
There is an additional severity type called Info. Although Info is listed as a severity type, in reality, Info simply displays activity information for corresponding plugins from third-party vendors. |
Known Exploits | This column indicates if there are any known exploits for the vulnerability.
|
Clicking a Vulnerability Name will take the user to the detail screen for that vulnerability. The vulnerability detail screen includes a synopsis of the vulnerability, a table of affected assets, and the remediation guidance for the vulnerability.
The Affected Assets table includes:
Asset Name
If the asset has been excluded (see Vulnerability Exclusions)
Asset ID
Asset Type
Date stamps for first and last time the vulnerability has been detected on the asset
Exclusions
Vulnerability Exclusions give users the ability to manage their vulnerability programs. Users can exclude vulnerabilities on specific reports or silence them to be addressed later.
Column | Description |
|---|---|
Vulnerability | This column displays the name of the vulnerability excluded. |
Excluded Assets | This column displays the number of assets excluded from the vulnerability, regardless of asset type (virtual machines and/or container images). |
Reason | This column displays the risk reason selected in the Exclude Assets form. |
CVSS Score | This columns displays the Common Vulnerability Scoring System (CVSS) score assigned to the vulnerability. The breakdown of CVSS Scores aligns with the Severity types. |
Severity | This column displays the severity level of the vulnerability. There are four severity types, based on the vulnerability's CVSS:
|
Known Exploits | This column indicates if there are any known exploits for the vulnerability.
|
Users can filter the table by any of the columns listed above.
Clicking the Menu icon to the right of the Expires On column allows users to View a read-only copy of the Exclusion Details or Remove Exclusions from the associated assets.
Reports
The Reports screen displays a table of completed reports. Reports are compiled and published on a weekly basis.
Armor generates a vulnerability report once a week on Sundays at 10:00PM UTC. These reports are stored for 13 months. This weekly report is valuable for Compliance and can be provided to auditors to illustrate patching activity over time. For example, a series of reports for an environment might show a decrease in Critical vulnerabilities over a span of weeks, showing actions taken to resolve detected vulnerabilities. A user concerned with patching vulnerabilities day to day will primarily focus on the Vulnerabilities tab.
Column | Description |
|---|---|
Report Name | Reports are named by the date on which they are imported from the VS service. |
Import Time | Import time is the time at which the report is imported into Nexus. |
Import Status | Import status is the status of the report job. Reports listed will show a status of either Completed or InProgress. |
Vulnerabilities | This column provides an at-a-glance view of the number of vulnerabilities included in a specific report, grouped by severity. Change in Quantity of SeverityOn April 1, 2021 we switched from the vulnerability subagent platform severity scoring to the industry standard of NVD CVSS v3.0 (https://nvd.nist.gov/vuln-metrics/cvss). Some of what the vulnerability subagent deemed critical, may not have a 10.0 CVSS v3.0 score. As a result of this, you may find a significant increase in the number of critical severities. Please note that the vulnerabilities themselves were detected previously and only scored differently. |
Data from within a Report can be filtered either by Vulnerability or Virtual Machine using the tabs at the top of the report.
Enable Vulnerability Scanning for Virtual Machines
Use the following commands to manage the Vulnerability Scanning service within the Scan Agent.
Install Vulnerability Scanning:
Windows: C:\.armor\opt\armor.exe vuln install
Linux: /opt/armor/armor vuln install
Uninstall Vulnerability Scanning:
Windows: C:\.armor\opt\armor.exe vuln uninstall
Linux: /opt/armor/armor vuln uninstall
Detect log4shell
Windows: C:\.armor\opt\armor.exe vuln detect-log4shell
Linux: /opt/armor/armor vuln detect-log4shell
Example: /opt/armor/armor vuln detect-log4shell /usr/share
If no flag (/usr/share in the example above) is provided, the command will search from the filesystem root.
Vulnerability Scanning Help
Windows: C:\.armor\opt\armor.exe vuln help
Linux: /opt/armor/armor vuln help
Enable Vulnerability Scanning for Container Images
For instructions on how to get started with Container Images, please see the documentation provided here.
View a Report
In the Nexus, in the left-side navigation, click Security.
Click Vulnerability Scanning.
Click the Reports tab.
Locate and select the desired scan.
On the next screen, you can filter the table By Vulnerabilities or By VM (virtual machine / host).
Troubleshooting
If you do not see any data in the Vulnerability Scanning screen, consider that:
The scanning is not complete.
The scan takes place every Sunday at approximately 10:00 PM, local server time.
You do not have permission to view this screen.
You must have the View Vulnerability Scans permission enabled. Contact your account administrator to enable this permission. To learn how to update your permissions, see Roles and Permissions.
If a virtual machine is incorrectly labeled as offline in a report, then contact Armor Support to run the Armor Toolbox.
Filter By Vulnerabilities
When you filter the table By Vulnerabilities, you will see:
COLUMN NAME | DESCRIPTION |
|---|---|
Vulnerability Name | This column displays the name of the vulnerability. |
Affected Assests | This column displays the virtual machines (host) affected by the vulnerability. If you are unfamiliar with the name of a virtual machine, you can use the Virtual Machines screen to search.
|
Category | This column displays the category(s) associated with the vulnerability. For a complete list of vulnerability categories and QIDs, please see this documentation. |
Known Exploits | This column indicates if there are any known exploits for the vulnerability.
|
Severity | This column displays the severity of the vulnerability. There are four severity types, based on the vulnerability's CVSS:
There is an additional severity type called Info. Although Info is listed as a severity type, in reality, Info simply displays activity information for corresponding plugins from third-party vendors. |
Filter By Virtual Machines
You will only see vulnerabilities for your active virtual machines.
When you filter the table By VM (virtual machines / host) you will see:
COLUMN | DESCRIPTION |
|---|---|
VM Name | This column displays the virtual machines (host) affected by this vulnerability. If you are unfamiliar with the name of a virtual machine, you can use the Virtual Machines screen to search.
|
Last Scan | This column displays the date and time of the last scan. |
Critical | This column displays the number of vulnerabilities that contained a score of 10. |
High | This column displays a vulnerability that scored between 7 to 10 on the CVSS. |
Medium | This column displays a vulnerability that scored between 4 to 7 on the CVSS. |
Low | This column displays a vulnerability that scored between 0 to 4 on the CVSS. |
Info | This column displays activity information regarding corresponding plugins from a third-party vendor. |
Request a New Vulnerability Scan Report
A weekly vulnerability scan report is available in Nexus. If you want a new report outside of the weekly report, you can request an "ad-hoc" report as needed.*
In the Nexus, in the left-side navigation, click Security.
Click Vulnerability Scanning.
Click the Reports tab.
Click Get New Report.
In the New Report Request window, click Submit.
The latest scan report will be requested, and will display in the list of reports on the Vulnerability Scanning screen in a Pending status.
You may need to refresh the page to view the report status.
If you recently provisioned a new virtual machine, configured new container images, or recently patched a vulnerability, Armor recommends that you wait at least 6 hours to ensure the changes are reflected in the latest report.
*Assets not upgraded to Agent 3.0 are limited to one report every 24 hours.
Export a Report of Vulnerabilities
From the By Vulnerability section, you can also download a CSV report.
In the Nexus, in the left-side navigation, click Security.
Click Vulnerability Scanning.
Click By Vulnerability.
(Optional) Use the filter function to customize the data displayed.
Below the table, click CSV.
You have the option to export all the data (All) or only the data that appears on the current screen (Current Set).
Export a Report of a Virtual Machines
From the By VM section, you can also download a CSV report.
In the Nexus, in the left-side navigation, click Security.
Click Vulnerability Scanning.
Click By VM.
(Optional) Ue the filter function to customize the data displayed.
Below the table, click CSV.
You have the option to export all the data (All) or only the data that appears on the current screen (Current Set).
Log Search for Vulnerability Scanning
Users can search for Vulnerability events in Log Search. For instructions on how to access and use Log Search, please see our documentation here.
An example of Vulnerability logs can be seen below:

For a full list of Log Search fields and descriptions, please visit our glossary here.
Troubleshooting
Each listed vulnerability contains information on how to troubleshoot the vulnerability, typically by downloading a patch from an external source.
In the Nexus, on the left-side navigation, click Security.
Click Vulnerability Scanning.
Select a vulnerability scanning report.
In the next screen, select By Vulnerabilities.
Select a vulnerability. You will be taken to a description page where you can review a description of the vulnerability, including the solution.
Under See Also, click the link to access external information and to download a patch.
To return to the previous screen and view additional vulnerabilities for the current report, click the name of the current report in the top menu.
Troubleshooting
If you do not see any data in the Vulnerability Scanning screen, consider that:
The scanning is not complete.
The scan takes place every Sunday at approximately 10:00 PM, local server time.
Your firewall rules have not been updated to support this feature. This applies onto for the Scan Agent and not Container Images
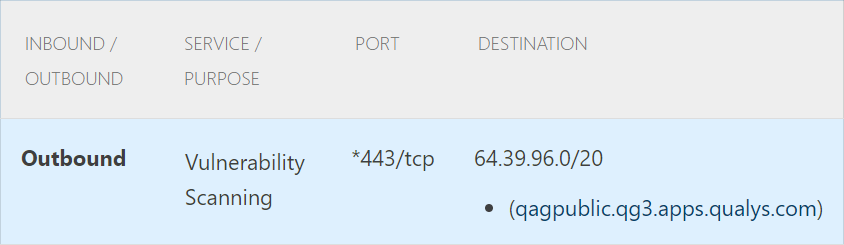
* The agent will perform a lookup to the applicable DNS entry, which may resolve to one of multiple Amazon Web Services based subnets. As a result, if your firewall does not support outbound filtering by domain name, then you may need to open all outbound traffic to 443/tcp to accommodate this service.
You do not have permission to view this screen.
You must have the View Vulnerability Scans permission enabled. Contact your account administrator to enable this permission. To learn how to update your permissions, see Roles and Permissions.
If a virtual machine is incorrectly labeled as offline in a report, then contact Armor Support to run the Armor Toolbox.
Related Documentation