Click Create User. An email will be sent to the user. After 96 hours, the sign-up link in the email will expire.
If the link expires, you can resend the user invitation. In the Users screen, hover over the desired user, click the vertical ellipses, and then select Resend Invitation.
You will be redirected to enter your account security information, including payment information.
If you already coordinated your payment process with Armor, then you will not see the payment screen.
Step 2: Complete Your Security Information
In this step, you will add your phone number to your account. This phone number will be used for multi-factor authentication. To complete the account signup process and to log into AMP, you must be near this phone number.
In this step, you will add your phone number to your account. This phone number will be used for multi-factor authentication. To complete the account signup process and to log into AMP, you must be near this phone number.
Note your Armor username.
The Username will be pre-populated with the email address of the Primary Contact for the account.
In Password and Confirm Password, create and enter an account password.
Your password must be at least 14 characters in length.
Your password must contain an upper-case character, a lower-case character, a number, and a special character.
Your password cannot contain personal information, such as your name, email address, birthday, etc. For example, if your name is John Smith, then you cannot use joh or smi in your password.
You can only change your password once every 24 hours.
Passwords expire after 60 days.
After 6 failed login attempts, you will be locked out of your account for an hour. To resolve this, you must contact your account administrator or contact Armor Support.
After 15 minutes of no activity, you will be logged out of the Armor Management Portal (AMP).
Complete the Challenge Phrase and Challenge Response.
If you call Armor for technical support, you will be asked the Challenge Phrase, and you must correctly answer the Challenge Response.
Do not use inappropriate language or suggestive material.
The answer must be at least five characters long.
In Phone Number, select your country code / flag, and then enter your phone number.
This phone number will be used for multi-factor authentication (MFA). Every time you log into the Armor Management Portal (AMP), you will receive a phone call in order to complete the login process.
You can enter a phone number with spaces and special characters, such as (555) 555-555.
(Optional) If your phone number contains an extension, enter the number in Extension. You cannot include spaces or special characters in this field.
Click Continue.
If you already coordinated with Armor to pay with a check, then you will be redirect to Armor Management Portal (AMP) login screen.
Step 3: Complete Your Payment Information
In Currency, select your currency.
(Optional) If your business is tax exempt, select I'm tax exempt.
In Tax Exempt ID, enter a valid tax exempt ID.
For Payment Method, mark the desired payment (credit card or bank account).
Option 1: Credit Card
Cardholder Name, Address, City, State, and Postal Code will be pre-populated with the name and contact information for the Primary Contact on the account.
In Card Number, enter the credit card number.
In Expiration Date, select the appropriate month and year.
In CVV, enter the verification number for the credit card
In Country, select the corresponding country.
Click Submit.
You will be redirected to Armor Management Portal (AMP) login screen.
Option 2: ACH Bank Debit
In ABA / Routing Number, enter the corresponding banking number.
In Bank Account Number, enter the account number.
Select the appropriate Account Type.
In Bank Name, enter the name of the banking institution.
In Account Holder Name, enter the name of the account holder.
Click Submit.
You will be redirected to Armor Management Portal (AMP) login screen.
Remove a newly created / invited user from your account
You can remove a user account that is in the Invited status or Enabled status.
In the Armor Management Portal (AMP), in the left-side navigation, click Account.
Click Users.
Locate the newly created user.
Hover over the user, and then click the vertical ellipses.
Select Remove User from Account.
Click OK.
Enable or disable a user account
A user cannot disable or enable their own user account.
When you disable a user, you also disable the ability to edit their roles. You cannot add or remove a disabled user's roles.
In the Armor Management Portal (AMP), in the left-side navigation, click Account.
Click Users.
Locate and hover over the desired user.
Click the vertical ellipses.
Click Enable or Disable.
Click OK.
After you disable a user, you can then remove a user from your account.
In the Armor Management Portal (AMP), in the left-side navigation, click Account.
Click Users.
Locate and hover over the desired user.
Click the vertical ellipses.
Select Remove User from Account.
Click OK.
Create and Invite a New Sub-Account (Add New Customer)
For Armor Partners looking to create new Customer Accounts, follow these instructions to create a Sub-Account in the Armor Management Portal.
Login to the Armor Management Portal (AMP)
For Internal Management Console (IMC) users, log into IMC and select the appropriate Partner account using the account context selector.
Navigate to the Sub-Accounts section in the Customer Account section
Account > Sub-Accounts
Click the icon to start
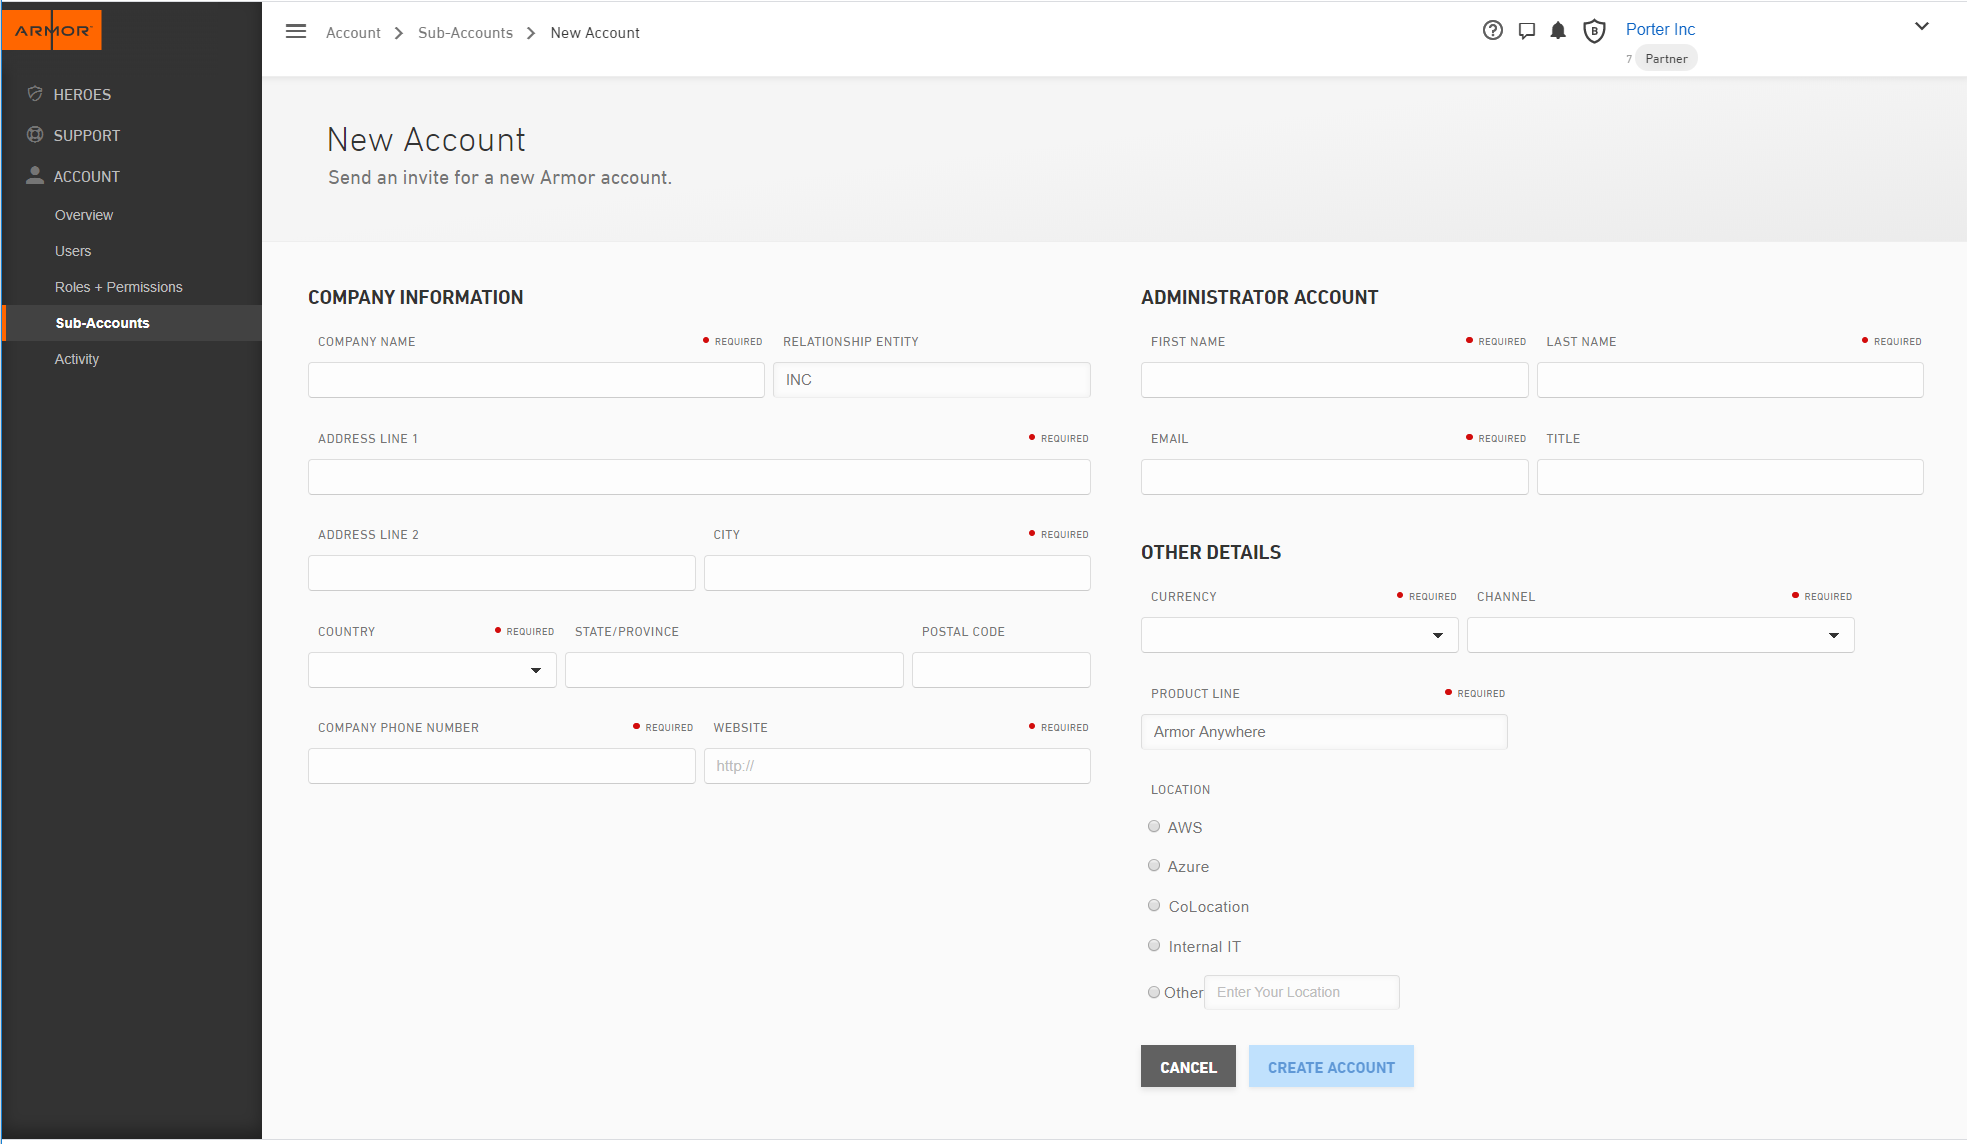
Fill out the "New Account" form
Any section with "*" is a required field and will need to be populated before you are able to create the account.
Review the table below for field descriptions: The Relationship Entity and Product Line fields will be auto-populated.
Field Name
Description
Company Name
Company name of the new customer’s account.
Address Line 1 and 2
Street number and suite (if applicable) of the new customer’s account.
City, Country, State, Postal Code
Geographic/postal information of the new customer’s account.
Company Phone/Website
Telephone number and web address for the new customer’s account.
First Name / Last Name
First and Last name for the Primary Point of Contact (POC) of the new customer’s account.
Email / Title
Email address and title of the Primary POC of the new customer’s account.
Auto-Accept User Invite Toggle
When using this feature, the user will be automatically enabled, bypassing the email invitation process.
Currency
Use the drop-down to select between USD and GBP for account billing for the new customer’s account.
Channel
Use the drop-down to select the company/industry type of the new customer’s account.
Location
Location of the new Sub-Account data center of the new customer’s account.
Click Create Account.
When you submit the account the following actions will happen:
Armor account will be created
Billing account will be created
Salesforce will be updated with the Armor account id.
This will be displayed in Salesforce in the general section in the Account Number field.
Account status will be updated to "Active"
An email will be sent that will welcome them to Armor and direct them to the account signup page.
They are required to complete this before they can have access to Armor services.
The account setup as a partner customer and linked to the partner account
The account will be assigned to the product catalog(s) the partner is assigned to
JavaScript errors detected
Please note, these errors can depend on your browser setup.
If this problem persists, please contact our support.