Introduction to Policy Rules
This article explains your options for creating Vormetric policy rules and how to configure these rules in your DSM (Data Security Manager). These rules will determine who or what has access to your encrypted data.
Video Tutorial
Prerequisites
Before you begin, you must:
Know how to Create a Starter Policy with Learn Mode
Review Vormetric Policy Planning
Log into the DSM as Security Administrator
What Are Policy Rules?
A policy rule is a statement that gives you options to allow, deny, apply an encryption key, and audit access attempts on a GuardPoint based on a combination of 6 criteria. The policy rules are analyzed in descending order, similar to firewall rules, which means the order of these rules is important.
Create a Policy with Security Rules
Log into your DSM as the Security Administrator.
In the menu bar, click Policies.
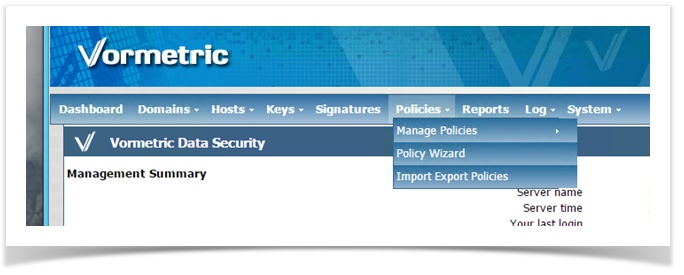
Click Add Online Policy.
In Name, enter a descriptive name.
Once you enter a name for a policy, you cannot change it.
In Description, enter a short description to help identify the purpose of this policy, such as Database_Policy.
You can change this description at a later time.
(Optional) Select Learn Mode.
Armor recommends that you select Learn Mode when you create and apply a new policy.
The cloning feature allows you to create an identical policy for future GuardPoints that require the same access rules.
To learn more about Learn Mode, see Create a Starter Policy with Learn Mode.
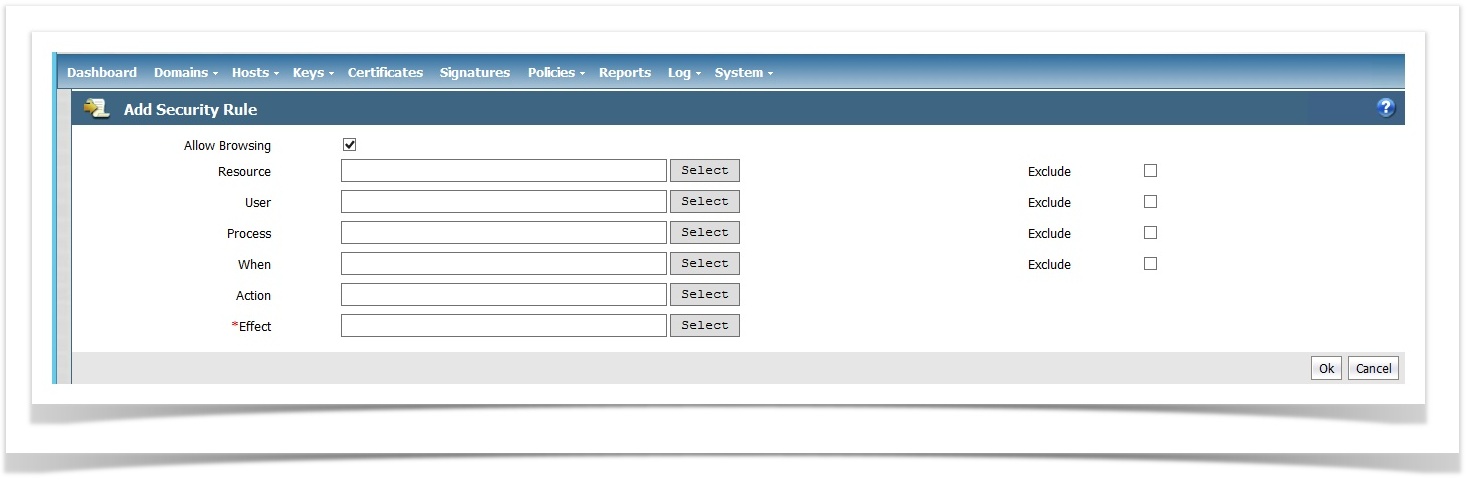
Under Security Rules, click Add.

In the window that appears, there are six options:
Resource - Specifies which folders or files in a GuardPoint can be accessed.
User - Specifies the users or user groups that can access the GuardPoint.
Process - Specifies the executables that can access the GuardPoint, such as usr/lib/exec/mysql.exe.
When - Specifies the date and time range when files can be accessed.
Action - Specifies the allowed file action, such as read, write, remove, rename, make directory, etc.
Effect - The following options correspond to Effect:
Permit - Permits access to the data.
Apply Key - Enables users and processes the ability to encrypt and decrypt data inside of the GuardPoint.
Audit - Creates an entry in the DSM message logs that describes what data is being accessed, when the attempt was made, and the security rule being applied.
Deny - Denies access to the data. You can also deny users or processes by simply leaving them out of the policy rules.

A blank field indicates the value of All.
Also, note the policy rules are read in a descending order, similar to firewall rules.
To learn more about each of these options, continue to the appropriate section below.


This topic explains how to create a new Resource Set.
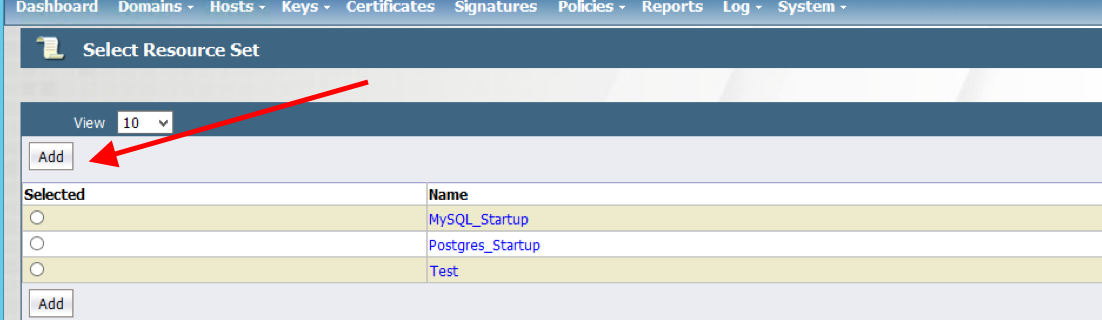
Next to Resource, click Select.

In the window that appears, click Add. This window also lists pre-existing resource sets.
In Name, enter a descriptive name for your Resource Set.
Click Add to specify a resource inside of your newly created Resource Set.
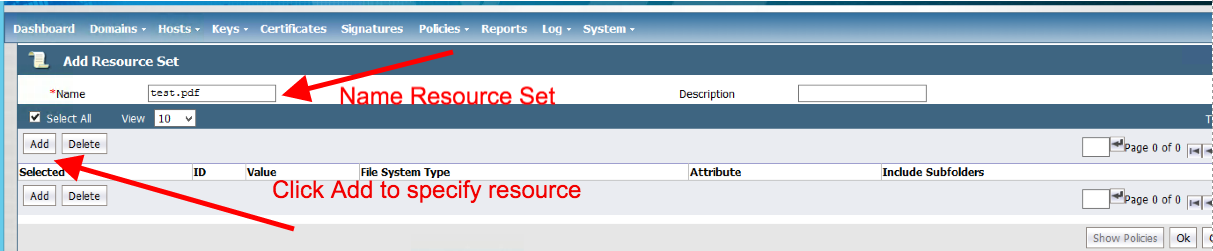
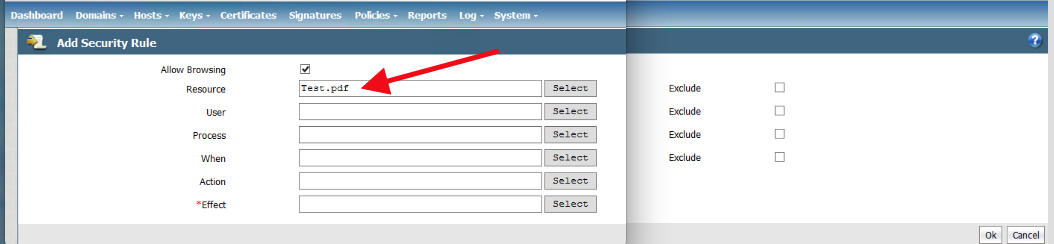
In the Add Resource screen, you can define a folder in the directory field, as well as individual files. When you specify a resource, the typed path must start where the GuardPoint ends. In the following example, the intended resource is test.pdf, located inside the C:\Data directory. Since the GuardPoint is C:\Data, you can manually type in your resource in the File field.
For example, Guard Point = C:\Data - File = test.pdf - Complete Path = C:\Data\test.pdf.

When specifying a resource, do not use Select a Host or the Browse function to designate a directory path. This feature automatically puts the full path of the resource in the Directory field. This action will cause the rule to be analyzed incorrectly.
Also, by default, the Include Sub-Folders is selected. This option permits access to any sub-folders beneath the specified resource. If necessary, you can unmark this option.
Click Ok to apply the new resource to your Resource Set.
(Optional) To add additional resources, click Add, and then return to step 5.

Click Ok.
In the list of Resource Sets, mark the desired resource set, and then click Select Resource Set.
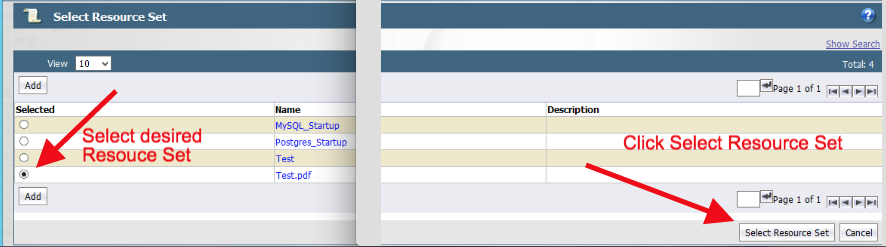
The Resource Set is now applied to the policy rule. You now have the option to add other criteria or select a desired Effect.
If you do not want to specify a resource in your policy rule, then you can move down and decide on the next option for your policy rule.
Next to Effect, click Select, and then mark the desired permissions.
Click Ok.
Mark the rule, and then click Up to move the new rule above the catch-all rule.


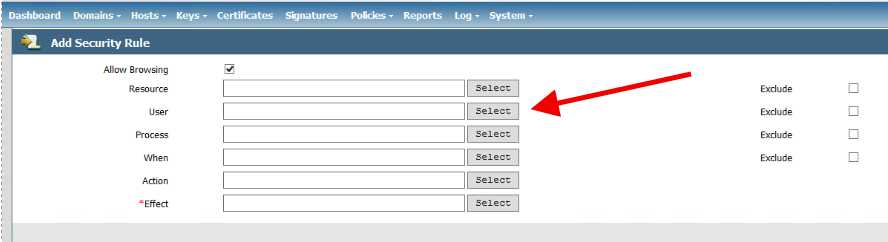
This topic explains how to create a new User Set. This option allows specific, authorized users or user groups to access a GuardPoint.
Next to User, click Select.
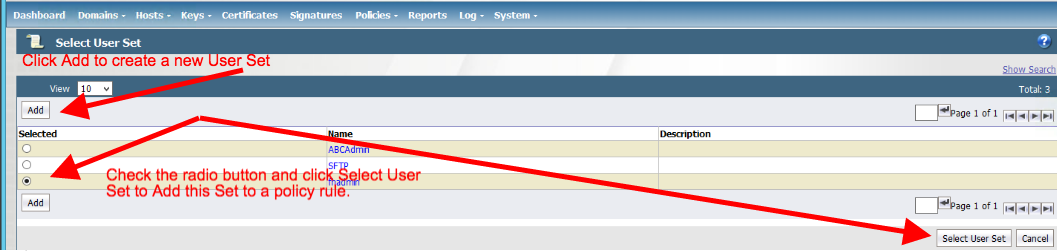
In the window that appears, to create a User Set, click Add.
(Optional) You can also modify an existing User Set. To modify, mark the button that corresponds to the desired User Set, click Select User Set, and then manually type the user information or use the remote browse feature to populate a user list on a specified virtual machine.
In Name, enter a descriptive name.
(Optional) In Description, enter a brief description.

Click Browse Users.
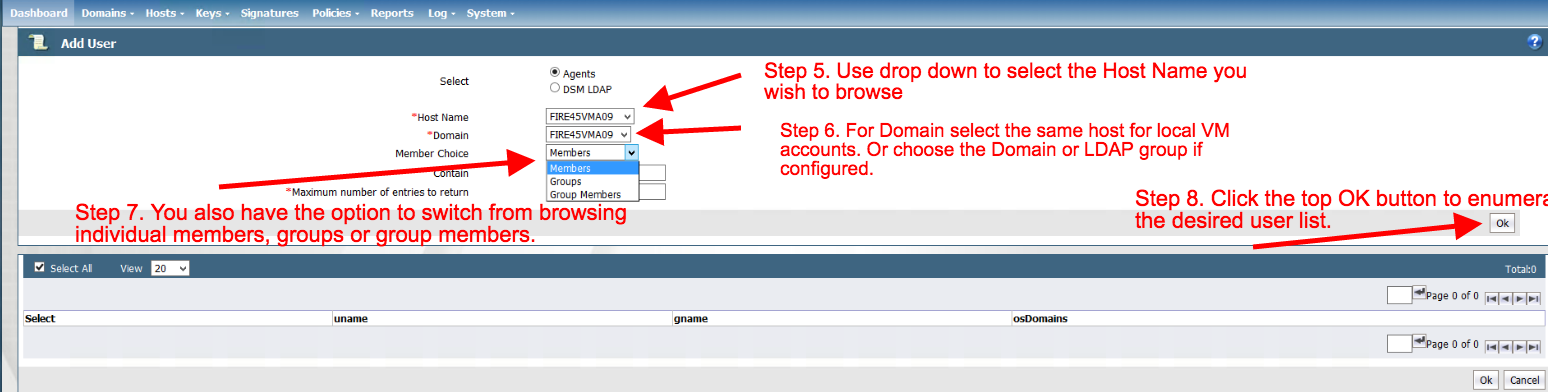
In Host Name, select host to browse.
In Domain, select the same host for your local virtual machine accounts.
If possible, you can also choose the Domain or LDAP group.
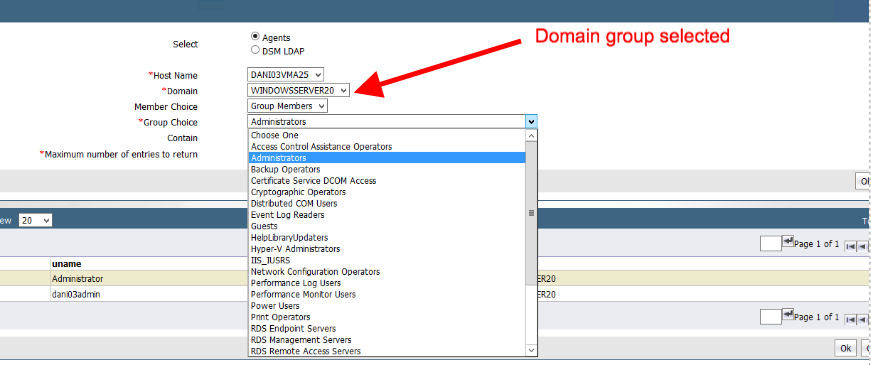
(Optional) You can configure how to browse for Users, either by single Members, Groups, or Group Members.
Click Ok to populate the desired user list.
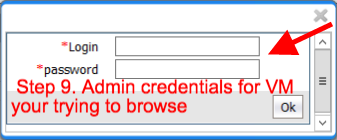
In the window that appears, enter the Admin credentials for the virtual machine that you want to remote browse, and then click Ok.
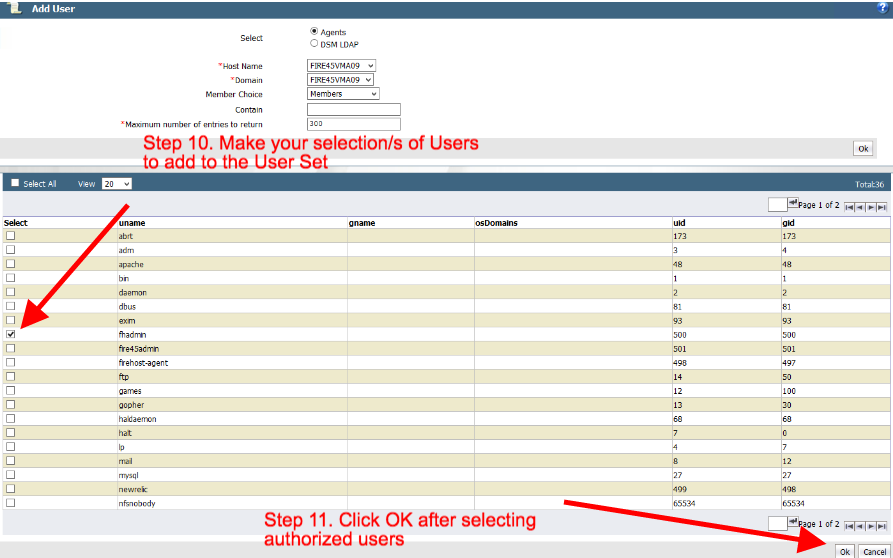
Mark the users you want to add to your User Set.
Click Ok.
Mark the desired User Set.
Click Select User Set. The newly created User Set will populate the User field.
Next to Effect, click Select, mark the desired permissions, and then click Ok.
Mark the rule, and then click Up to move the new rule above the catch-all rule.
Click Apply to save your changes, and then click Ok to return to the list of policies.


This topic explains how to create a Process Set. This option allows a path or paths and their executables to access a GuardPoint.
In the menu bar, click Policies, mark the link for the policy you want to add, and then click Add.
Next to Process, click Select.
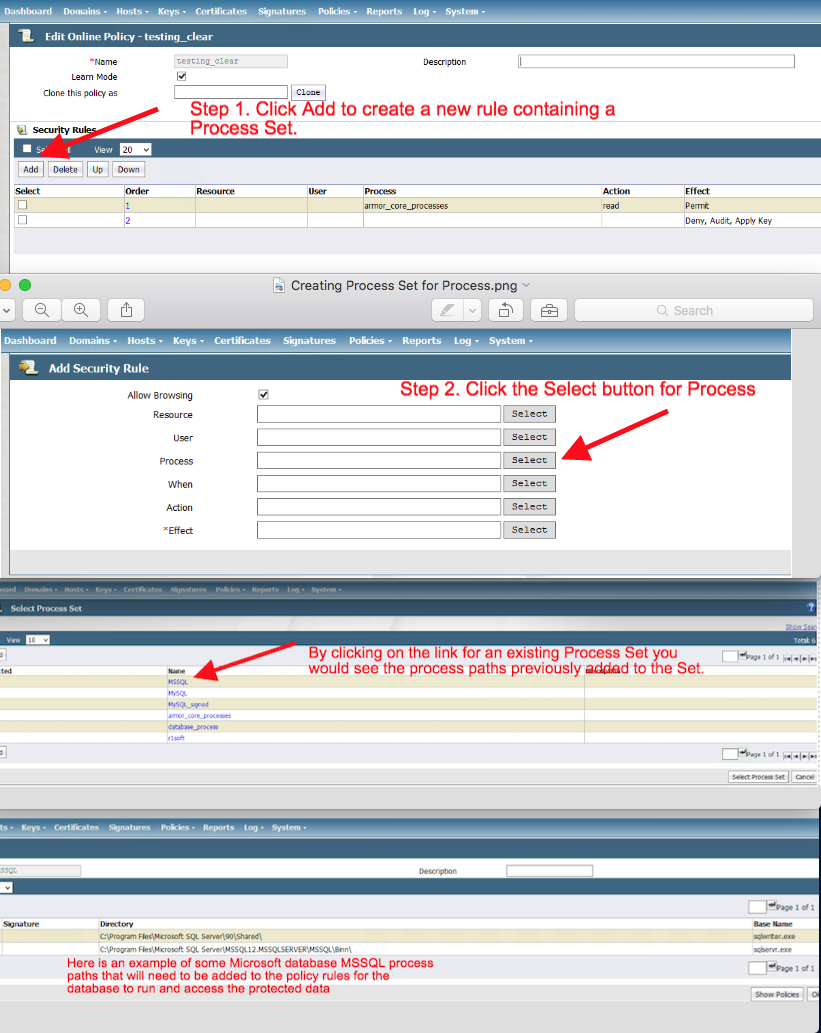
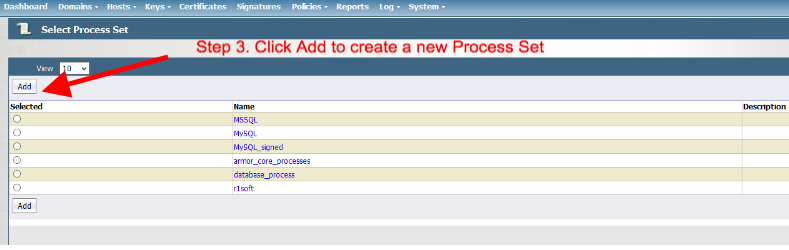
In the Select Process Set window, click Add.
In Name, enter a descriptive name.
Click Add.

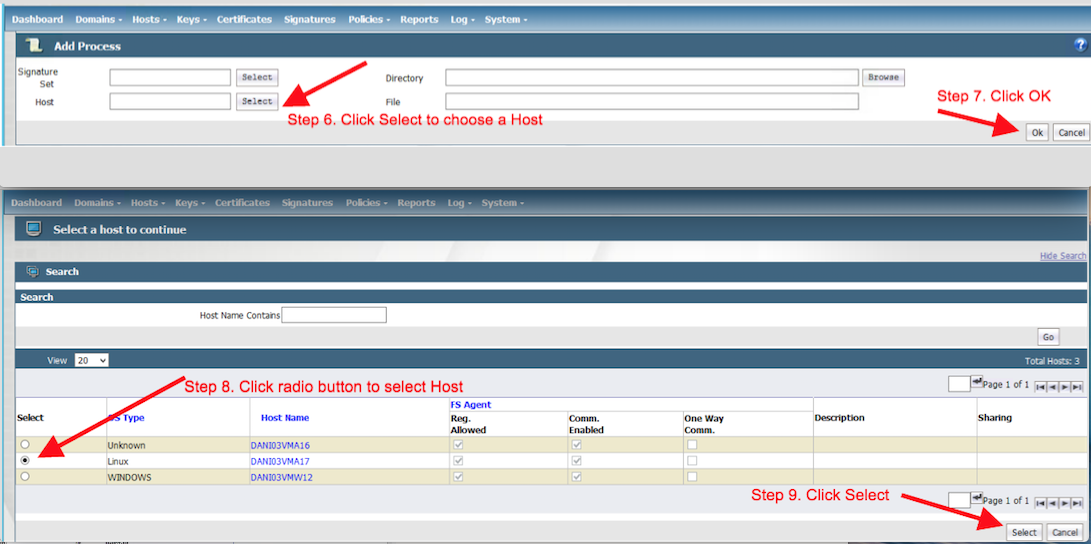
Click Select to choose a host.
Click Ok.
Mark the desired host.
Click Select.
Note that the Host field is now populated. Click Browse to find the directory path.

In the window that appears, select (highlight) the parent directory where the executable lives, and then click Ok.
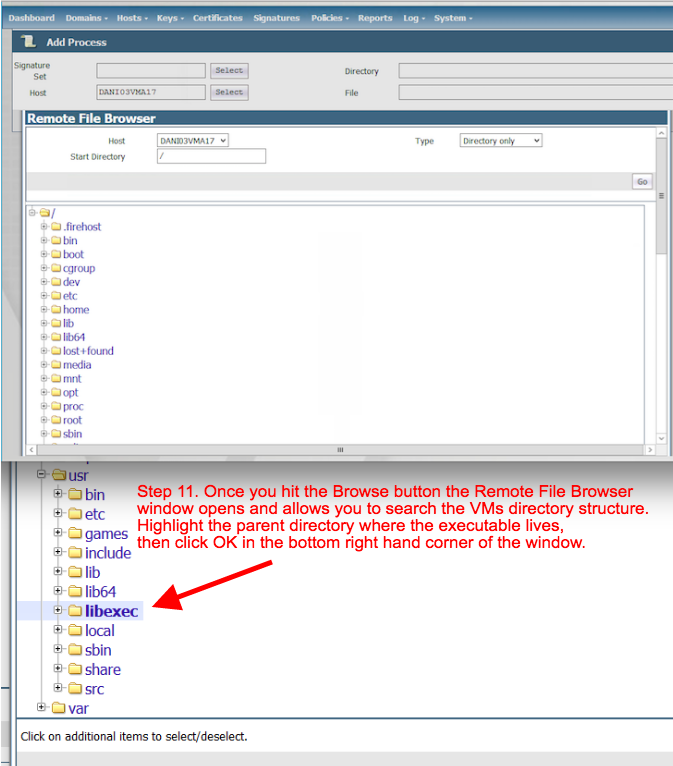
Note that the Directory field is now populated. In File, enter the executable name.
Click Ok.

Click Ok.

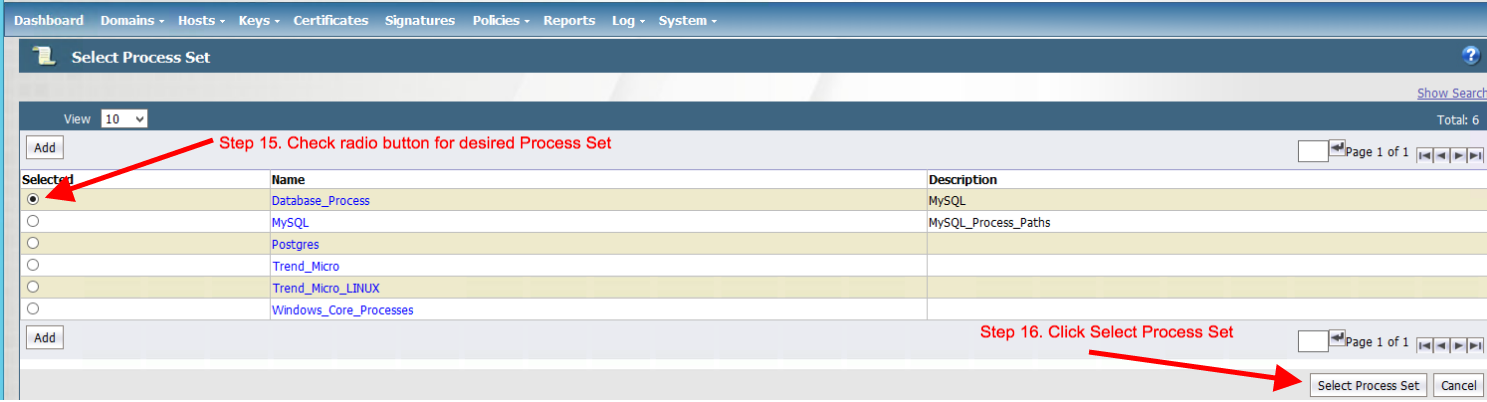
Mark your newly created Process Set.
Click Select Process Set.
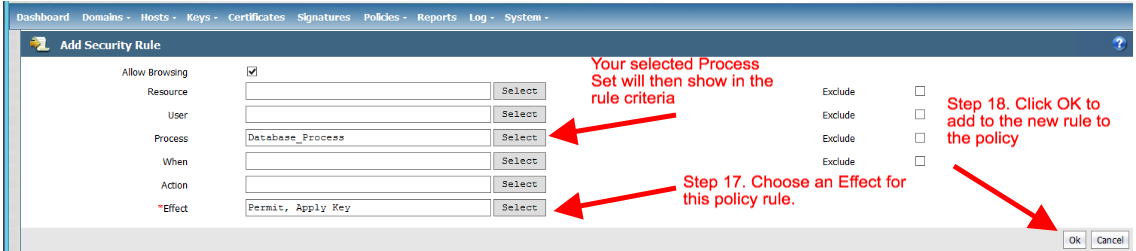
In Effect, click Select, and then mark the desired permissions.
Click Ok.
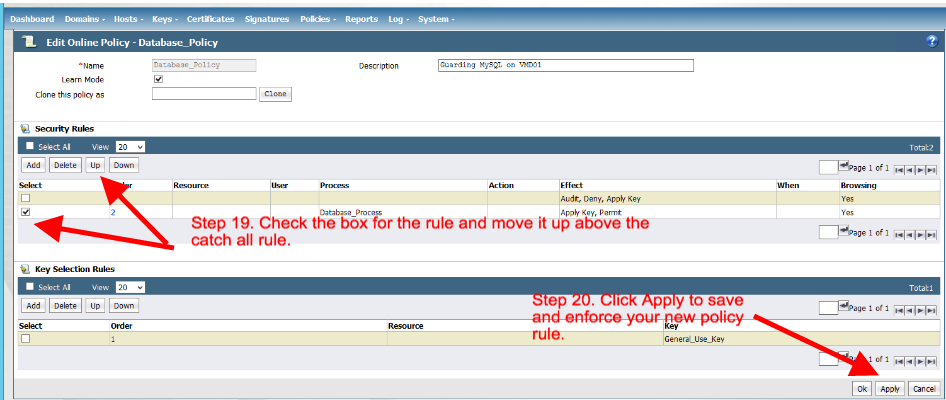
Mark the rule, and then click Up to move the new rule above the catch-all rule.
Click Apply to save and apply your Process Set and policy rule.


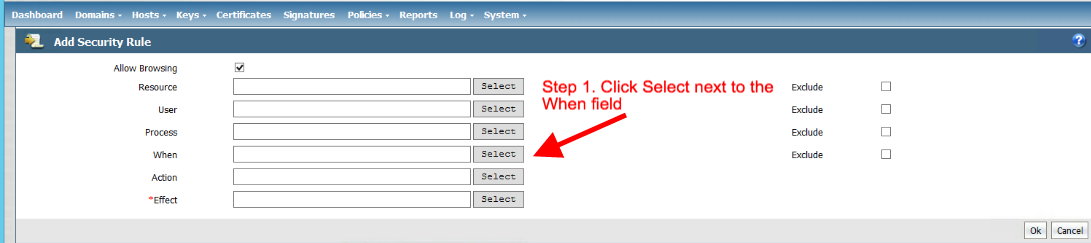
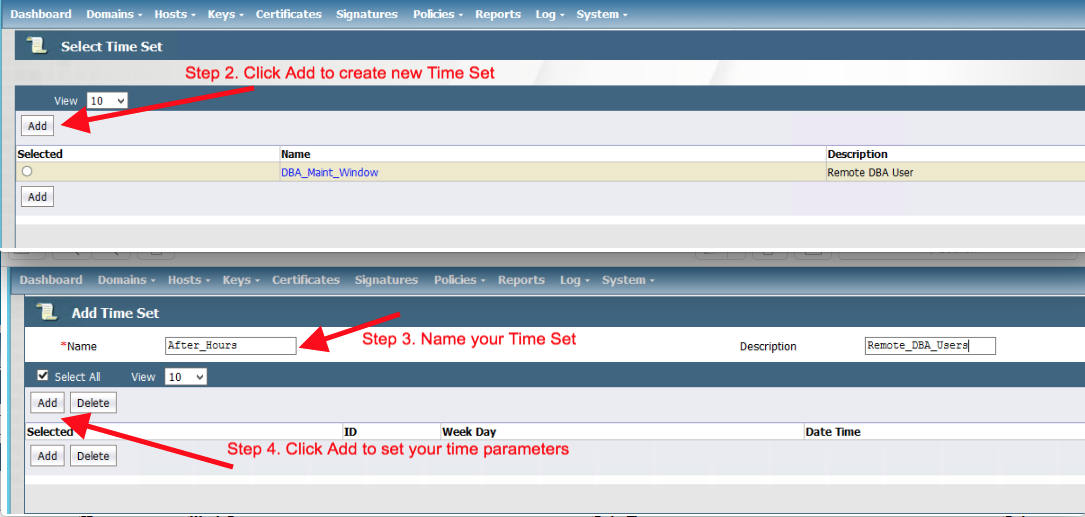
This topic explains how to create a Time Set. This option allows or denies access to a guarded folder based on a configured day and time.
Next to When, click Select.
Click Add to create a Time Set.
In Name, enter a descriptive name for the Time Set.
Click Add to create time parameters.
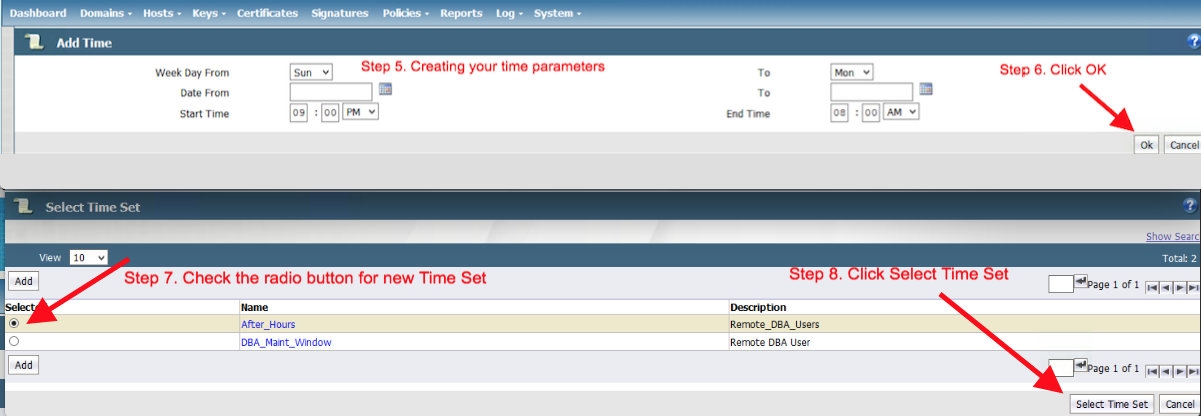
Configure your desired time parameters.
Click Ok to populate the time parameters into the Time Set.

Mark the desired Time Set.
Click Select Time Set.
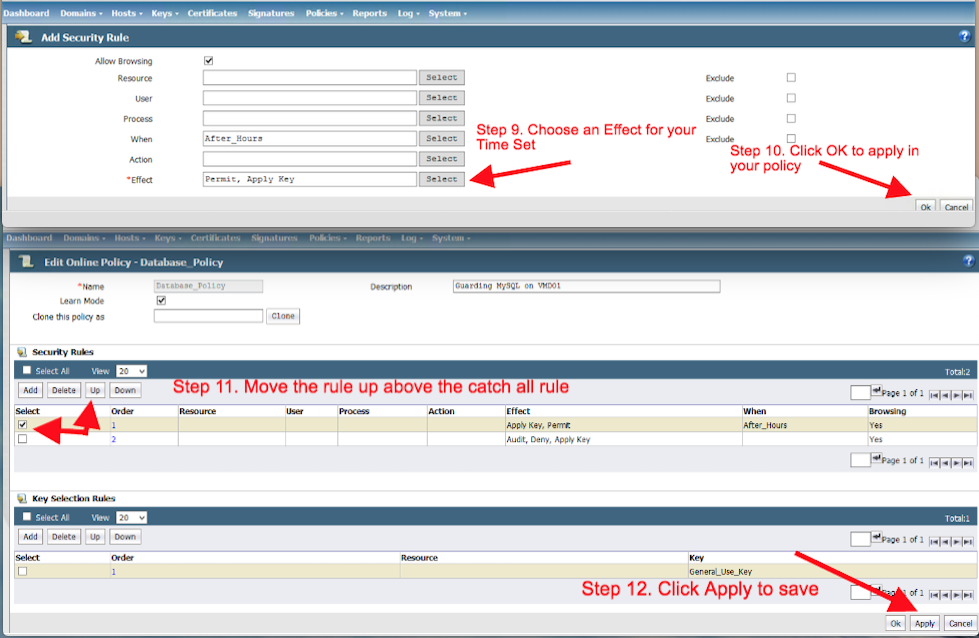
In Effect, click Select, and then mark the desired permissions.
Click Ok to add this Time Set to the policy.
Mark the desired rule, and then click Up to move the rule above the catch-all rule.
Click Apply to save.


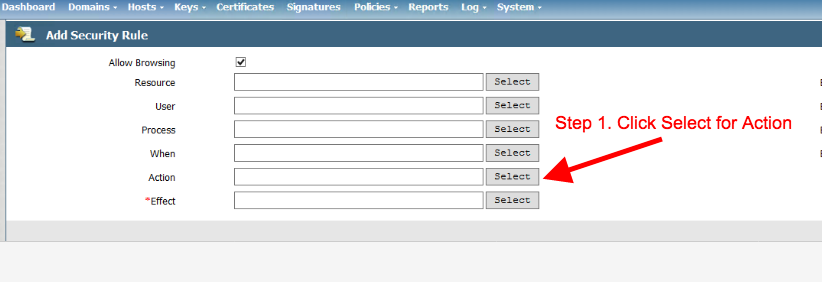
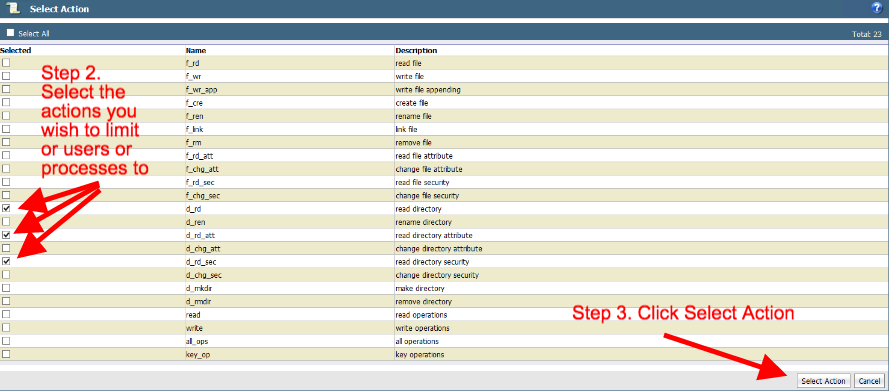
This topic explains how to create an Action Set. This option allows you to limit the type of actions a user or process (with permitted access) can execute in a GuardPoint.
Next to Action, click Select.
Mark the actions you want to allow your users or processes to be able to execute in the GuardPoint.
Click Select Action.
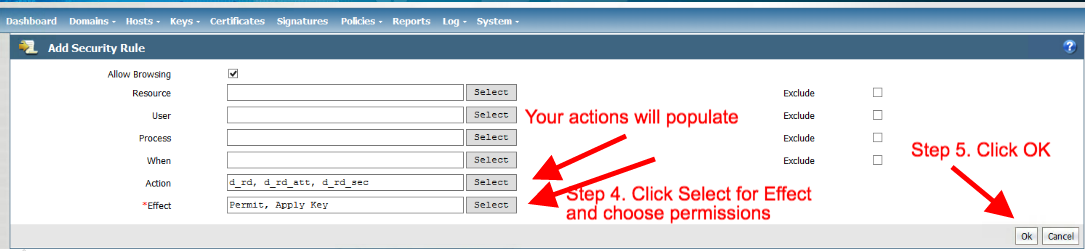
Note that the Actions field is now populated. In Effect, click Select, and then mark the desired permissions.
Click Ok.
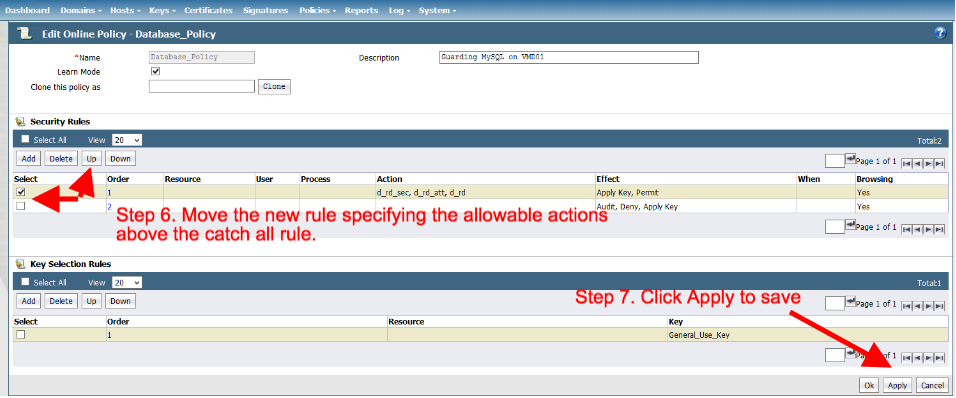
Mark the desired rule, and then click Up to move the rule above the catch-all rule.
Click Apply to save.


The Effect field must be completed; this is the only mandatory field to complete in order to create a policy rule.
The Effect field will either permit or deny access, and additionally, determine if the rule should be audited or if the encryption key will be applied.
The following table shows the available options:
Type of Effect | Action |
|---|---|
Permit | Permits access to the data. |
Deny | Denies access to the data. |
Apply Key | Encrypts the data written into the GuardPoint with the key specified in the Key Selection Rules tab. |
Audit | Creates an entry in the Message Log that describes:
|

Next Step: Introduction to GuardPoints and the Copy Method
Topics Discussed