User Accounts
Create and invite a user account
In Nexus, hover over the left-side nav and find Settings
 .
. Click Users.
Click New User
Complete the First Name, Last Name, and Email Address fields.
The email address you enter will be the username.
Select a role for this user.
You must assign a role to the user.
You can assign multiple roles to the user.
You can assign a default role (Admin, Technical, billing).
Admin contains every permission in Nexus.
Technical contains mostly write-only permissions.
Billing contains mostly read-only permissions
To learn about Roles and Permissions, see Roles and Permissions.
Click Create User. An email will be sent to the user.
After 96 hours, the sign-up link in the email will expire.
If the link expires, you can resend the user invitation. In the Users screen, hover over the desired user, click the three dot icon, and then select Resend Invitation.
If you want to remove this newly created/invited user from your account, see Remove a newly created / invited user from your account.
Accept and complete a user invitation
Step 1: Open the Account Signup Email
In the email from Armor, click the link.
You will be redirect to enter your account security information, including payment information.
If you already coordinated your payment process with Armor, then you will not see the payment screen.
Step 2: Complete Your Security Information
In this step, you will add your phone number to your account. This phone number will be used for multi-factor authentication. To complete the account signup process and to log into Nexus, you must be near this phone number.
Note your Armor username.
The Username will be pre-populated with the email address of the Primary Contact for the account.
In Password and Confirm Password, create and enter an account password.
Your password must be at least 14 characters in length.
Your password must contain an upper-case character, a lower-case character, a number, and a special character.
Your password cannot contain personal information, such as your name, email address, birthday, etc. For example, if your name is John Smith, then you cannot use joh or smi in your password.
You can only change your password once every 24 hours.
After 6 failed login attempts, you will be locked out of your account for an hour. To resolve this, you must contact your account administrator or contact Armor Support.
After 15 minutes of no activity, you will be logged out of the Nexus.
Complete the Challenge Phrase and Challenge Response.
If you call Armor for technical support, you will be asked the Challenge Phrase, and you must correctly answer the Challenge Response.
Do not use inappropriate language or suggestive material.
The answer must be at least five characters long.
In Phone Number, select your country code / flag, and then enter your phone number.
This phone number will be used for multi-factor authentication (MFA). Every time you log into Nexus, you will receive a phone call in order to complete the login process.
You can enter a phone number with spaces and special characters, such as (555) 555-555.
(Optional) If your phone number contains an extension, enter the number in Extension. You cannot include spaces or special characters in this field.
Click Continue.
Remove a newly created / invited user from your account
You can remove a user account that is in the Invited status or Enabled status.
Go to the Users screen.
Locate the newly created user.
Hover over the user, and then click the vertical dots icon.
If the user is Enabled, Disable it first.
Select Remove User from Account.
Click OK.
Enable or disable a user account
A user cannot disable or enable their own user account.
When you disable a user, you also disable the ability to edit their roles. You cannot add or remove a disabled user's roles.
Go to the Users screen.
Locate and hover over the desired user.
Click the vertical three dot icon.
Click Enable or Disable.
Click OK.
A user cannot remove their own user account.
Switch to another user account
If you have multiple accounts, you can simply switch to another user account. You do not have to logout and login again to access your other accounts.
You can switch accounts while inside a specific page without being redirected to the home page. This function exists when you switch to another account that contains the same, corresponding page.
In Nexus, in the top, right corner, click the account name.
In the menu that appears, select the desired account. The screen will automatically refresh and load the selected account.
Account Overview
You can update basic profile information using Nexus
In Nexus, hover over the left-side nav and find Settings
. Click Account
Make your desired changes.
Click Save Changes.
Change your password
To create a secure login for your account, Armor recommends that you use a passphrase, and not a password.
A passphrase is a combination of seemingly unrelated words; a password tends to be a single word, followed by numbers and special characters. To increase the strength of your passphrase, you can add numbers, special characters, and a mix of upper-case and lower-case letters.
For example, you can enhance the passphrase armoravocadosummer to armor@vocado$uMM3er.
When you create and change your password, consider the following statements:
You can only change your password once every 24 hours.
You cannot use any of your previous 24 passwords.
After 6 failed login attempts, you will be locked out of your account for an hour.
An account administrator on your account or Armor support can unlock your account.
After 15 minutes of inactivity, you will be logged out of Nexus
You will receive an email from Armor to confirm that you have changed your password. If you wrongly receive this email, you must contact Armor immediately.
In the Nexus, in the top, right corner, click the vertical ellipses.
In the drop-down menu, select Settings.
Click Security + Authentication.
Click the Armor Okta Dashboard link. This will open the Armor Okta Dashboard in a new tab in your web browser.
From the dashboard, pull down the menu under your user name in the top right corner of the dashboard.
Select the Settings option.
Select the green Edit Profile button and verify your credentials and MFA to enable the editing of the account settings.
Scroll the page to the Change Password section.
The password requirements are displayed on the screen in the Change Password section
Enter your current password and the new password and click Change Password
You will then be required to enter your current password and click Verify
You will then be asked to verify your MFA which is required to complete the changing of your password
Once verified, your password has been changed
Reset a forgotten password
You can only change your password once every 24 hours.
You can reset your password via email.
Reset a password via email
On the login page, click Need additional help?
Click Forgot Password?
Enter the email address associated with your user account, and then click Reset via Email.
Click the Reset Password link in the email.
Enter a new password; re-enter the password to confirm, and then click Reset Password.
You will receive an error message if:
Your passwords do not match.
Your password does not meet the password requirements.
Your password was changed less than 24 hours ago.
Your password was recently used. (You cannot use any of your previous 24 passwords.)
After you reset your password, your screen will refresh to the Armor Okta Dashboard.
To access the Nexus Portal, Click on the Nexus icon on the dashboard
A new tab will open and prompt you for MFA verification.
After successful validation you will be navigated to the Nexus.
Configure Multi-Factor Authentication (MFA) for your account
Each time you log into Nexus, you must connect via a multi-factor authentication (MFA) method. There are two MFA methods:
Phone call
Every time you log into Nexus, you will receive a phone call. Answer the call, and follow the instructions to access Nexus.
Phone application (Okta Verify)
Every time you log into Nexus, you will receive a push notification on your phone from the application. Open the application, and then click Verify to access Nexus.
Users are not required to enroll in both MFA options, but at a minimum, the phone call option is required.
Configure MFA For New User
The first time a user logs into Nexus, the user will be prompted to configure their MFA. All users are required to setup the MFA phone call option. After configuring the MFA phone call option, the user can choose to optionally setup the MFA phone application (Okta Verify).
Navigate to https://nexus.armor.com/ and enter your credentials
The required MFA phone call setup wizard will be launched.
Enter the phone number you want to use for your MFA phone call
Click the Call button
When your phone rings, a 5 digit code will be read to you and you will enter the 5 digit code into the Verify box on the screen.
Once the setup for the required MFA phone call is complete, you will see a screen that allows you to optionally setup the MFA phone application
To setup the optional MFA phone application, click the Set up link
The MFA phone application setup wizard will be launched.
Select the type device
In your phone device, download the application called Okta Verify and open the Okta Verify app.
Click next in the setup wizard
In the Okta Verify app click Add Account and choose Organization. You will be prompted to scan the QR code in the setup wizard with the app on your phone.
After the MFA configuration is complete, you should be successfully logged into the Nexus.
Change MFA Method Used For MFA
If you have configured both the MFA options, the last MFA option that was used to successfully login to Nexus with be used as the default MFA option for all subsequent logins.
To change the default MFA option used (only applies if enrolled in both MFA options)
Navigate to https://nexus.armor.com/ and enter your credentials
Click on the drop down on the MFA verification screen and select the MFA option.
Complete the MFA verification process
MFA Management
All MFA management (i.e. phone number change, MFA enrollment) will be done in the Armor Okta Dashboard.
In Nexus, in the top, right corner, click the vertical ellipses.
In the drop-down menu, select Settings.
Click Security + Authentication.
Click the Armor Okta Dashboard link. This will open the Armor Okta Dashboard in a new tab in your web browser.
From the dashboard, pull down the menu under your user name in the top right corner of the dashboard.
Select the Settings option.
Select the green Edit Profile button and verify your credentials and MFA to enable the editing of the account settings.
Scroll the page to the Extra Verification section. You should see a Remove option on the MFA options you are currently enrolled in and a Set up option for those you are not enrolled in.
To change your phone number or MFA enrollment, select to Remove any options that you are currently enrolled in.
The select the Set up option next to the MFA enrollment you wish to enroll in and follow the instructions.
You must re-enroll in the MFA phone call. If you fail to re-enroll, you will be prompted to enroll before you are able to access Nexus.
Troubleshoot MFA for a new phone device or phone number
Every time you log into Nexus, you must connect via a multi-factor authentication (MFA) method that is specific to your phone device or phone number. As a result, if you change your phone device or phone number, you may need to perform additonal steps in order to maintain access to your Nexus account.
Review the following scenarios to learn how to maintain access to your account:
Roles and Permissions
Create a role and add permissions
In Nexus, hover over the left-side nav and find Settings
. Click Roles
Then click New Role
Provide a Name for the role.
Then select the permissions for the role.
Click Save Role
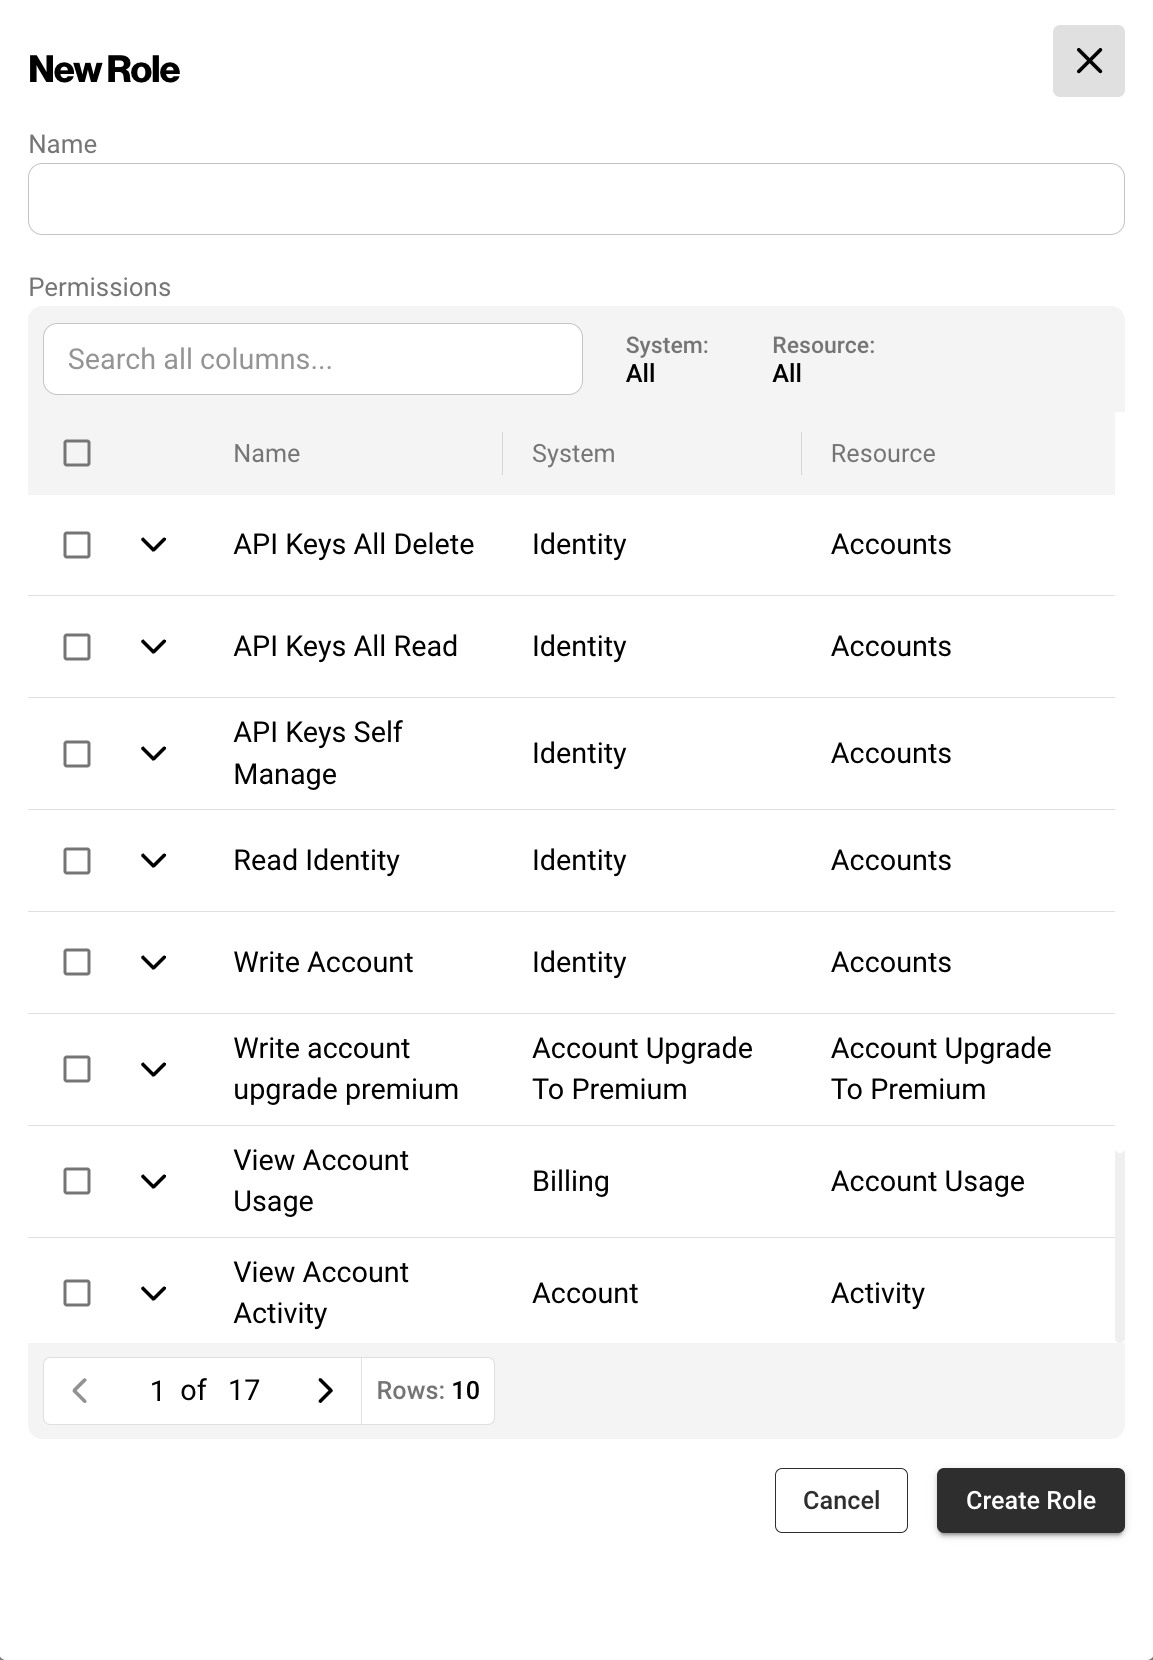
Nexus - Create a New Role
Assign a role to an existing user account
In the Roles page.
Locate and select the desired role.
In the top menu, click Members.
In the field, enter and select the desired user.
The change will be automatically saved.
The user will have immediate access to the permissions within the role.
(Optional) To remove a user, hover over the desired user, click the red cross icon, and then click Remove Member for the Role
Configure notification preferences
Armor recommends that you configure your account to receive notifications for Account, Billing, and Technical events.
These notification preferences do not relate to support tickets.
To update your notification preferences for support tickets, see Support Tickets.
Account | You will receive a notification when:
|
Billing | You will receive a notification when:
You can configure a user to become the primary billing contact for an account. This user will receive billing notifications. Additionally, this user will be listed in the Bill to field in an invoice.
|
Technical | You will receive a notification when:
|
You can only change the notification preferences for your own account. You cannot change the notification preferences for other user accounts.
In the Nexus, in the top, right corner, click the vertical ellipses.
Click Settings.
Click Notification Preferences.
Use the slider to make your desired changes.
Select Email to receive notifications through email.
Click Update Notification Preference to save your changes.
The above notifications preference types are not available unless the user is assigned one of the following permissions:
AccountBillingTechnical
Read Identity
Update Personal Identity
Write Identity
Update Payment Information
View Invoices
Read Product Catalog
View Subscriptions
Write Subscriptions
Read Workload(s)
Write Workload
Read Virtual Machine(s)
Write Virtual Machine