AWS WAF
AWS WAF is a web application firewall that helps protect your web applications or APIs against common web exploits that may affect availability, compromise security, or consume excessive resources. AWS WAF gives you control over how traffic reaches your applications by enabling you to create security rules that block common attack patterns, such as SQL injection or cross-site scripting, and rules that filter out specific traffic patterns you define. You can get started quickly using Managed Rules for AWS WAF, a pre-configured set of rules managed by AWS or AWS Marketplace Sellers. The Managed Rules for WAF address issues like the OWASP Top 10 security risks. These rules are regularly updated as new issues emerge. AWS WAF includes a full-featured API that you can use to automate the creation, deployment, and maintenance of security rules.
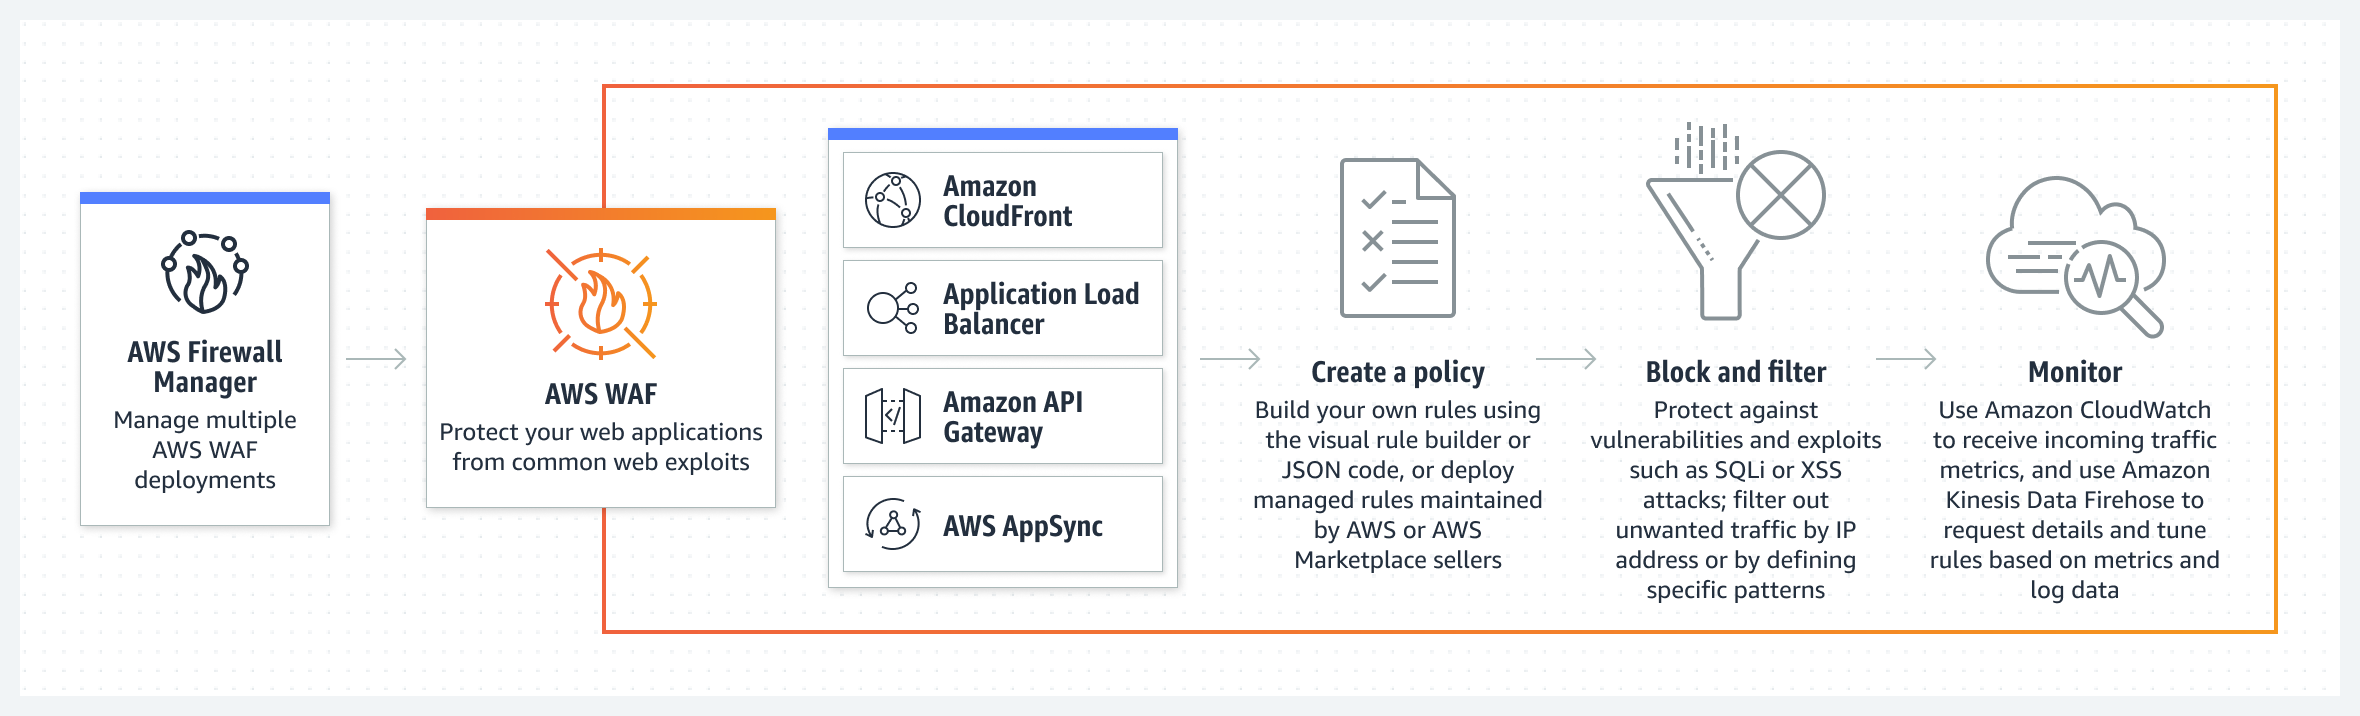
How It Works
Topics Discussed
Benefits
Agile protection against web attacks
AWS WAF rule propagation and updates take under a minute, enabling you to quickly update security across your environment when issues arise. WAF supports hundreds of rules that can inspect any part of the web request with minimal latency impact to incoming traffic. AWS WAF protects web applications from attacks by filtering traffic based on rules that you create. For example, you can filter any part of the web request, such as IP addresses, HTTP headers, HTTP body, or URI strings. This allows you to block common attack patterns, such as SQL injection or cross-site scripting.
Save time with managed rules
With Managed Rules for AWS WAF, you can quickly get started and protect your web application or APIs against common threats. You can select from many rule types, such as ones that address issues like the Open Web Application Security Project (OWASP) Top 10 security risks, threats specific to Content Management Systems (CMS), or emerging Common Vulnerabilities and Exposures (CVE). Managed rules are automatically updated as new issues emerge, so that you can spend more time building applications.
Improved web traffic visibility
AWS WAF gives near real-time visibility into your web traffic, which you can use to create new rules or alerts in Amazon CloudWatch. You have granular control over how the metrics are emitted, allowing you to monitor from the rule level to the entire inbound traffic. In addition, AWS WAF offers comprehensive logging by capturing each inspected web request's full header data for use in security automation, analytics, or auditing purposes.
Ease of deployment & maintenance
AWS WAF is easy to deploy and protect applications deployed on either Amazon CloudFront as part of your CDN solution, the Application Load Balancer that fronts all your origin servers, Amazon API Gateway for your REST APIs, or AWS AppSync for your GraphQL APIs. There is no additional software to deploy, DNS configuration, SSL/TLS certificate to manage, or need for a reverse proxy setup. With AWS Firewall Manager integration, you can centrally define and manage your rules, and reuse them across all the web applications that you need to protect.
Cost effective web application protection
With AWS WAF you pay only for what you use. AWS WAF provides a customizable, self-service offering, and pricing is based on how many rules you deploy and how many web requests your web application receives. There are no minimum fees and no upfront commitments.
Security integrated with how you develop applications
Every feature in AWS WAF can be configured using either the AWS WAF API or the AWS Management Console. This allows your DevOps team to define application-specific rules that increase web security as they develop applications. This lets you put web security at multiple points in the development process chain, from the hands of the developer initially writing code, to the DevOps engineer deploying software, to the security administrators enforcing a set of rules across the organization.
You can use this document to collect and send AWS WAF Classic logs to Armor's Security Information & Event Management (SIEM).
Pre-Deployment Considerations
Log Relay
For remote log collection, you must have a Log Relay server on your account.
To learn how to add Log Relay to your account, see Obtain Log Relay for Remote Log Collection.
AWS Account Permissions (Policies)
AWS WAF
AWS Lambda
AWS CloudWatch
AWS CloudFormation
Web ACL
To ingest logs from an AWS WAF, you must first configure a Web ACL.
To learn how to create a Web ACL, see AWS's documentation site.
Armor does not provide support for using AWS CloudFormation to set up AWS WAF resources in AWS GovCloud (US).
Configure The AWS WAF CloudFormation Stack Template
Login into the AWS console.
Go to the CloudFormation service.
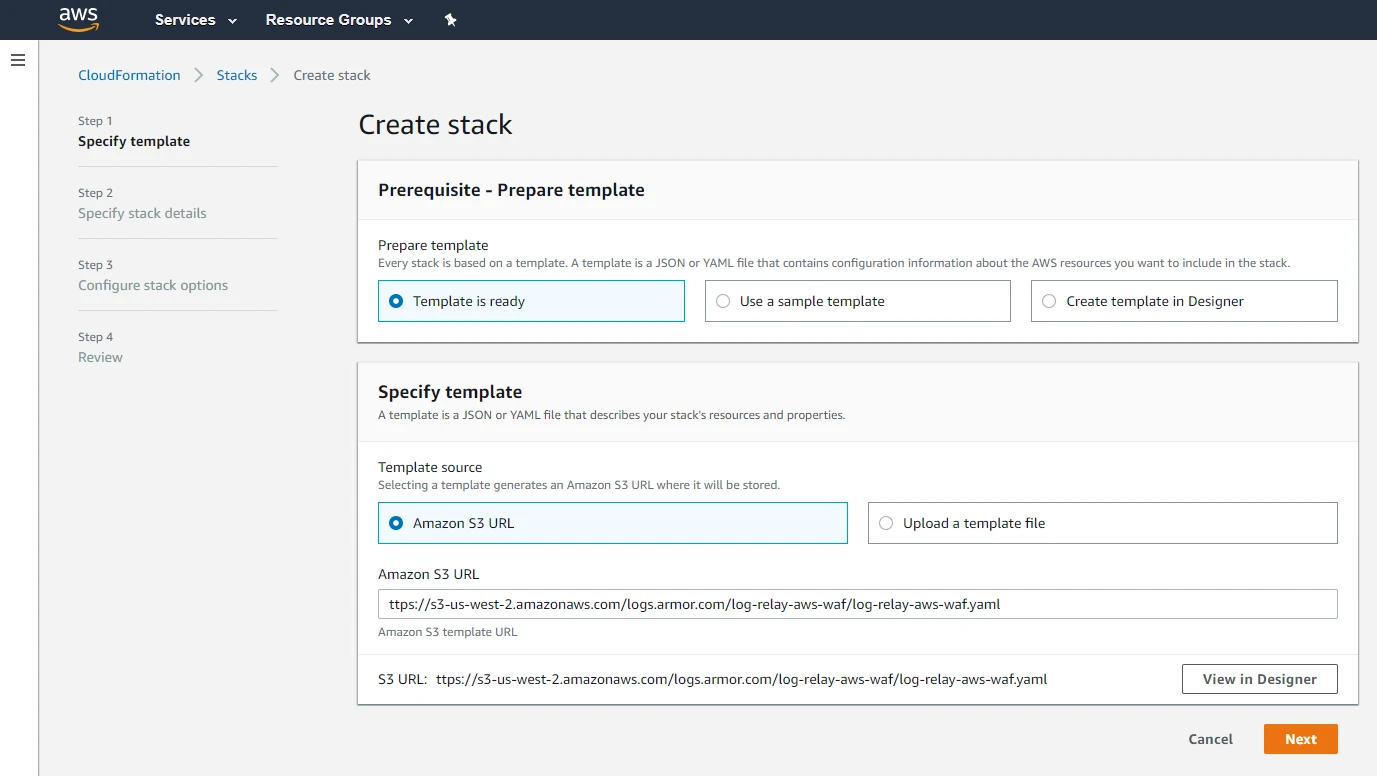
Click Create stack.
AWS is in the process of updating the screens in their AWS console. As a result, there are two versions of the AWS CloudFormation screen.
Review the following table to understand your particular view, and then review the appropriate option.
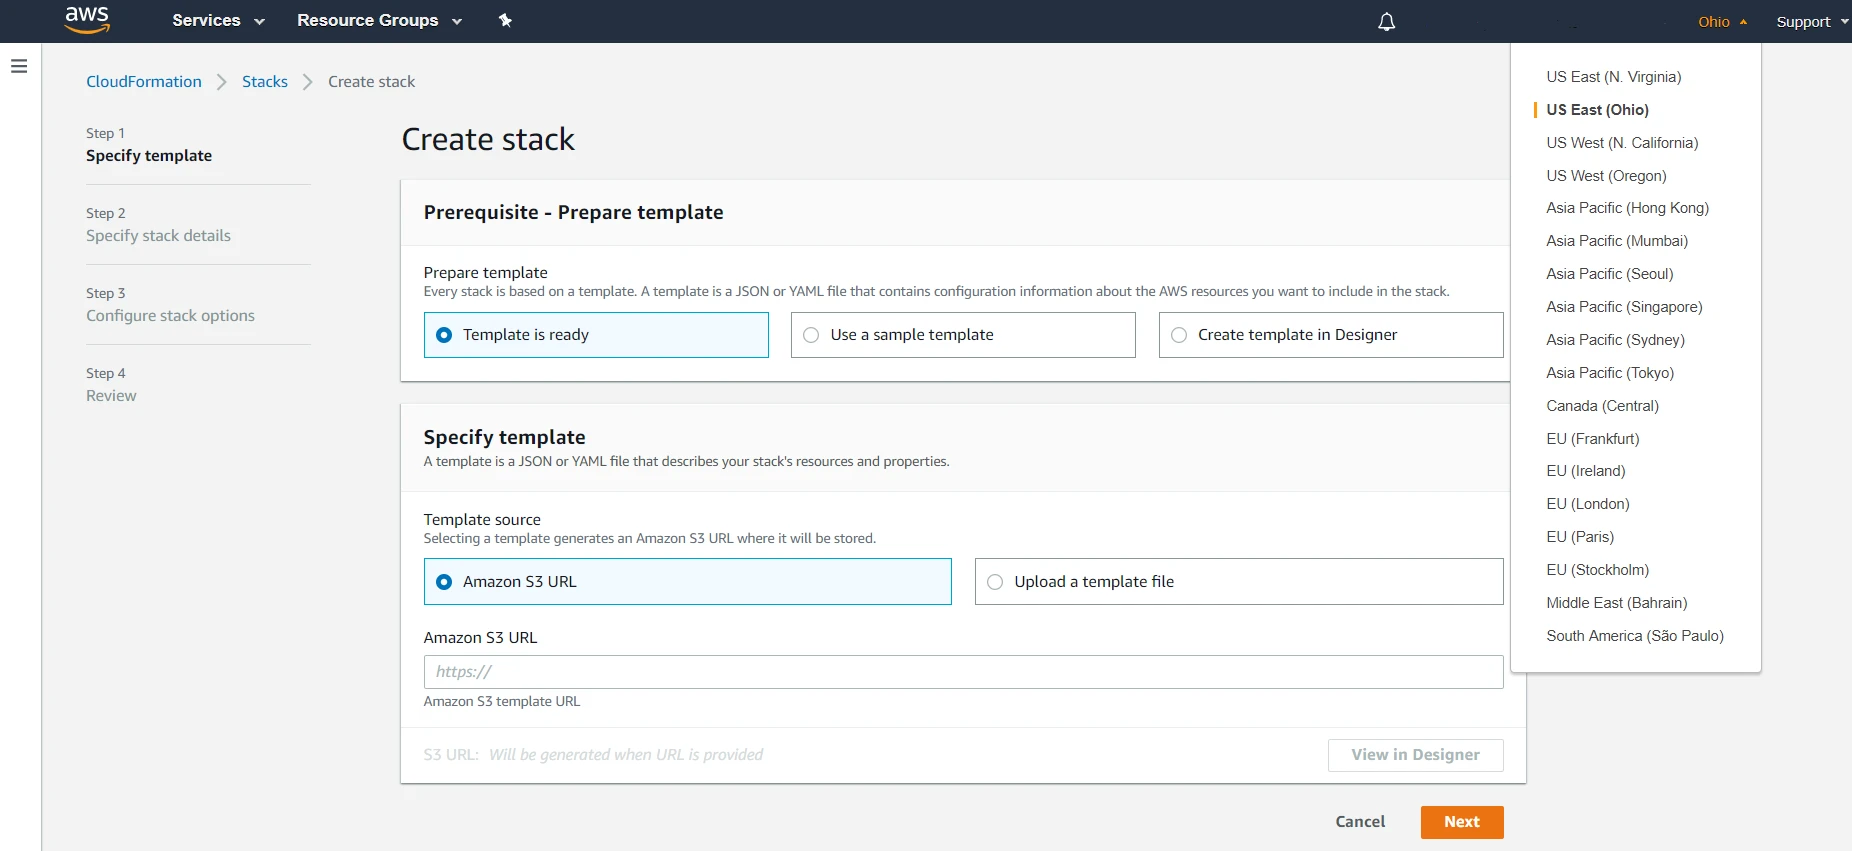
In the AWS console, in the top menu, on the right side, select the desired region for log collection.
-
The CloudFormation template must be executed in the same region as the Web ACL.
In Amazon S3 URL, input the following link: https://s3-us-west-2.amazonaws.com/logs.armor.com/log-relay-aws-waf/log-relay-aws-waf.yaml.

Click Next.
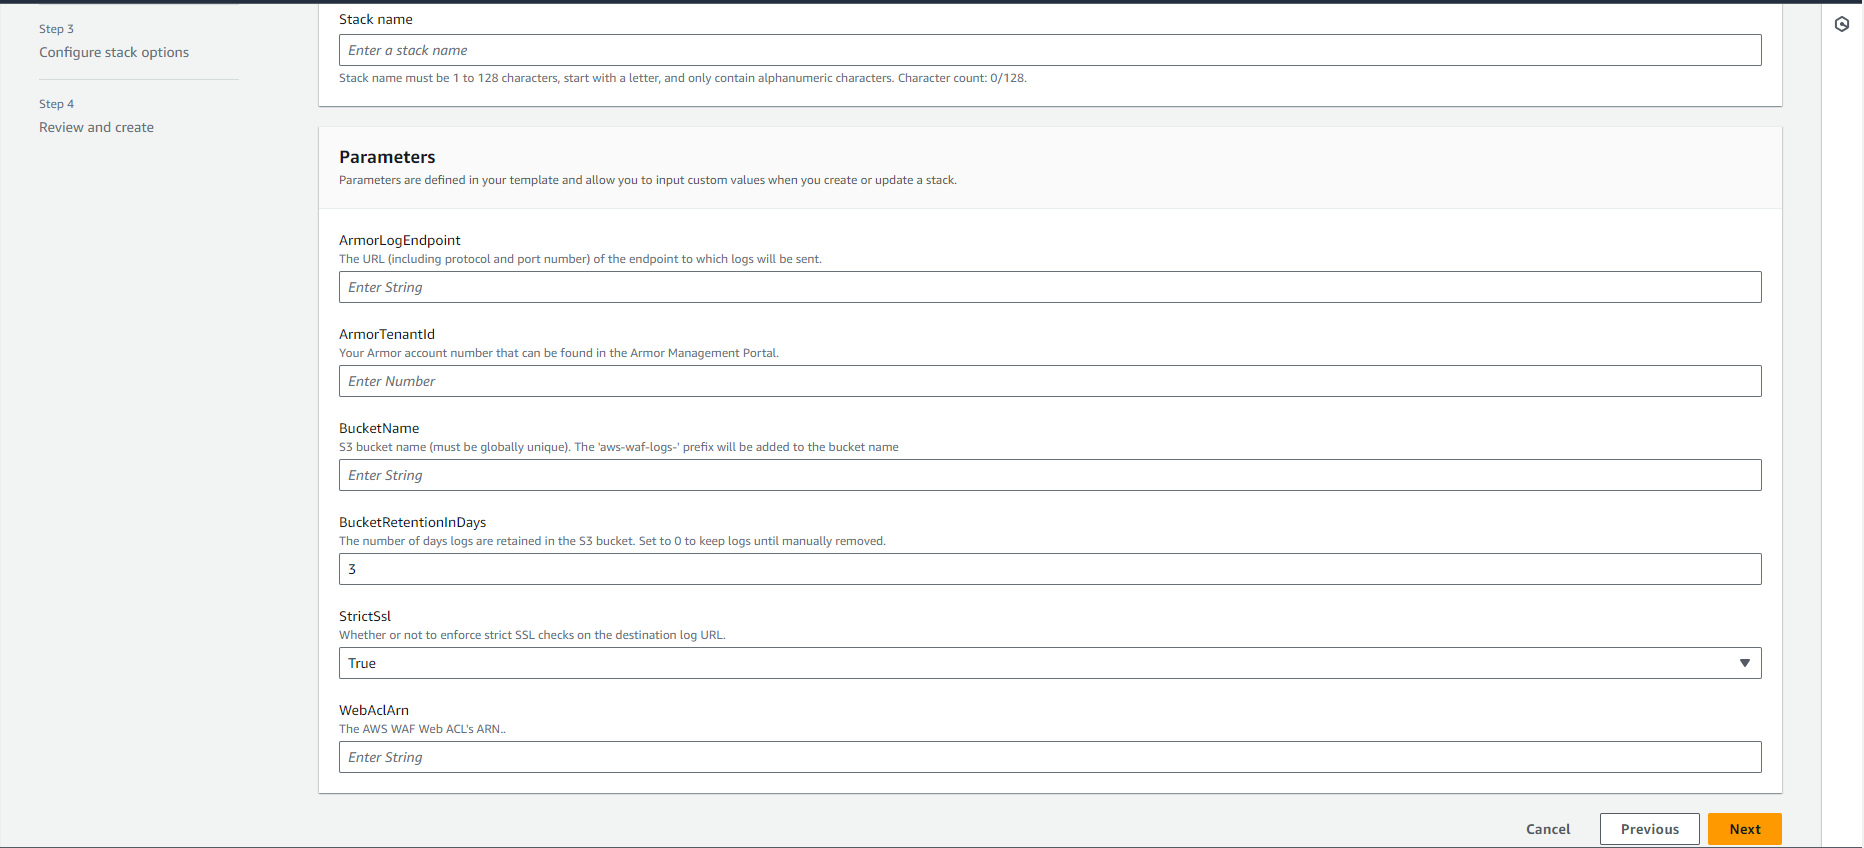
In Stack name, enter a descriptive name.
This name must begin with a letter, and can only contain letters, numbers, and hyphens.
In ArmorLogEndpoint, enter the URL (including protocol and port number) of the endpoint to which logs will be sent.
This is the IP address or DNS name of the log relay instance, using the https protocol and port 5443.
In ArmorTenantId, enter your Armor account number.
This can be found in the Account Overview section of your AMP account.
In BucketName, enter your S3 bucket name. This must be globally unique and bucket name should start with ‘aws-waf-logs’.
This is the S3 bucket (name) created by the CloudFormation template.
In BucketRetentionInDays, enter the number of days logs are retained in the S3 bucket.
By default, Armor has configured 3 days; set to 0 to keep logs until manually removed.
In StrictSsl, indicate whether or not strict SSL checks should be enforced on the destination log URL (True or False).
Armor recommends that StrictSsl be set to True. Afterwards, you must complete the steps to enable SSL to utilize the CloudFormation template. If these steps are not performed, when you attempt to launch the newly created CloudFormation template, the process will fail.
In WebAclId, enter the ID of the AWS WAF Web ACL.
Click Next.
(Optional) If required by your organization, under Tags, add your organization's tags to the CloudFormation deployment.
(Optional) If required by your organization, under Permissions, in the drop-down menu, select IAM role ARN, and then in the corresponding field, enter AWSCloudFormationStackSetExecutionRole.
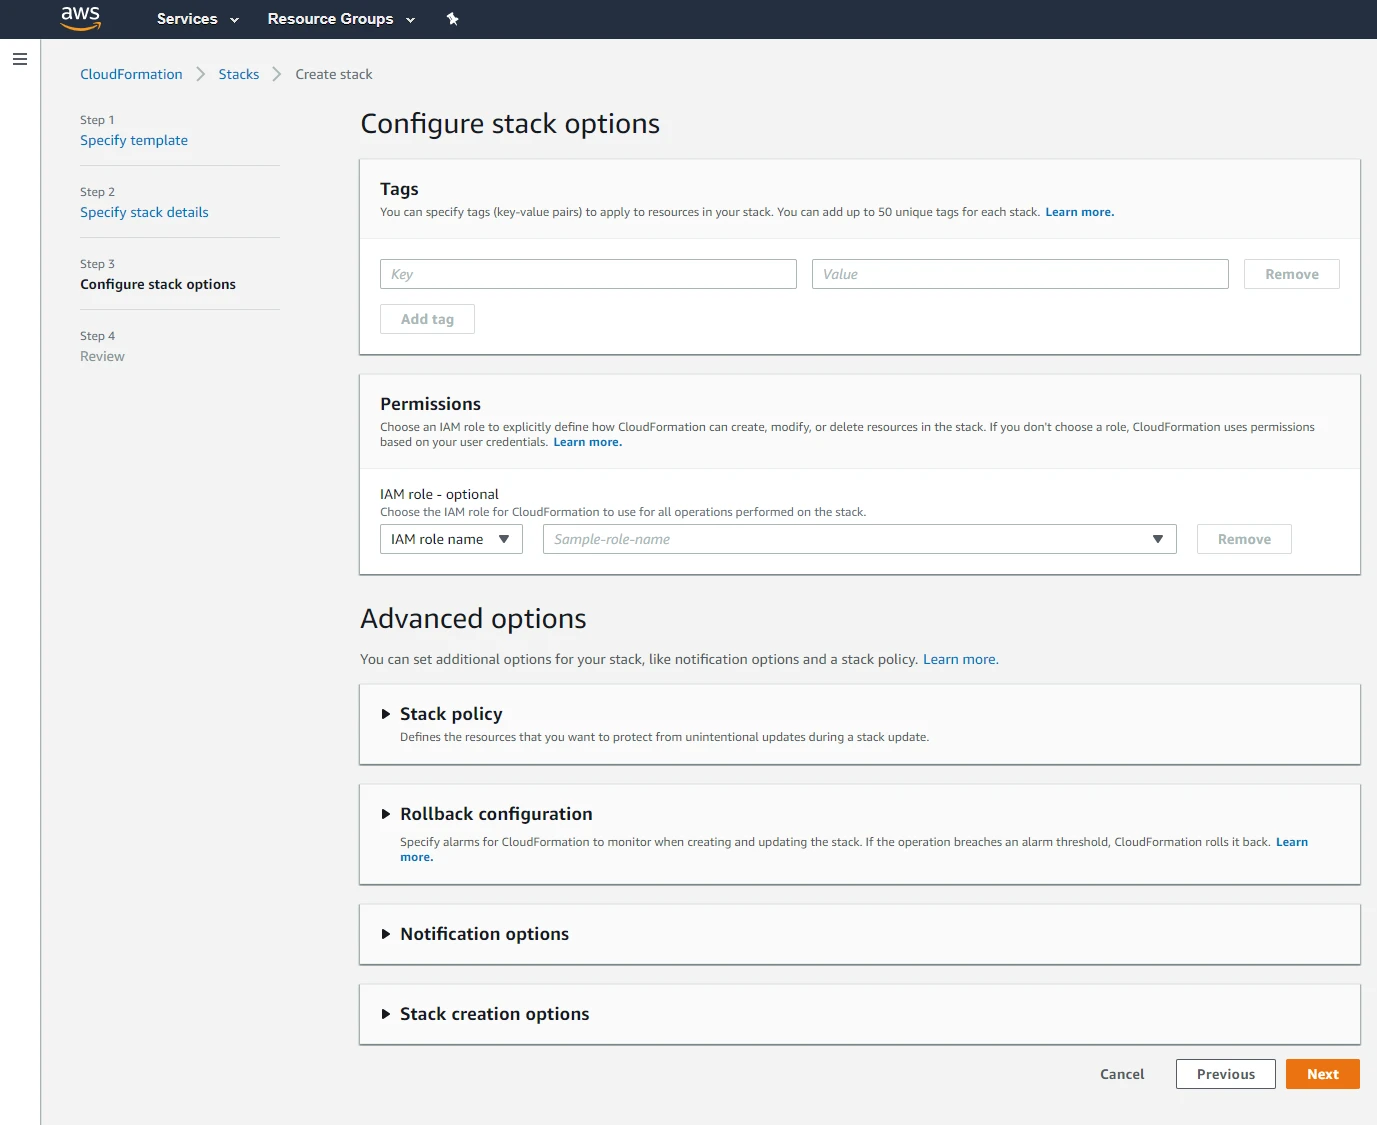
Review the information for the stack.
At the bottom of the screen, mark the box to accept the terms, and then click Create stack.
After a few minutes, the stack status should change from CREATE_IN_PROGRESS to CREATE_COMPLETE.
If you want to upgrade the existing AWS WAF CloudFormation, please delete the existing template and use the new CloudFormation template.
Verify Connection
In Nexus, hover over Threat Management
 on the left-side nav.
 Click Log Search.
Then click Log Search tab on the top of the page.
Wait for the SSO.
In the Source column, review the source name to locate the newly created AWS WAF remote log source.
In the search field, you can also enter "webaclid" to locate AWS WAF messages.
Troubleshooting
If you are having issues adding a remote collector to an AWS WAF remote device, consider that:
You do not have proper permissions in AWS.
You entered the AWS account information for an incorrect AWS service account.
If you have multiple AWS accounts, especially child or organization accounts, you must verify that you added the service account information for the correct service account
Edit a Stack
This section only applies to single stacks, not stack sets.
Currently, Armor's AWS CloudFormation template does not support updates. If you want to update your stack, then you must delete the remote log source, and then create a new one with your desired updates.