Advanced Backup
To fully use this screen, you must have the following permissions assigned to your account:
Read Advanced Backup Plans
Read Advanced Backup
Read Advanced Backup VMs
Write Advanced Backup
Create an Advanced Backup Policy
Read the Advanced Backup Policy
Read Advanced Backup Snapshots
Refresh Advanced Backup Snapshots
Remove Advanced Backup
Request Advanced Backup Restore
Update Advanced Backup Policy
Commit Advanced Backup Restore
Refresh Advanced Backup Snapshots
Restore from Backup
Read Advanced Backup Overview
You can use the Advanced Backup add-on product to take backups of your virtual machines. (These backups are also known as a snapshot.) In the event of data loss, you can use these snapshots to restore your virtual machine to a previous state. These snapshots will be stored with Armor, based on the retention configurations you create in the backup policy.
At a high level, to use Advanced Backup, you must:
Create a backup policy
(Optional) Download and install the Rubrik agent
To restore specific files or folders, you must download and install the agent.
Assign a policy to a virtual machine or fileset configuration
Currently, Advanced Backup from Rubrik is available in the DFW01 (Dallas) and ORD01 (Chicago ) environments.
If you use the London (LHR01) or Amsterdam (AMS01) data centers, then you can use the Backup & Recovery add-on product from R1 Soft. To learn more, see Backup & Recovery.
If you plan to use the Advanced Backup service on the same VM where you also leverage the Continuous Server Replication service for Disaster Recovery, please review some important information regarding the interoperability of those two services here.
For Advanced Backup, there is a cost associated with the amount of data that you backup.
Armor offers two types of backups:
Type of Backup | Description | Additional Information |
|---|---|---|
Virtual Machine | This backup restores your entire virtual machine. | |
Fileset | This backup restores specific files or folders, not the entire virtual machine. When you create a policy, you can configure which files to include (and exclude) from the snapshot. |
Access the Advanced Backup screen
In the Armor Management Portal (AMP), in the left-side navigation, click Infrastructure.
Click Advanced Backup.
Overview
Self-service Advanced Backup usage reporting is available for each account within the Armor Management Portal (AMP). Displayed on the Overview tab, customers can leverage reporting for the following use cases:
Confirming the impact on total usage when editing their policies or adding/removing VM or Fileset Protection
Staying appraised of daily usage as a means for validating your configurations and invoicing (e.g. "Am I backing up the amount I expect?")
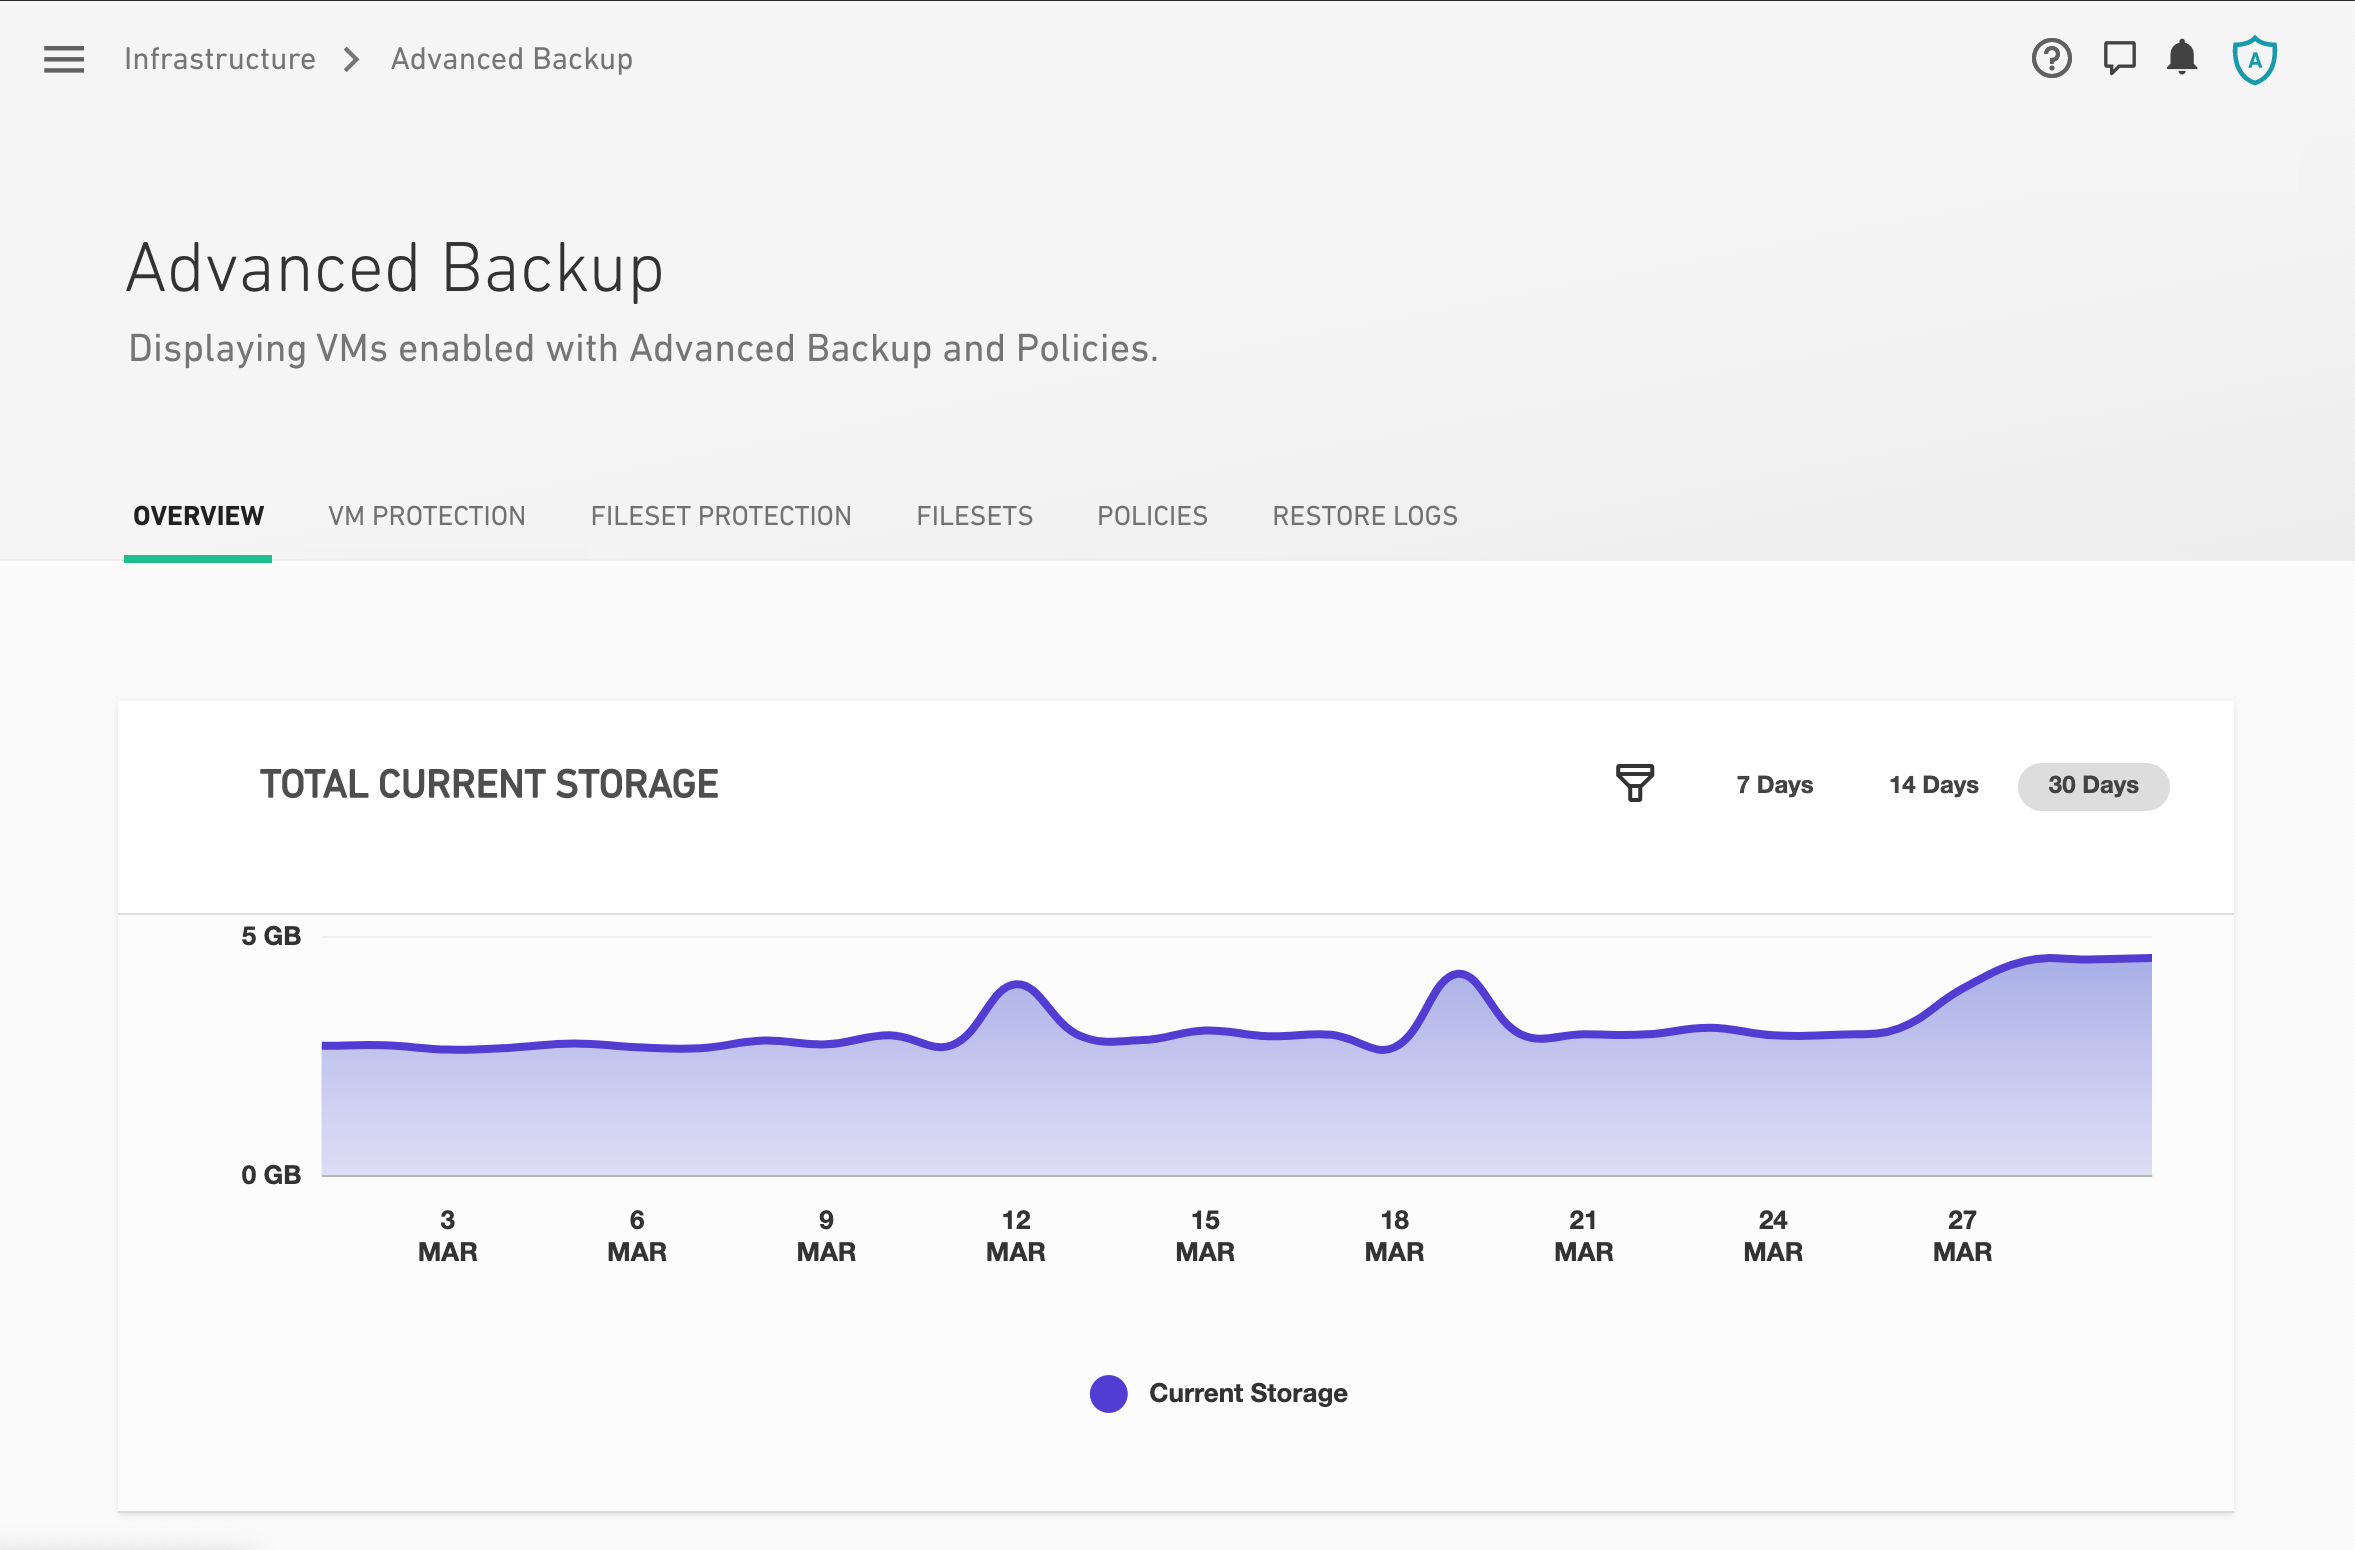
The reports can be filtered and modified, allowing customers to:
See an overview of your Advanced Backup usage, expressed as storage used across a period of time.
Switch views between one of three pre-defined slices of time: 7, 14 or 30 days back from the current date. The default is to show the most-recent 30 days; to change this, click any of the time-span buttons at the top-right of the report area
Filter the reports, in order to focus on any combination of specific virtual machines or protection types (Fileset and/or VM). The default is to show usage for all machines protects within the selected timespan (including machines that may not be currently under protection). To change your filter, click the "funnel" icon to open an aside, then select/deselect VMs as desired.
Fileset Protection
Column | Description |
|---|---|
VM Name | This column displays the name of the virtual machine that is subscribed to Advanced Backup. |
Location | This column displays the data center where the virtual machine is located (and where the backup will take place). |
Fileset Name | This column displays the assigned fileset grouping that will be backed-up. |
Policy Name | This column displays the corresponding policy. This policy configures how often a backup will take and for how long that backup will be retained. |
Storage Used | This column displays how much space has been used to store the backups. For Advanced Backup, there is a cost associated with the amount of data that you backup. |
Status | This column displays if the agent is Connected or Disconnected. |
Restore Logs
Column | Description |
|---|---|
Event | This column displays a completed action. You can use this information to view the progression of a restoration. When you restore a virtual machine from a virtual machine restoration, you will see:
When you restore a fileset from a virtual machine restoration, you will see:
When you restore a fileset from a fileset restoration, you will see:
|
Message | This column describes a completed action, including the corresponding virtual machine or filesets. |
Start Time | The date and time when this action began to take place. |
End Time | The date and time when this action ended. |
Status | This column describes the status of the action taking place, which can result in success, in-progress, or failure. |
Snapshot Date | This column displays the date and time that the snapshot was taken. |
Add Advanced Backup for virtual machine restoration
You can use these instructions to create and store snapshots of your virtual machine.
To simply create a backup of specific files or folders, see Add Advanced Backup for your filesets.
To enable backup on your virtual machine, you must:
Create a policy
(Optional) Download and install the Rubrik agent
Assign a policy to a virtual machine
You must use an existing virtual machine. To create a virtual machine, see Virtual Machines.
A newly created virtual machine may not appear immediately in this screen. You may need to wait an hour before a newly created virtual machine appears.
To properly backup SQL databases, before you create a backup policy, Armor recommends that you separately create a backup of the database, and then place that backup in the server to be backed-up.
You must create a policy to configure how often to take a backup and how long to keep a backup.
By default, times are based on your web browser's configured time zone.
The location of your virtual machine does not relate to the time zone used in this feature.
In the Armor Management Portal (AMP), in the left-side navigation, click Infrastructure.
Click Advanced Backup.
Click Policies.
Click plus ( + ) icon.
In Policy Name, enter a descriptive name.
In Location, select the data center where the virtual machine is located (and where the backup will take place).
In Type, select VM Protection.
Next to Backup Schedule, under Take Snapshots (Frequency), enter how often Armor should take a snapshot. And then directly across, under Keep Snapshots (Retention), enter how long Armor should keep this snapshot.
You must enter your time configurations in the same row.
For example, to take a snapshot every week and to keep that snapshot for six months, under Take Snapshots (Frequency), in Every (Days), enter 7, and then directly across, under Keep Snapshots (Retention), in For (Days), enter 182.
You can create a maximum of four Frequency and Retention settings.
The minimum retention period is 3 days.
Additionally, you must create a policy that takes place once per day. You must enter a time in hours.
For example, to take a snapshot every two hours and to keep that snapshot for three days, under Take Snapshots (Frequency), in Every (Hours), enter 2, and then directly across, under Keep Snapshots (Retention), in For (Days), enter 3.
(Optional) In Snapshot Window, configure the time frame for when your scheduled snapshots should take place. By default, Rubrik will determine when the scheduled snapshots will take place; however, with this option, you have the ability to configure a specific time frame for when the scheduled snapshots will take place. This option can be useful if you want to perform snapshots during a period of low traffic.
Next to First Full Window, configure the time frame for when the first full snapshot should take place.
Armor recommends that you configure a time when your environment experiences low traffic, low transaction volume, or low changes.
By default, times are based on your web browser's configured time zone.
After the first full snapshot is complete, the configuration you created under Take Snapshots (Frequency) and Take Snapshots Between will be implemented.
For example, next to First Full Window, if you configure an initial time frame of Sunday 12 AM to Sunday 6 AM, then your first full snapshot will take place at any time during this time frame. After the first full snapshot is complete, then the time frame configured in Take Snapshots (Frequency) and Take Snapshots Between will begin. If the first snapshot completes at Sunday at 5 AM, and your policy includes a snapshot every 4 hours, then the next snapshot will take place at 9 AM, and then again at 1 PM.
Click Create Policy.
There is a maximum number of 2000 retained backups per policy configuration per upcoming calendar year. This is calculated based on the values you supply for the Take/Keep field combinations.
As you configure your policy, the system will perform calculations to determine if you have exceeded the maximum threshold. When this occurs, you will be blocked from saving your policy changes until you've changed your Take/Keep combinations to come back under the threshold.
To perform a full virtual machine restoration, you do not need to download and install the agent. However, if you download and install the agent, then you will have the ability to perform a separate fileset restoration.
You must download an agent for every data center you use.
In the Armor Management Portal (AMP), in the left-side navigation, click Infrastructure.
Click Advanced Backup.
Click VM Protection.
Hover over the ( + ) icon, and then click the Download Rubrik Agent icon.
Select the data center where the virtual machine lives.
This must be the same data center that you selected in Step 1: Create a policy.
Select the operating system for the desired virtual machine.
Download and install the installer package onto your server.
Operating System | Step 1: Download the agent | Step 2: Install the agent |
|---|---|---|
Windows | Download and install the installer package in AMP, or run the command below. The following command uses the DFW01 data center. Be sure to replace DFW01 with your desired data center.
CODE
| Not applicable |
CentOS | Download the installer package in AMP, or run the command below. The following command uses the DFW01 data center. Be sure to replace DFW01 with your desired data center.
CODE
| Run the following command:
CODE
|
Ubuntu | Download the installer package in AMP, or run the command below. The following command uses the DFW01 data center. Be sure to replace DFW01 with your desired data center.
CODE
| Run the following command:
CODE
|
Red Hat Enterprise Linux | Download the installer package in AMP, or run the command below. The following command uses the DFW01 data center. Be sure to replace DFW01 with your desired data center.
CODE
| Run the following command:
CODE
|
Restore a virtual machine from a virtual machine snapshot
If your virtual machine is running in a corrupt state, or if you notice data loss, then you may choose to restore that virtual machine to one of your retained backups.
During a restoration, you may experience intermittent issues in your environment. As a result, Armor recommends that you restore a virtual machine from a backup during a period of low traffic.
Once the restoration process has started, you will not be able to rollback your virtual machine.
In the Armor Management Portal, in the left-side navigation, click Infrastructure.
Click Advanced Backup.
In VM Protection, locate and hover over the desired virtual machine.
Click the vertical ellipses.
Click Refresh Available Backups.
This action ensures that AMP lists the latest retained backup.
Hover over the desired virtual machine again, and then click the vertical ellipses.
Click Restore from Backup.
Locate the desired snapshot, and then click the corresponding vertical ellipses.
Click Restore
Click Restore again.
Once the restoration has started, you will not be able to rollback your virtual machine.
If you are not satisfied with the selected snapshot, you can select a different snapshot in a later step.
Once the restoration is complete, the Status column for the corresponding virtual machine will display Pending Commit.
During a Pending Commit status, the virtual machine will operate in a transitional storage environment. The virtual machine is fully operational; however, during this time, storage performance may not run in an optimal state.
Hover over the desired virtual machine, and then click the vertical ellipses.
Click Commit to Snapshot.
This action will cause your data to move from the transitional storage environment to the production storage environment where storage performance will return to the appropriate storage tier. At this point, the status will display as Restore Successful.
Storage performance will be impacted during this commit process, so you may want to perform this step at a time during periods of low anticipated traffic.
You can still make changes to your environment before and after you click Confirm Snapshots. Rubrik will create a separate file (or files) to accommodate any changes made during the final restoration process.
In the event that you do not commit, the virtual machine will be auto-committed after 72 hours.
If you want to select a different snapshot, from the vertical ellipses, select Choose Different Snapshot.
Click OK.
In the VM Protection section, review the Status column to view the status of your restoration.
Additionally, you can access the Restore Logs section to view the progression of a restoration.
After you begin the restoration process, you can still cancel the restoration.
Before the snapshot reaches the Pending Customer Commit status, you can cancel a restoration. (You can use the Review Logs section to view the status of the restoration.)
In the Armor Management Portal, in the left-side navigation, click Infrastructure.
Click Advanced Backup.
In VM Protection, locate and hover over the desired virtual machine.
Click the vertical ellipses.
Click Cancel VM restore.
Click Continue.
Restore a fileset from a virtual machine snapshot
You can use these instructions to restore a fileset from a virtual machine snapshot.
You cannot use these instructions to restore a fileset from a filest snapshot.
To restore a fileset from a fileset snapshot, see Restore a fileset from a fileset snapshot.
To restore a fileset from a virtual machine snapshot, you must have the Rubrik agent installed in the corresponding data center.
In the Armor Management Portal, in the left-side navigation, click Infrastructure.
Click Advanced Backup.
In VM Protection, locate and hover over the desired virtual machine.
Click the vertical ellipses.
Click Register Rubrik Agent.
Review the Agent Status column to display Installed.
Click the vertical ellipses, and then select Refresh From Available Backups.
Click the vertical ellipses, and then select Restore From Backup.
Locate the desired snapshot, and then click the vertical ellipses
Click Browse.
Navigate to the specific file or folder to restore.
You can also navigate to a high-level folder.
Hover over, and then click the vertical ellipses.
Click Restore.
There are two types of restorations.
Option 1: Mark Overwrite Original to replace your existing files with the restored files.
Option 2: Mark Restore to Separate Folder to place the restored files in a separate location. This option will not replace your existing files. You can use this option to verify specific files before you remove the original files.
In Folder Name, enter a valid file path to place the restored files.
Click Restore.
To review the status of the restoration, in the top menu, click Restore Logs.
Add Advanced Backup for fileset restoration
You can use these instructions to retain snapshots of specific files, and not of your entire virtual machine.
To properly backup SQL databases, before you create a backup policy, Armor recommends that you separately create a backup of the database, and then place that backup in the server to be backed-up.
You must create a policy to configure often to take a backup and how long to keep a backup.
By default, times are based on your web browser's configured time zone.
The location of your virtual machine does not relate to the time zone used in this feature.
In the Armor Management Portal (AMP), in the left-side navigation, click Infrastructure.
Click Advanced Backup.
Click Policies.
Click plus ( + ) icon.
In Policy Name, enter a descriptive name.
In Location, select the data center where the virtual machine is located (and where the backup will take place).
In Type, select Fileset Protection.
Next to Backup Schedule, under Take Snapshots (Frequency), enter how often Armor should take a snapshot. And then directly across, under Keep Snapshots (Retention), enter how long Armor should keep this snapshot.
You must enter your time configurations in the same row.
For example, to take a snapshot every week and to keep that snapshot for six months, under Take Snapshots (Frequency), in Every (Days), enter 7, and then directly across, under Keep Snapshots (Retention), in For (Days), enter 182.
You can create a maximum of four Frequency and Retention settings.
The minimum retention period is 3 days.
Additionally, you must create a policy that takes place once per day. You must enter a time in hours.
For example, to take a snapshot every two hours and to keep that snapshot for three days, under Take Snapshots (Frequency), in Every (Hours), enter 2, and then directly across, under Keep Snapshots (Retention), in For (Days), enter 3.
(Optional) To enable off-site replication, for Replication, mark On.
Select a Location.
Configure a time for retention.
This time cannot be larger than the time configured for local retention.
This feature stores copies of your snapshots in another physical location, which you can retrieve in case the copies in your local machine are not accessible or usable.
There is a cost associated with this feature.
(Optional) In Snapshot Window, configure the time frame for when your scheduled snapshots should take place. By default, Rubrik will determine when the scheduled snapshots will take place; however, with this option, you have the ability to configure a specific time frame for when the scheduled snapshots will take place. This option can be useful if you want to perform snapshots during a period of low traffic.
Under First Full Window, configure the time frame for when the first full snapshot should take place.
Armor recommends that you configure a time when your environment experiences low traffic, low transaction volume, or less frequent changes.
By default, times are based on your web browser's configured time zone.
After the first full snapshot is complete, the configuration you created under Take Snapshots (Frequency) and Take Snapshots Between will be implemented.
For example, under First full Window, if you configure an initial time frame of Sunday 12 AM to Sunday 6 AM, then your first full snapshot will take place at any time during this time frame. After the first full snapshot is complete, then the time frame configured in Take Snapshots (Frequency) and Take Snapshots Between will begin. If the first snapshot completes at Sunday at 5 AM, and your policy includes a snapshot every 4 hours, then the next snapshot will take place at 9 AM, and then again at 1 PM.
Click Create Policy.
You must download an agent for every data center you use.
In the Armor Management Portal (AMP), in the left-side navigation, click Infrastructure.
Click Advanced Backup.
Click Fileset Protection.
Hover over the ( + ) icon, and then click the Download Rubrik Agent icon.
Select the data center where the virtual machine lives.
You must use the same data center that you configured in Step 1: Create a policy.
Select the operating system for the desired virtual machine.
Download and install the installer package onto your server.
Operating system | Step 1: Download the agent | Step 2: Install the agent |
|---|---|---|
Windows | Download and install the installer package in AMP, or run the command below. The following command uses the DFW01 data center. Be sure to replace DFW01 with your desired data center.
CODE
| Not applicable |
CentOS | Download the installer package in AMP, or run the command below. The following command uses the DFW01 data center. Be sure to replace DFW01 with your desired data center.
CODE
| Run the following command:
CODE
|
Ubuntu | Download the installer package in AMP, or run the command below. The following command uses the DFW01 data center. Be sure to replace DFW01 with your desired data center.
CODE
| Run the following command:
CODE
|
Red Hat Enterprise Linux | Download the installer package in AMP, or run the command below. The following command uses the DFW01 data center. Be sure to replace DFW01 with your desired data center.
CODE
| Run the following command:
CODE
|
Restore a fileset from a fileset snapshot
During a restoration, you may experience intermittent issues in your environment. As a result, Armor recommends that you perform a restoration during a period of low traffic.
In the Armor Management Portal, in the left-side navigation, click Infrastructure.
Click Advanced Backup.
In Fileset Protection, locate and hover over the desired fileset.
Click the vertical ellipses.
Click Restore from Backup.
Locate and hover over the desired snapshot.
Click the vertical ellipses, and then click Browse.
Navigate to the specific file or folder to restore.
You can also navigate to a high-level folder.
Hover over, and then click the vertical ellipses.
Click Restore.
There are two types of restorations.
Option 1: Mark Overwrite Original to replace your existing files with the restored files.
Option 2: Mark Restore to Separate Folder to place the restored files in a separate location. This option will not replace your existing files. You can use this option to verify specific files before you remove the original files.
In Folder Name, enter a valid file path to place the restored files.
(Optional) Slide Continue on restore errors to avoid a possible interruption or cancelation of the restoration.
If you activate this option, then in the event a file cannot be restored, the system will continue to try to restore all other selected files.
If you do not activate this option, then in the event a file cannot be restored, the system will not attempt to restore additional files. Files that were previously restored will remain.
Click Restore.
To review the status of the restoration, in the top menu, click Restore Logs.
Edit an existing policy
Before you update an existing policy, consider that:
You cannot update the location of an existing policy.
If you update the Snapshot Window for an existing policy and there is a virtual machine already assigned to the policy, then the virtual machine will not experience another first full snapshot.
Existing snapshots for the virtual machine will remain stored with Armor.
If you decrease the Retention rate, then older snapshots will be removed in accordance with the updated policy. For example, if you lower the retention rate from 14 days to 10 days, then backups older than 10 days will be removed.
In the Armor Management Portal (AMP), in the left-side navigation, click Infrastructure.
Click Advanced Backup.
Click Policies.
Locate and hover over the desired policy.
Click the vertical ellipses.
Click Edit.
Make your desired changes, and then click Update Policy.
Replace an existing policy for a virtual machine
You can use these instructions to replace one existing policy with another existing policy for a virtual machine.
Before you begin, consider that:
When you replace a policy, the virtual machine will not experience another first full snapshot.
Existing snapshots for the virtual machine will remain stored with Armor.
If you replace a policy that has a different Retention rate, then older snapshots will be removed in accordance with the updated policy. For example, if the newly assigned policy has a retention rate of 10 days whereas the previously assigned policy had a retention rate of 14 days, then backups older than 10 days will be removed.
In the Armor Management Portal (AMP), in the left-side navigation, click Infrastructure.
Click Advanced Backup.
In VM Protection, locate and hover over the desired virtual machine.
Click the vertical ellipses.
Click Assign New Policy.
Under Policy, select an existing policy to use.
Click Update Policy.
Policy changes will not affect existing backups unless the Retention rate is decreased. In this case, older snapshots will be removed in accordance with the updated policy. For example, if you lower the retention rate from 14 days to 10 days, then backups older than 10 days will be removed.
Delete a policy
You cannot delete a policy that is assigned to a virtual machine. As a result, you must first unassign a policy from a virtual machine.
You can skip Step 1: Unassign a policy if:
You have already unassigned a policy from a virtual machine.
You have never assigned a policy to a virtual machine.
You want to delete a fileset protection policy.
Step 1: Unassign a policy
In the Armor Management Portal (AMP), in the left-side navigation, click Infrastructure.
Click Advanced Backup.
In VM Protection, locate and hover over the desired virtual machine.
Click the vertical ellipses.
Click Assign New Policy.
Under Policy, select an existing policy to use.
Click Update Policy.
Step 2: Delete an unassigned policy
In the Armor Management Portal (AMP), in the left-side navigation, click Infrastructure.
Click Advanced Backup.
Click Policies.
Locate and hover over the desired policy.
Click the vertical ellipses.
Click Delete.
Click OK.
Remove Advanced Backup from a virtual machine
You can use these instructions to remove the Advanced Backup add-on product from a virtual machine.
When you remove Advanced Backup:
A snapshot will no longer be taken of the virtual machine.
Snapshots of the virtual machine will no longer be available.
This action will not delete the policy associated with the virtual machine. The policy will still be available in the Policies section of the Advanced Backup screen.
Based on when you remove this feature, you may receive a charge for the service on your next invoice.
In the Armor Management Portal (AMP), in the left-side navigation, click Infrastructure.
Click Advanced Backup.
Locate and hover over the desired virtual machine.
Click the vertical ellipses.
Click Remove from Backup.
Click OK.
Troubleshooting
If you cannot access or update the Advanced Backup screen, consider that:
You do not have permissions to view this add-on product.
You must have the following permissions to fully use the Advanced Backup add-on product. Contact your account administrator to enable these permissions. (If you are an account administrator, then to update your permissions, see Roles and Permissions).
Read Advanced Backup Plans
Read Advanced Backup
Read Advanced Backup Vms
Write Advanced Backup
Create Advanced Backup Policy
Read Advanced Backup Policy
Read Advanced Backup Snapshots
Refresh Advanced Backup Snapshots
Remove Advanced Backup
Request Advanced Backup Restore
Update Advanced Backup Policy
Commit Advanced Backup Restore
Refresh Advanced Backup Snaphots
Restore from Backup
For Vormetric users:
As a Vormetric user, how should I configure my files for Advanced Backup?
You must update the encryption policy to allow the Rubrik agent to access your files and directories.
You can give Rubrik read-only permissions or read and decrypt permissions.
If you allow read-only permissions, then the files will be backed up in an encrypted format; however, the Vormetric DSM, agent, and keys will need to be available in order to access the recovered, encrypted data. As a result, these files will have a higher change rate.
If you give Rubrik read and decrypt permissions, then the unencrypted files will be encrypted when they are transmitted to the backup appliance and platform. During this time, the content can potentially be recovered by Armor in an unencrypted format, which may not meet your desired security practices or compliance requirements.
During a file backup, if some files are missing, will I see an error message?
The Rubrik agent silently skips any files that it cannot access and continues with the backup. As a result, Rubrik does not generate any kind of error message.
To correct, this, please update the file system permissions, or the encryption policy, so that the Rubrik agent can access these files.