Workloads
To fully use this screen, you must have the following permissions assigned to your account:
Read Workload(s)
Write Workload
Read Virtual Machine Stats
Read Virtual Machine(s)
Write Virtual Machine
Scale Virtual Machine
Read Location(s)
Read Virtual Data Centers
Read Tasks
Write Tasks
Read Storage
Workloads and Tiers are visual tools used in the Nexus to help you organize your virtual machines and corresponding resources. Workload refers to a container of virtual machines that live inside the Armor data center. Tiers are levels within workloads.
Create a workload with a new virtual machine
You cannot create a workload without a virtual machine. As a result, you must first create a virtual machine, and then create the corresponding workload.
To review available virtual machines, see available virtual machines.
In Nexus, hover over Infrastructure
 in the left nav.
Click Compute.
Then Virtual Machines.
Click Add New VM.
If you do not have any virtual machines listed, then click Deploy New, and then select Virtual Machine.
Locate and select the desired operating system and operating system version.
Use the Region drop-down menu to select the data center.
Select the desired virtual machine based on your CPU and memory needs (GB).
You can click High CPU or High Memory to filter the list of virtual machines. You can also click Show All Options to see every virtual machine offering.
Armor labels virtual machines by CPU and memory features. For instance, 2x4 indicates that the virtual machine has 2 CPU and 4 GB of memory.
In Name, enter a descriptive name for your virtual machine.
In Workload, select New Workload.
In New Workload Name, enter a descriptive name.
In New Tier Name, enter a descriptive name.
In Location, select and verify the data center to host your virtual machine.
Under Access Credentials, note your username to access the virtual machine.
In Password, enter a secure password to use to access the virtual machine.
Your password must contain:
An upper-case letter
A lower-case letter
A number
A special character: ! @ # $ % ^ * ( ) { } [ ]
You can also click Generate Password to allow Armor to create a password.
(Optional) For additional storage, under Storage Substrate and Disk Size, select your desired storage, and then click Add Disk.
On the right-side menu, review the pricing information, and then click Purchase.
When you order a virtual machine, you are also ordering Intelligence Security Model (ISM) for the virtual machine. Prices for ISM will vary based on the number of virtual machines you have ordered. IMS pricing is based on the following tiered structure:
Tier | Number of virtual machines |
|---|---|
1 | 1 - 10 |
2 | 11 - 25 |
3 | 26 - 100 |
4 | 101- 250 |
5 | 251 - 500 |
6 | 500 + |
To view the status of your newly created virtual machine, in the left-side navigation, access the Virtual Machines screen, and then search for your newly created virtual machine.
After you create a virtual machine, Armor recommends that you:
Create a firewall rule
By default, outbound and inbound traffic are blocked from virtual machines. To allow traffic, you must create a firewall rule. To learn more, see Firewall Rules.
Download the SSL/VPN client.
To access the virtual machine, you must download the SSL/VPN client. To learn more, see SSL VPN.
Change the Name of a Workload
In Nexus, hover over Infrastructure
in the left nav.Click Compute.
Then Workloads.
Locate and click the Name of the desired workload.
Click Actions.
Select Rename Workload
Update the name of the workload.
Click Rename.
Create a New Tier in an Existing Workload
In Nexus, hover over Infrastructure
in the left nav.Click Compute.
Then Workload.
Locate and click the Name of the desired workload.
Click Actions.
Then click the Add Tier + icon.
Enter a descriptive tier name.
Click Add.
(Optional) There are two ways to add a virtual machine to this newly created tier.
You can create and add a new virtual machine.
You can move an existing virtual machine.
Option 1: Create a virtual machine to add to an existing tier
As an optional step, you can add a new virtual machine to the newly created tier.
In Nexus, hover over Infrastructure
in the left nav.Click Compute.
Then Workloads.
Locate and click the Name of the desired workload.
Click Actions.
Click Add Virtual Machine.
Locate and select the desired operating system and operating system version
On the right side, use the Region drop-down menu to select the data center to host your virtual machine.
Select the desired virtual machine based on your CPU and memory needs (GB).
In Name, enter a descriptive name for your virtual machine.
Verify the listed Workload, Workload Tier, and Location.
Under Access Credentials, note your username to access the virtual machine.
In Password, enter a secure password to use to access the virtual machine.
Your password must contain:
An upper-case letter
A lower-case letter
A number
A special character: ! @ # $ % ^ * ( ) { } [ ]
You can also click Generate Password to allow Armor to create a password.
(Optional) For additional storage, under Storage Substrate and Disk Size, select your desired storage, and then click AddDisk.
On the right-side menu, review the pricing information, and then click Purchase.
To view the status of your newly created virtual machine, in the left-side navigation, access Virtual Machines, and then search for your newly created virtual machine.
Option 2: Move an existing virtual machine to an existing tier
In Nexus, hover over Infrastructure
in the left nav.Click Compute.
Then Virtual Machines.
Locate and select the desired virtual machine by clicking on the Name.
Find Workload and click Move
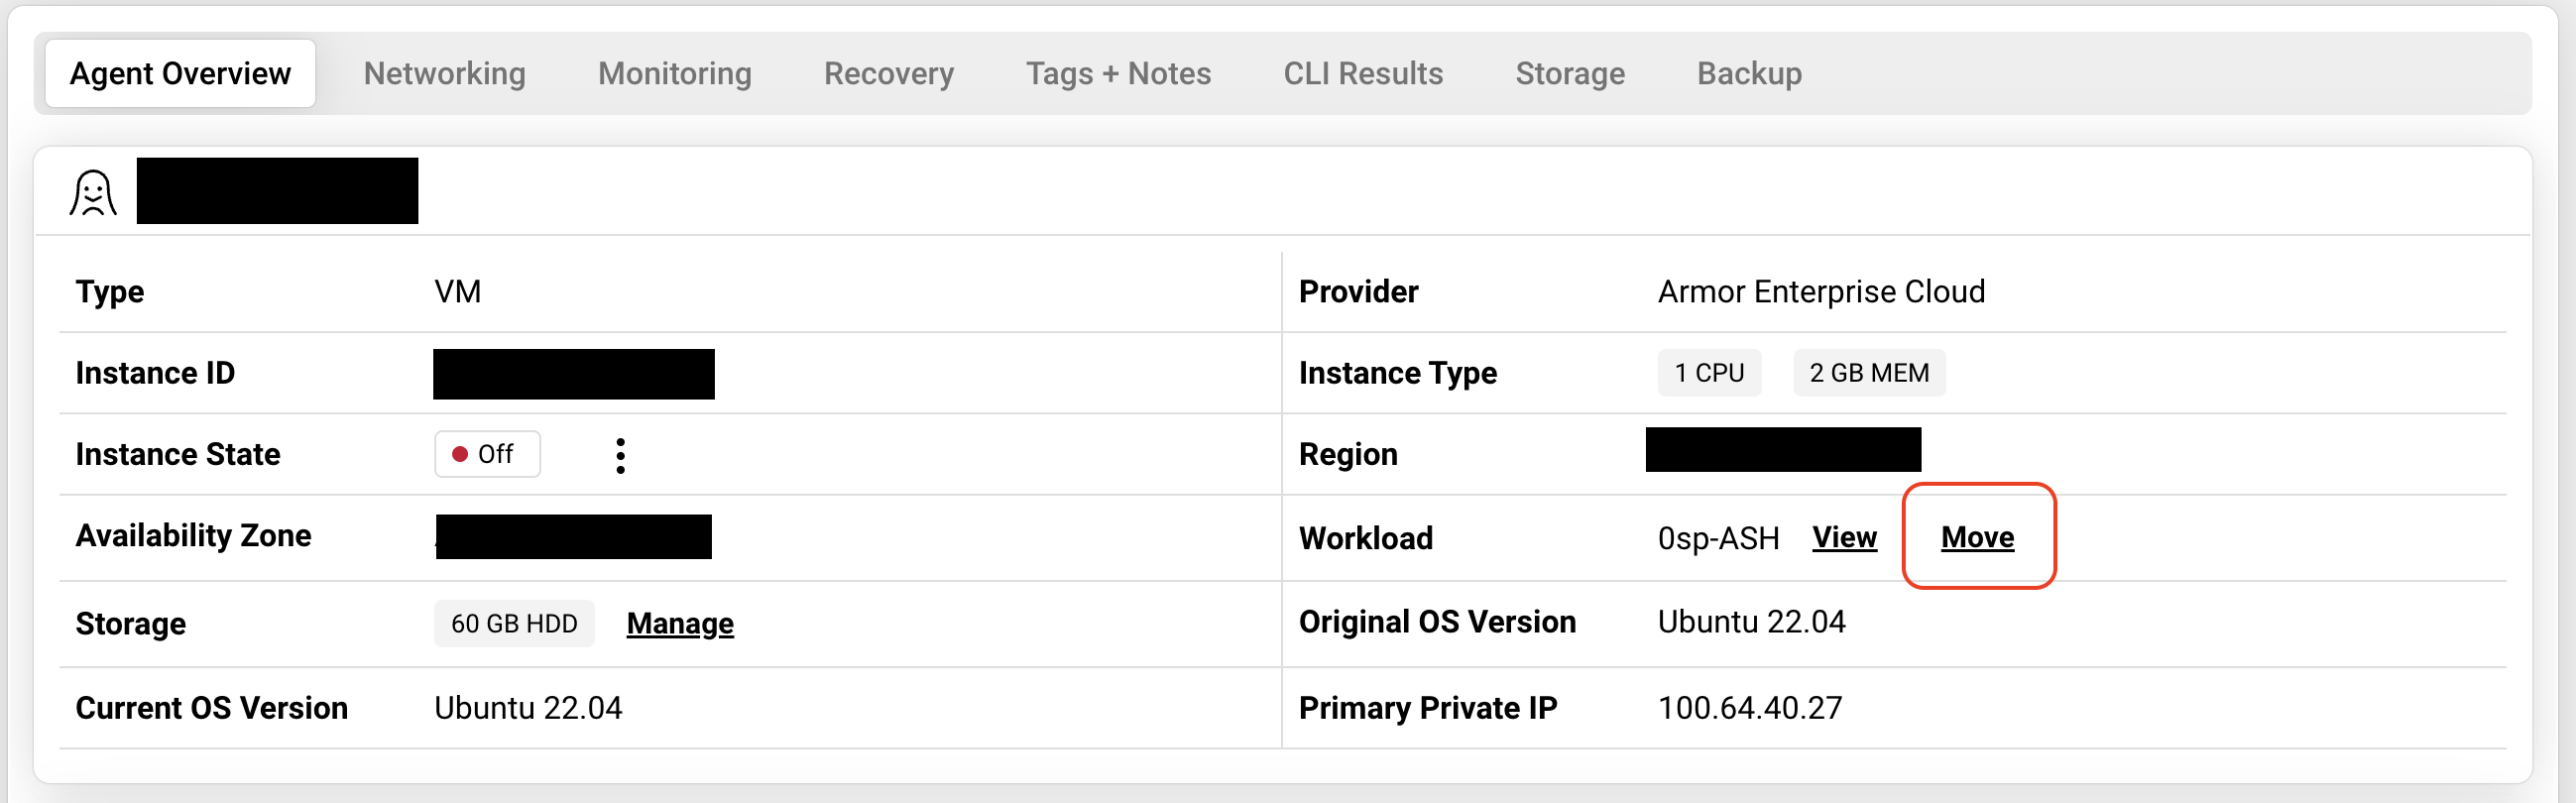
Nexus - VM Details Screen
Delete a Workload
You can only delete an empty workload. You cannot delete a workload that contains a virtual machine.
In Nexus, hover over Infrastructure
in the left nav.Click Compute.
Then Workloads.
Locate and click the Name of the desired workload.
Click Actions.
Click the Delete Workload.
Click Delete Workload.
Delete a Tier
You can only delete an empty tier. You cannot delete a tier that contains a virtual machine. Last remaining empty tier in a workload cannot be deleted.
In Nexus, hover over Infrastructure
in the left nav.Click Compute.
Then Workloads.
Locate and click the Name of the desired workload.
Locate the desired tier, and then click the corresponding vertical ellipses.
Click Delete Tier.
Click Delete Tier again.
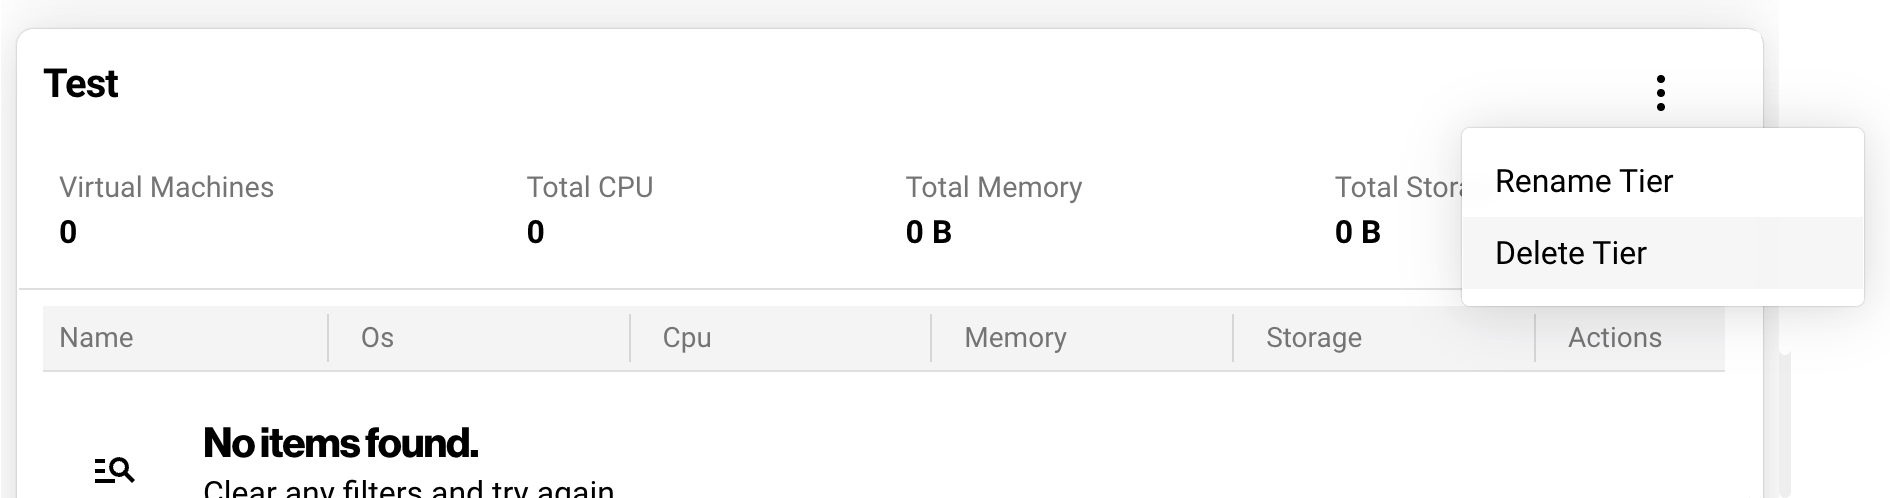
Nexus - Workload Details
Export Workload Data
In Nexus, hover over Infrastructure
in the left nav.Click Compute.
Then Workloads.
(Optional) Use the filter function to customize the data displayed.
In the bottom, right part of the screen, select CSV.
You have the option to export all data (All) or only the data that appears on the current screen (Current Set).
Function | Data Displayed |
|---|---|
CSV |
|
Troubleshooting
In the Workloads screen, if a tier does not contain a virtual machine or sever, consider that:
A virtual machine or server was never added.
You do not have permission to view and edit tiers.
You must have the Read Workload(s) and Write Workload permissions enabled. Contact your account administrator to enable these permissions. To learn how to update your permissions, see Roles and Permissions