Virtual Machines
To fully use this screen, you must have the following permissions assigned to your account:
Read Workload(s)
Write Workload
Read Virtual Machine Stats
Read Virtual Machine(s)
Write Virtual Machine
Scale Virtual Machine
Read Location(s)
Read Virtual Data Centers
Read Tasks
Write Tasks
Read Storage
Read product catalog
Read Network IP
Read Network NAT
Read Entity Metadata
Read Log Management Plan Selection
Write Orders
Read Orders
Read Notification(s)
The Virtual Machine screen also displays:
Load Balancer
Backup & Recovery Server
Persistent Data Encryption Manager
Advanced WAF
Available Virtual Machines
Armor offers the following types of virtual machines:
Windows
Operating system |
|
|---|---|
Version |
|
Windows servers require a minimum of 2 CPU and 2GB of memory.
CPU |
|
|
|
|
|
|
|---|---|---|---|---|---|---|
Memory (GB) |
|
|
|
|
|
|
Storage Type | Storage Purchase Options |
|---|---|
SSD | 10gb up to 500gb in 10gb increments |
RAW | 250gb up to 2000gb in 250gb increments |
FLUID | 50 - 2000gb in 50gb increments |
Linux
Operating system |
|
|
|
|---|---|---|---|
Version |
|
|
|
Linux servers require a minimum of 1 CPU and 2GB of memory.
CPU |
|
|
|
|
|
|
|
|---|---|---|---|---|---|---|---|
Memory (GB) |
|
|
|
|
|
|
|
Review Virtual Machines
The Virtual Machines screen provides a high-level view of all of your virtual machines.
In Nexus, hover over Infrastructure
in the left nav.
Click Compute.
Then Virtual Machines.
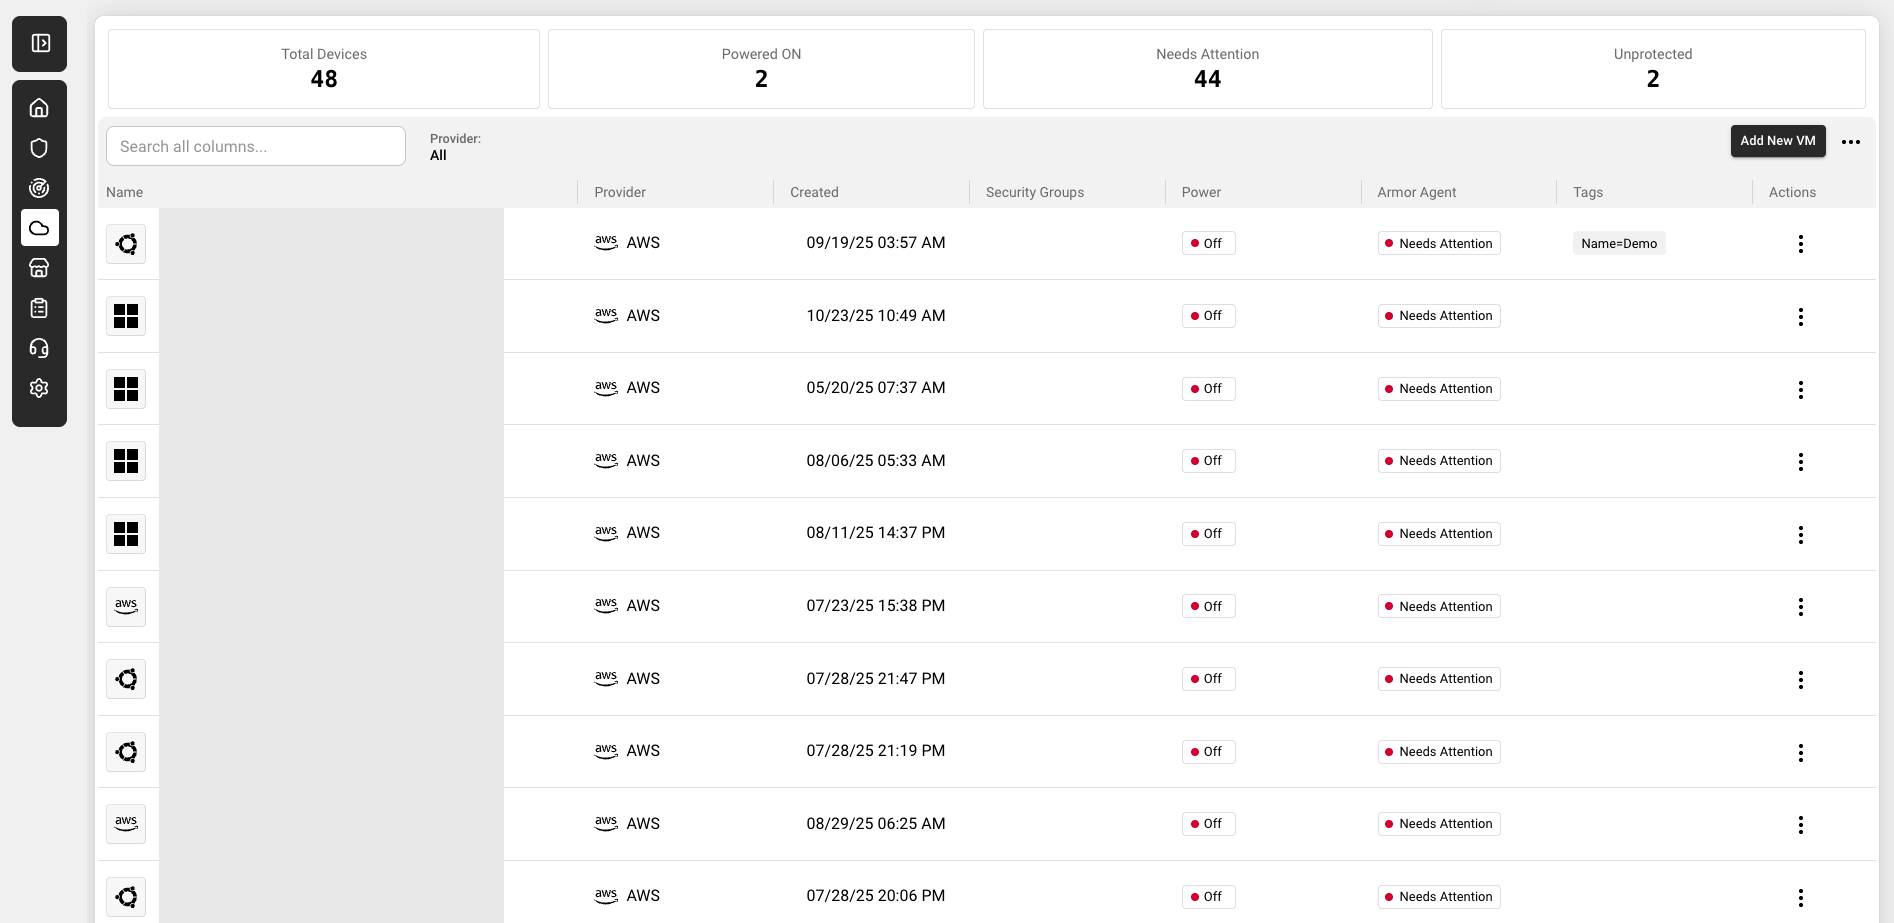
Nexus - Virtual Machine
Column | Description |
|---|---|
Name | This column displays the name of the virtual machine. |
Location | Data center that host your virtual machine. |
Provider | This entry displays Armor's private cloud, the provider for the instance. |
Primary IP | This column displays the primary IP address associated with the instance. |
Type | This column display the type of instance. More common types are VM and Log Relay. |
Created | This column displays the date the virtual machine was created in Nexus. |
Power | This column displays the power status of the virtual machine:
|
Armor Agent | The security status of the instance, in relation to the installed agent. There are three states:
|
Tags | This column displays any tags that have been added to the virtual machine on the Tags + Notes screen. |
Review Details for a Specific Virtual Machine
From the Virtual Machines screen, you can access detailed information for each virtual machine.
In Nexus, hover over Infrastructure
Click Compute.
Then Virtual Machines.
Locate and select the desired instance.
Overview
This section displays detailed information for the virtual machine.
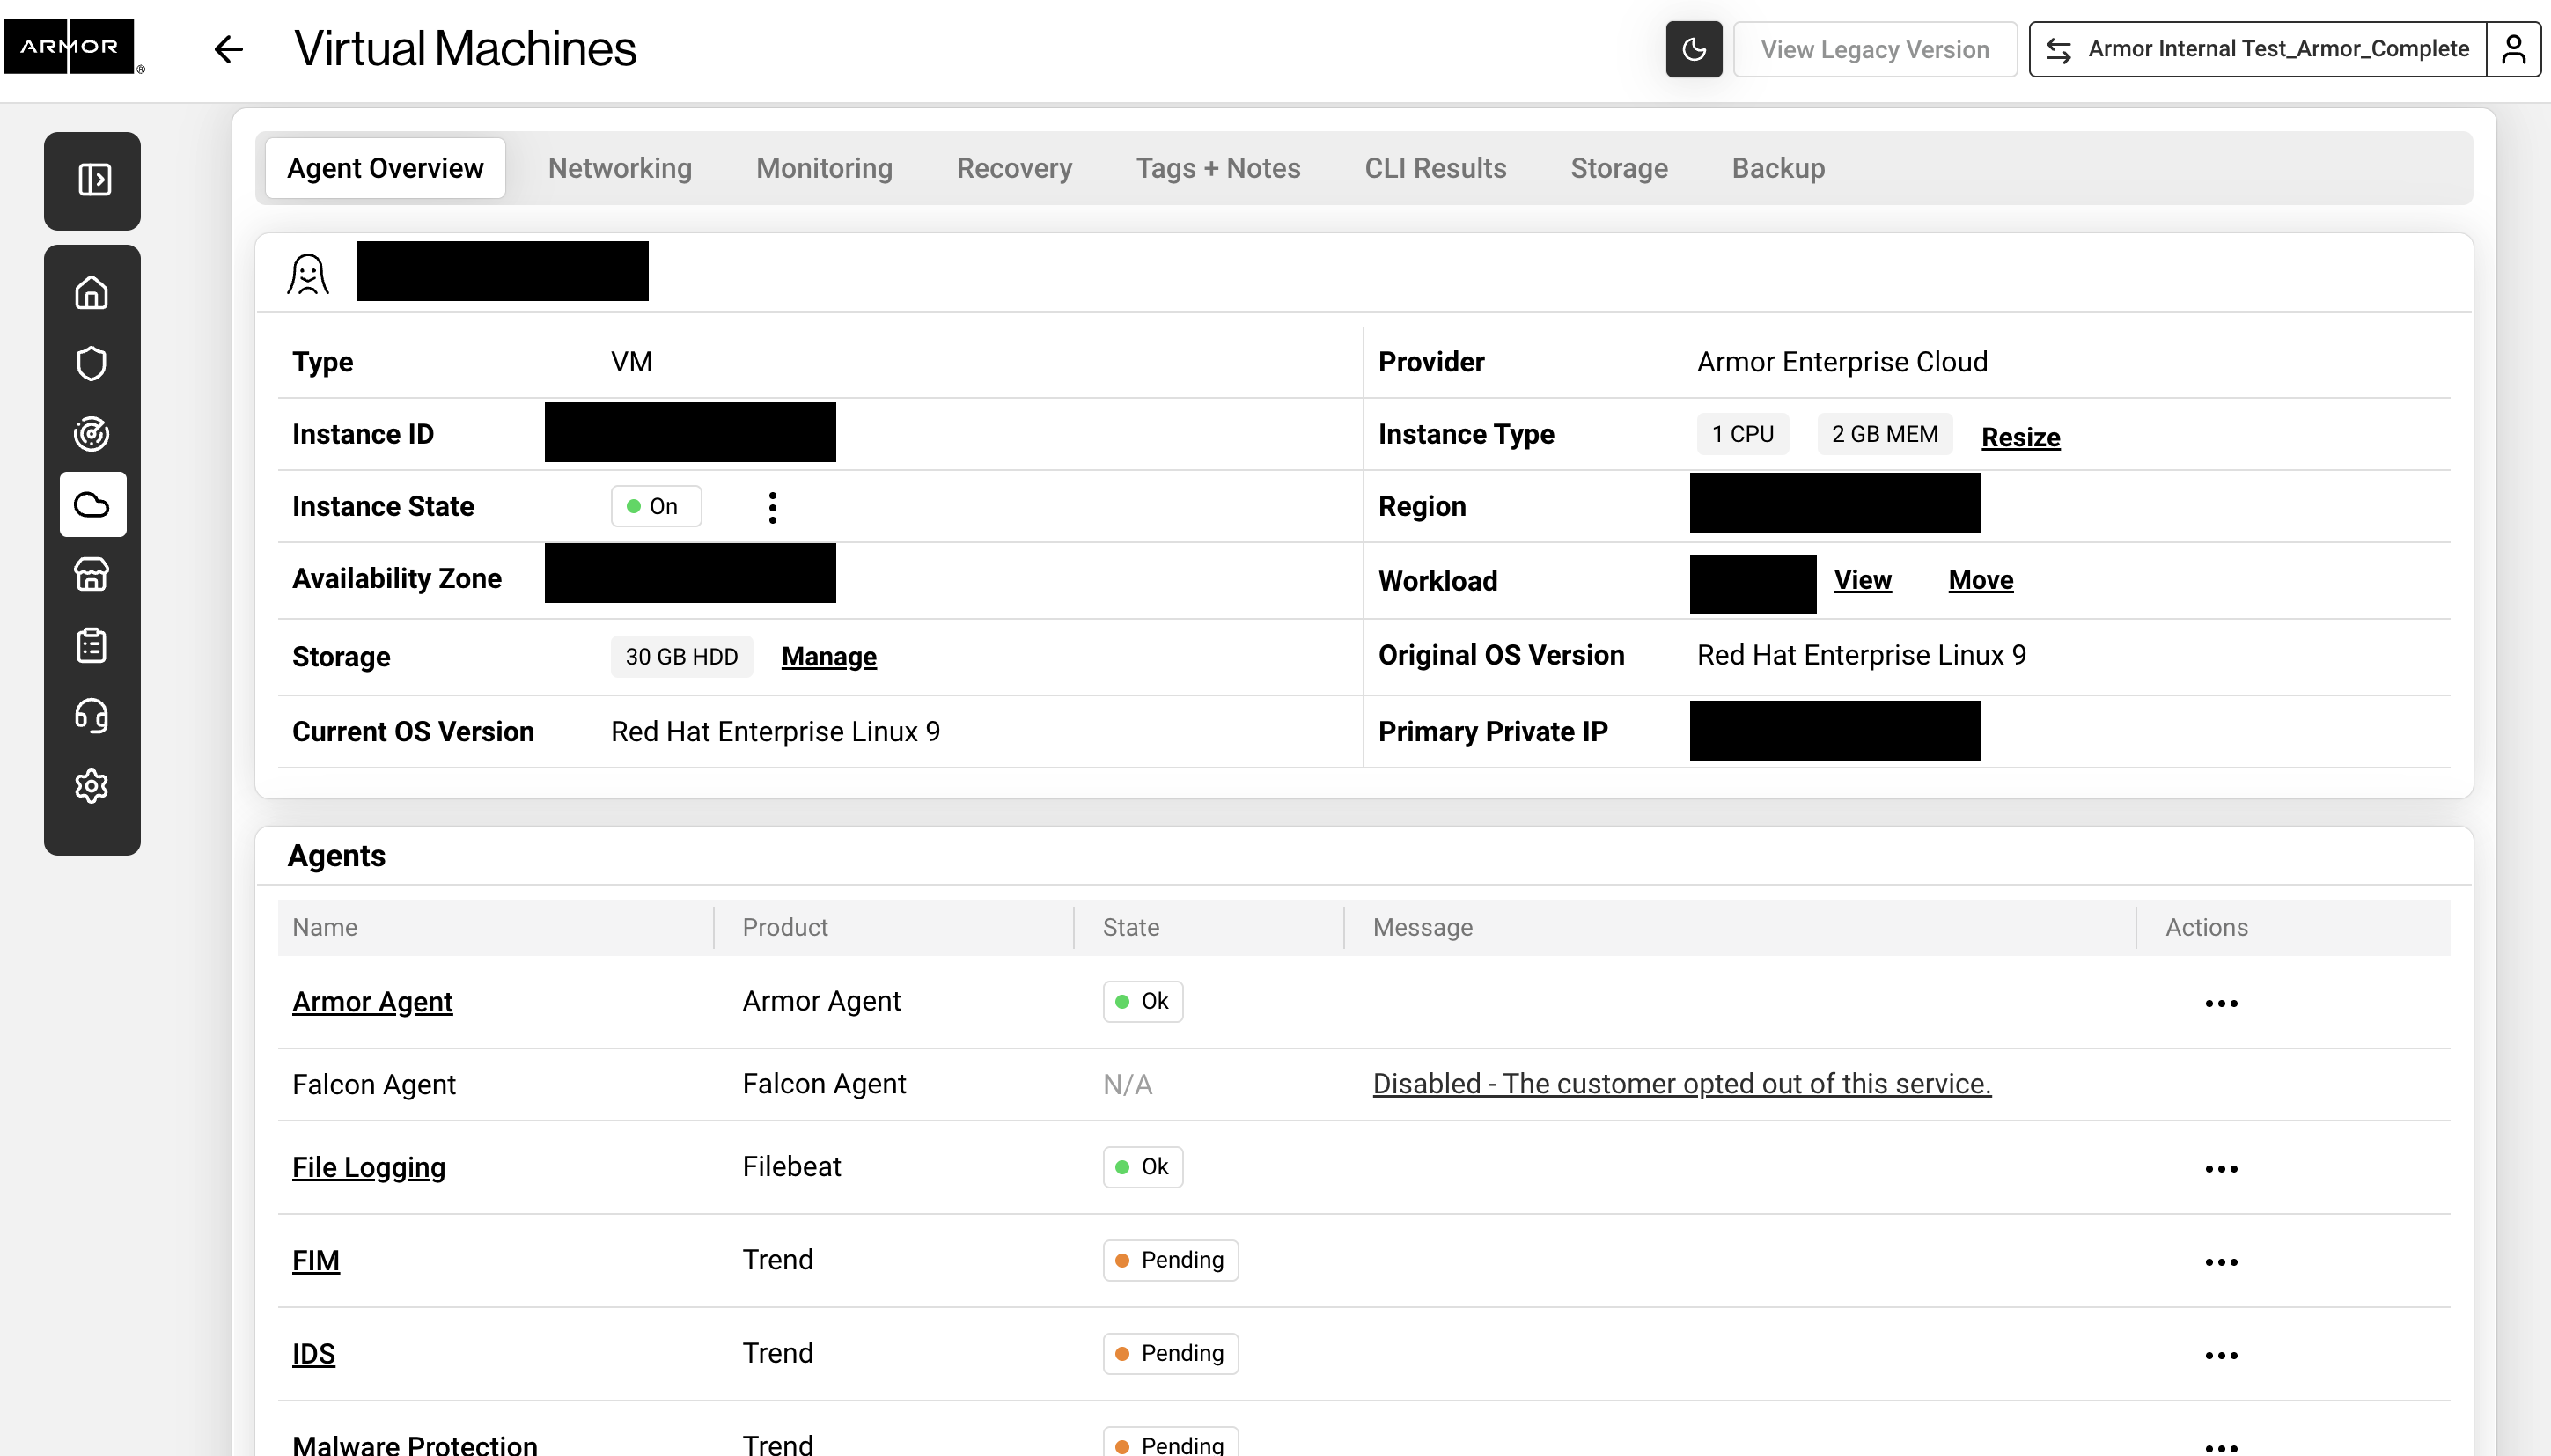
Nexus - Virtual Machine Detail
Field | Description |
|---|---|
Type | This entry displays the type of instance, specific to the offerings offered by your public cloud provider, such as EC2 instance for AWS.
|
Provider | This entry displays Armor's private cloud, the provider for the instance. |
Instance ID | This entry displays the ID associated with the virtual machine. |
Instance State | This entry displays the security status of the virtual machine. |
Region | This entry displays the data center that hosts the virtual machine. |
Availability Zone | This entry displays the available zone within the specified region. |
Workload | This entry displays the workload associated with the virtual machine. |
Storage | This entry displays the disk storage amount. |
Original OS Version | This entry displays the original operating system for the virtual machine. |
Current OS Version | This entry displays the current operating system for the instance or virtual machine. |
Public IPS | This entry displays the public IP address(es) associated with the virtual machine. |
Primary Private IP | This entry displays the private IP address associated with the virtual machine. |
Sub-Agent Health Table
This section displays the sub-agent health related to your Armor-protected virtual machines.
COLUMN | DESCRIPTION |
|---|---|
Name | This entry displays the specific service that is being checked. |
Product | This column displays the product name associated with the sub-agent (i.e. Trend, Rapid7). |
State | This entry displays the status of the service, either OK, Needs Attention, or Pending.
|
Message | If the status is Needs Attention, then this entry will display additional details on the service check results. |
Review Sub-Agent Health Details for a Virtual Machine
For each of your virtual machines, you can view sub-agent health details. You can use this information to troubleshoot agents that may be in a bad state.
In Nexus, hover over Infrastructure
Click Compute.
Then Virtual Machines.
Locate and select the desired instance.
Locate the sub-agent that you want to view.
Click the Name of the desired sub-agent. Or, click the vertical ellipses, then click View Details.
Armor Agent
Review specific information and troubleshooting steps for the Armor Agent service.
SECTION | DESCRIPTION |
|---|---|
Details | This section displays the following information for the Armor agent: Heartbeat
|
File Logging
Review specific information and troubleshooting steps for the File Logging service.
SECTION | DESCRIPTION |
|---|---|
Details | Logs
|
Connectivity | This section displays the script to check connectivity, along with steps to remediate. |
File Integrity Monitoring
Review specific information and troubleshooting steps for the File Integrity Monitoring (FIM) service.
SECTION | DESCRIPTION |
|---|---|
Trend to Armor Sync | Trend
Armor
Steps to Remediate |
Connectivity | This section displays the script(s) to check connectivity, along with steps to remediate. |
Errors | This section displays any known errors, along with steps to remediate. |
Intrusion Detection System
Review specific information and troubleshooting steps for the Intrusion Detection System (IDS) service.
SECTION | DESCRIPTION |
|---|---|
Trend to Armor Sync | Trend
Armor
Steps to Remediate |
Connectivity | This section displays the script(s) to check connectivity, along with steps to remediate. |
Errors | This section displays any known errors, along with steps to remediate. |
Malware Protection
Review specific information and troubleshooting steps for the Malware Protection service.
SECTION | DESCRIPTION |
|---|---|
Trend to Armor Sync | Trend
Armor
Steps to Remediate |
Connectivity | This section displays the script(s) to check connectivity, along with steps to remediate. |
Errors | This section displays any known errors, along with steps to remediate. |
Vulnerability Scanning
Review specific information and troubleshooting steps for the Vulnerability Scanning service.
SECTION | DESCRIPTION |
|---|---|
REGISTERED | This section displays the following information for the Armor agent that is registered:
|
SUBSCRIBED AGENT DETAILS |
Remediation |
SCAN IMPORT | This section displays the following scan import information for the Armor agent:
Remediation |
CONNECTIVITY | This section displays the script(s) to check connectivity, along with steps to remediate. |
LAST SCAN TIME | This section displays the following information regarding the most recent scan:
Remediation |
Create a Virtual Machine
Create a Virtual Machine with a New Workload
In Nexus, hover over Infrastructure
 in the left nav.
Click Compute.
Then Virtual Machines.
Click Add New VM.
If you do not have any virtual machines listed, then click Deploy New, and then select Virtual Machine.
Locate and select the desired operating system and operating system version.
Use the Region drop-down menu to select the data center.
Select the desired virtual machine based on your CPU and memory needs (GB).
You can click High CPU or High Memory to filter the list of virtual machines. You can also click Show All Options to see every virtual machine offering.
Armor labels virtual machines by CPU and memory features. For instance, 2x4 indicates that the virtual machine has 2 CPU and 4 GB of memory.
In Name, enter a descriptive name for your virtual machine.
In Workload, select New Workload.
In New Workload Name, enter a descriptive name.
In New Tier Name, enter a descriptive name.
In Location, select and verify the data center to host your virtual machine.
Under Access Credentials, note your username to access the virtual machine.
In Password, enter a secure password to use to access the virtual machine.
Your password must contain:
An upper-case letter
A lower-case letter
A number
A special character: ! @ # $ % ^ * ( ) { } [ ]
You can also click Generate Password to allow Armor to create a password.
(Optional) For additional storage, under Storage Substrate and Disk Size, select your desired storage, and then click Add Disk.
On the right-side menu, review the pricing information, and then click Purchase.
When you order a virtual machine, you are also ordering Intelligence Security Model (ISM) for the virtual machine. Prices for ISM will vary based on the number of virtual machines you have ordered. IMS pricing is based on the following tiered structure:
Tier | Number of virtual machines |
|---|---|
1 | 1 - 10 |
2 | 11 - 25 |
3 | 26 - 100 |
4 | 101- 250 |
5 | 251 - 500 |
6 | 500 + |
After you create a virtual machine, Armor recommends that you:
Create a firewall rule
By default, outbound and inbound traffic are blocked from virtual machines. To allow traffic, you must create a firewall rule. To learn more, see Firewall Rules.
Download the SSL/VPN client.
To access the virtual machine, you must download the SSL/VPN client. To learn more, see SSL VPN.
Create a Virtual Machine with an Existing Workload
If you create a virtual machine with an existing workload, then your Location and Virtual Data Center will be automatically selected.
In Nexus, hover over Infrastructure
 in the left nav.
Click Compute.
Then Virtual Machines.
Click Add New VM.
If you do not have any virtual machines listed, then click Deploy New, and then select Virtual Machine.
Locate and select the desired operating system and operating system version.
Use the Region drop-down menu to select the data center.
Select the desired virtual machine based on your CPU and memory needs (GB).
You can click High CPU or High Memory to filter the list of virtual machines. You can also click Show All Options to see every virtual machine offering.
Armor labels virtual machines by CPU and memory features. For instance, 2x4 indicates that the virtual machine has 2 CPU and 4 GB of memory.
In Name, enter a descriptive name for your virtual machine.
In Workload, select the workload from the drop down menu.
In New Tier Name, enter a descriptive name.
In Location, select and verify the data center to host your virtual machine.
Under Access Credentials, note your username to access the virtual machine.
In Password, enter a secure password to use to access the virtual machine.
Your password must contain:
An upper-case letter
A lower-case letter
A number
A special character: ! @ # $ % ^ * ( ) { } [ ]
You can also click Generate Password to allow Armor to create a password.
(Optional) For additional storage, under Storage Substrate and Disk Size, select your desired storage, and then click Add Disk.
On the right-side menu, review the pricing information, and then click Purchase.
When you order a virtual machine, you are also ordering Intelligence Security Model (ISM) for the virtual machine. Prices for ISM will vary based on the number of virtual machines you have ordered. IMS pricing is based on the following tiered structure:
Tier | Number of virtual machines |
|---|---|
1 | 1 - 10 |
2 | 11 - 25 |
3 | 26 - 100 |
4 | 101- 250 |
5 | 251 - 500 |
6 | 500 + |
Edit a Virtual Machine
Reboot, Reset or Turn Off a Virtual Machine
These instructions only apply to virtual machines in a Powered On status.
In Nexus, hover over Infrastructure
in the left nav.Click Compute.
Then Virtual Machines.
Locate the desired virtual machine.
Click the vertical ellipses.
Select and confirm the action:
Power Off - This action will turn off your virtual machine.
Force Power Off - This action will forcefully turn off your virtual machine if Power Off does not respond.
If the state of your virtual machine does not change after 5 minutes, please contact Armor Support.
Rename a Virtual Machine
In Nexus, hover over Infrastructure
in the left nav.Click Compute.
Then Virtual Machines.
Locate and select the desired virtual machine.
Hover over the gear icon, and then click the pencil icon.
In VM Name, enter a descriptive name, and then click Rename.
Resize a Virtual Machine
You can use these instructions to learn how to upgrade or downgrade a virtual machine:
Upgrade a Virtual Machine
If you upgrade a virtual machine's memory or CPU, then you will need to reboot your virtual machine.
When you upgrade a virtual machine, the changes will take place immediately. Your next bill will be pro-rated to reflect this upgrade.
In Nexus, hover over Infrastructure
in the left nav.Click Compute.
Then Virtual Machines.
Locate the desired virtual machine.
Click the vertical ellipses.
Click Resize.
Click Increase CPU / RAM.
Select the desired virtual machine type, and then review the information on the right screen.
Click Resize VM.
Click Resize VM again.
Downgrade a Virtual Machine
When you downgrade a virtual machine, the changes will take place immediately. Also, to complete the downgrade, your virtual machine will be rebooted.
Your bill will be pro-rated to reflect this change.
In Nexus, hover over Infrastructure
in the left nav.Click Compute.
Then Virtual Machines.
Locate the desired virtual machine.
Click the vertical ellipses.
Click Resize.
Click Decrease CPU / RAM.
Select the desired virtual machine type, and then review the information on the right screen.
Click Resize VM.
Click Resize VM again.
Add Disk Space to an Existing Virtual Machine
You can add the following types of storage to your virtual machine:
Storage Type | Minimum (in GB) | Maximum (in GB) |
|---|---|---|
RAW | 250 | 2000 |
SSD | 10 | 500 |
Fluid | 50 | 2000 |
In Nexus, hover over Infrastructure
in the left nav.Click Compute.
Then Virtual Machines.
Locate the desired virtual machine.
Click the vertical ellipses.
Then Manage Storage. Or, click the Storage tab.
Click Add A Disk.
Select your desired Storage, Disk Size. Optionally, Advanced Settings can be selected (Bus No is the SCSI Bus and Unit No is the placement on the SCSI Bus), and then click Add Disk.
Move a Virtual Machine to a Different Workload
You can use these instructions to move a virtual machine from one workload into a different, existing workload.
You cannot create a workload without a virtual machine. In other words, you cannot create an empty workload. If you have not created additional workloads, see Workloads.
In Nexus, hover over Infrastructure
in the left nav.Click Compute.
Then Virtual Machines.
Locate and select the desired virtual machine by clicking on the Name.
Find Workload and click Move
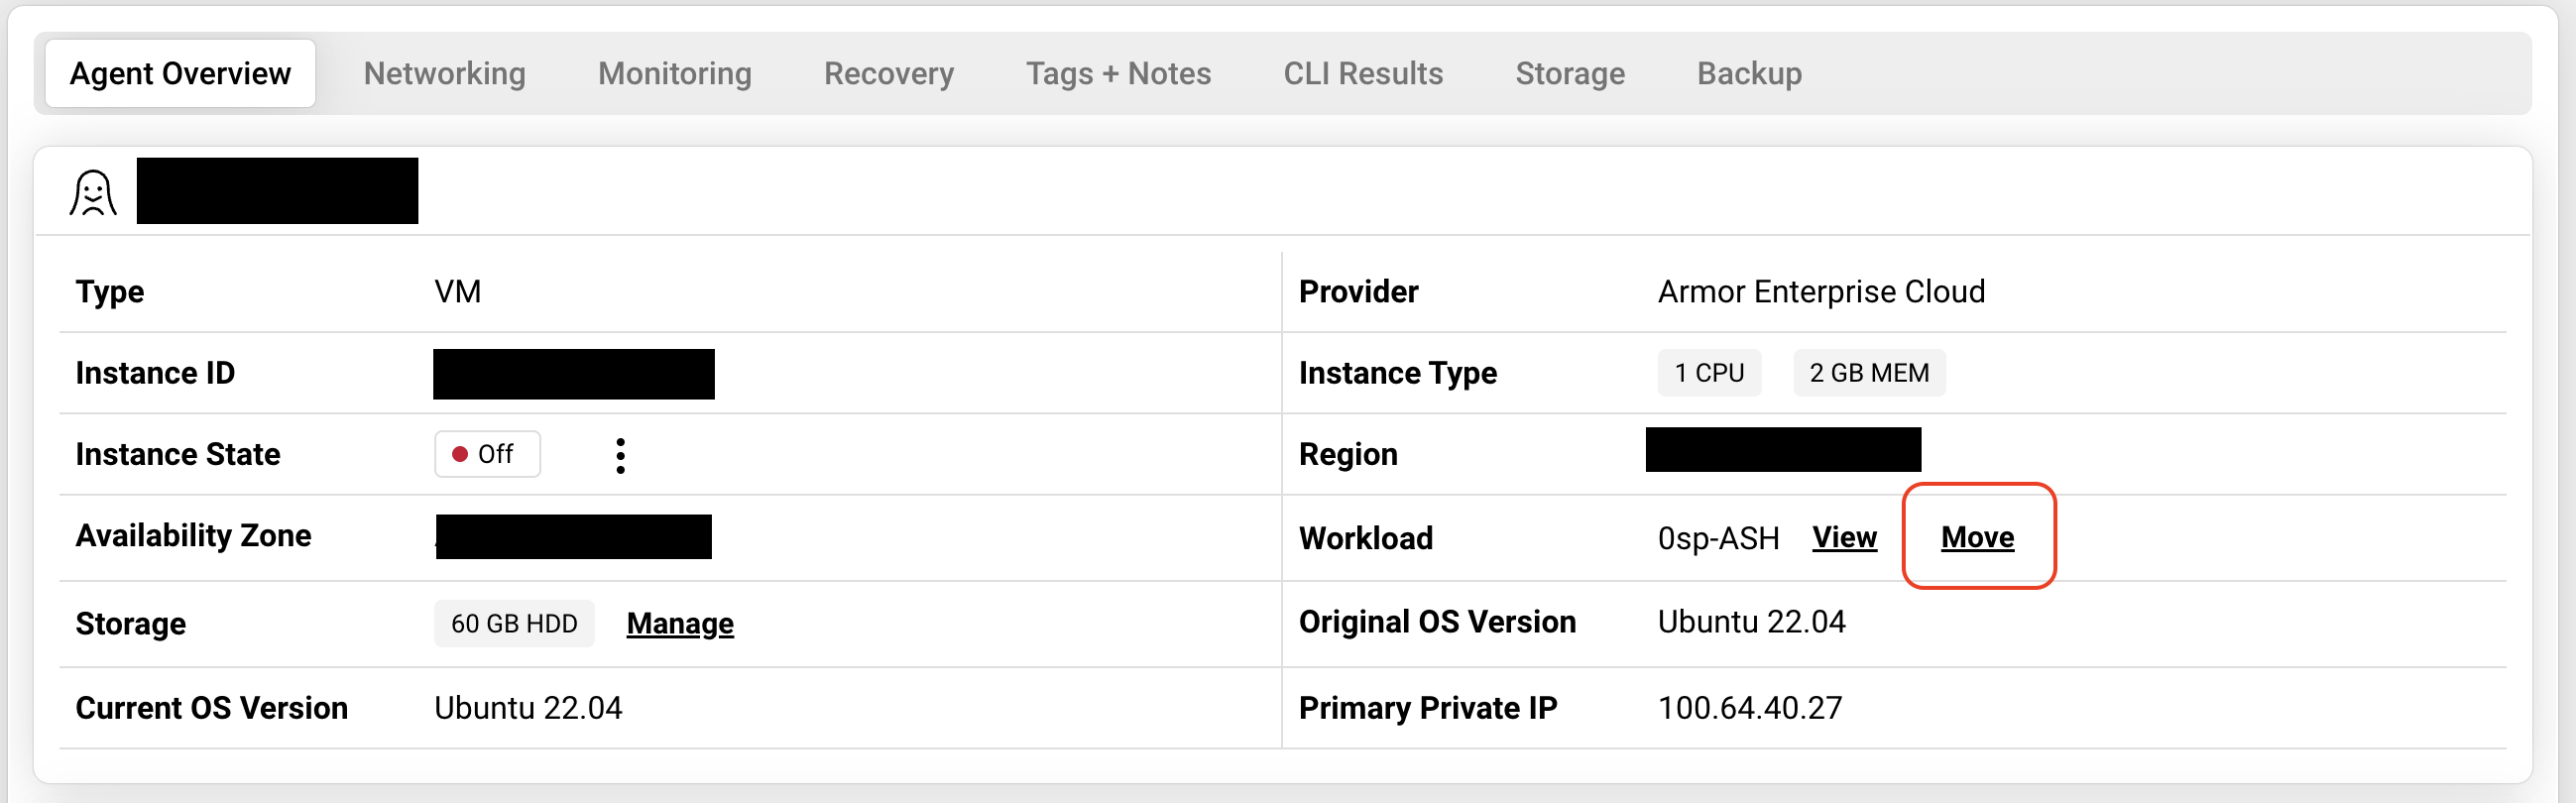
Nexus - VM Details Screen
Add Tags and Notes to a Virtual Machine
You can use the Tags + Notes section to add tags to your instance, to improve categorization and search capabilities. You can also add notes to help track changes and tasks related to an instance.
In Nexus, hover over Infrastructure
in the left nav.Click Compute.
Then Virtual Machines.
Locate and select the desired virtual machine by clicking on the Name.
Click Tags + Notes.
In the Tags section, enter the desired tag, then click the
 symbol to add.
Multiple tags may be added.
In the Notes section, enter the desired note.
Click Save Changes.
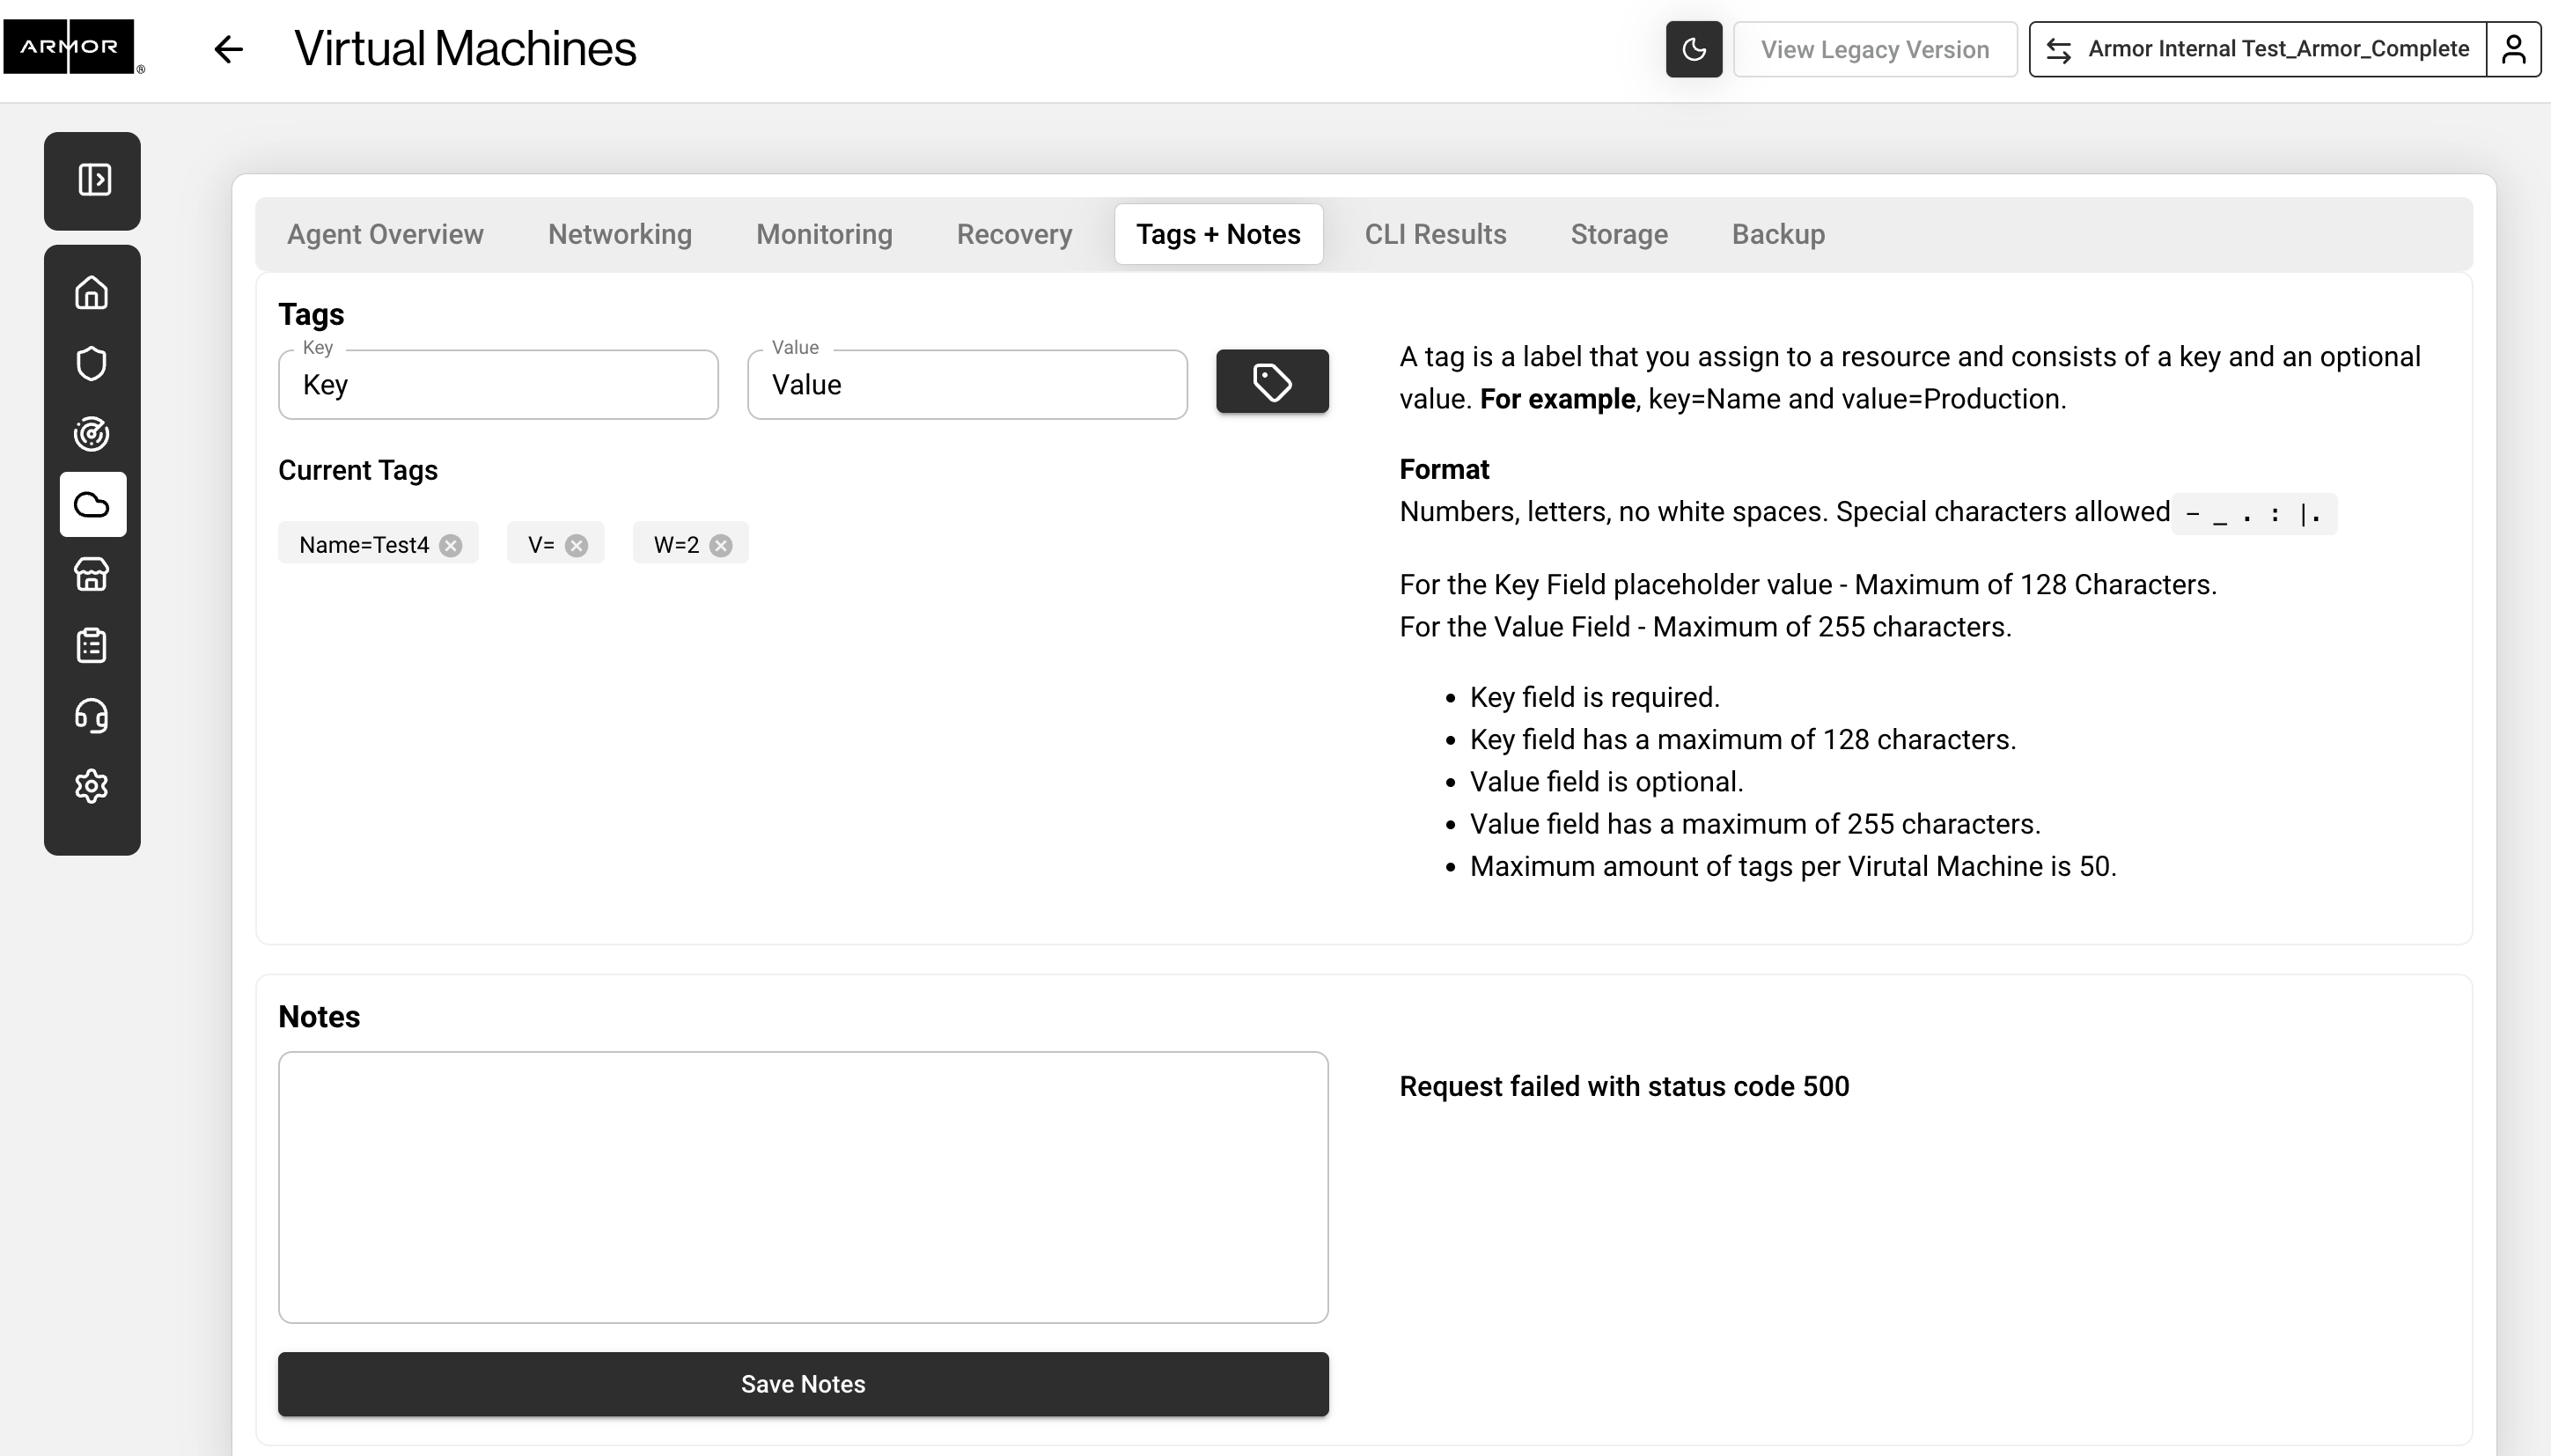
Nexus - Tags + Notes
Remove Tags and Notes from a Virtual Machine
In Nexus, hover over Infrastructure
in the left nav.Click Compute.
Then Virtual Machines.
Locate and select the desired virtual machine by clicking on the Name.
Click Tags + Notes.
In the Tags section, click the "X" next to the tag that you want to remove.
In the Notes section, delete or edit the note.
Click Save Changes.
Nexus - Delete a Tag
Hide an Offline Virtual Machine
In the Nexus, on the left-side navigation, click Infrastructure.
Click Virtual Machines.
Hover over the plus ( + ) icon, and then click the Virtual Machine Settings icon.
In the window on the right-hand side of the screen, enable the Auto Remove VM's Option.
Use the Remove VM's After drop-down menu options allows users to automatically remove Virtual Machines from Nexus after a machine shows offline for a predetermined time frame.
Select your desired time frame.
Click Save.
Delete a Virtual Machine
Armor recommends that you regularly review, and possibly remove, virtual machines that are offline. These virtual machines may affect the data that appears in the Security Dashboard.
You can only delete virtual machines that are offline (Power Off).
If you delete a virtual machine before the end of the billing cycle, you will still be charged for the full amount; however, in the next invoice, you will receive a credit to offset the cost.
Additionally, any add-on products or add-on subscriptions associated with the deleted virtual machine must be canceled separately.
In Nexus, hover over Infrastructure
in the left nav.Click Compute.
Then Virtual Machines.
Locate and hover over the desired virtual machine.
Click the vertical ellipses.
Click Power Off.
Click Power Off again.
Locate and select the desired virtual machine by clicking on the Name.
Click the vertical ellipses located beside Instance State.
Click Delete VM.
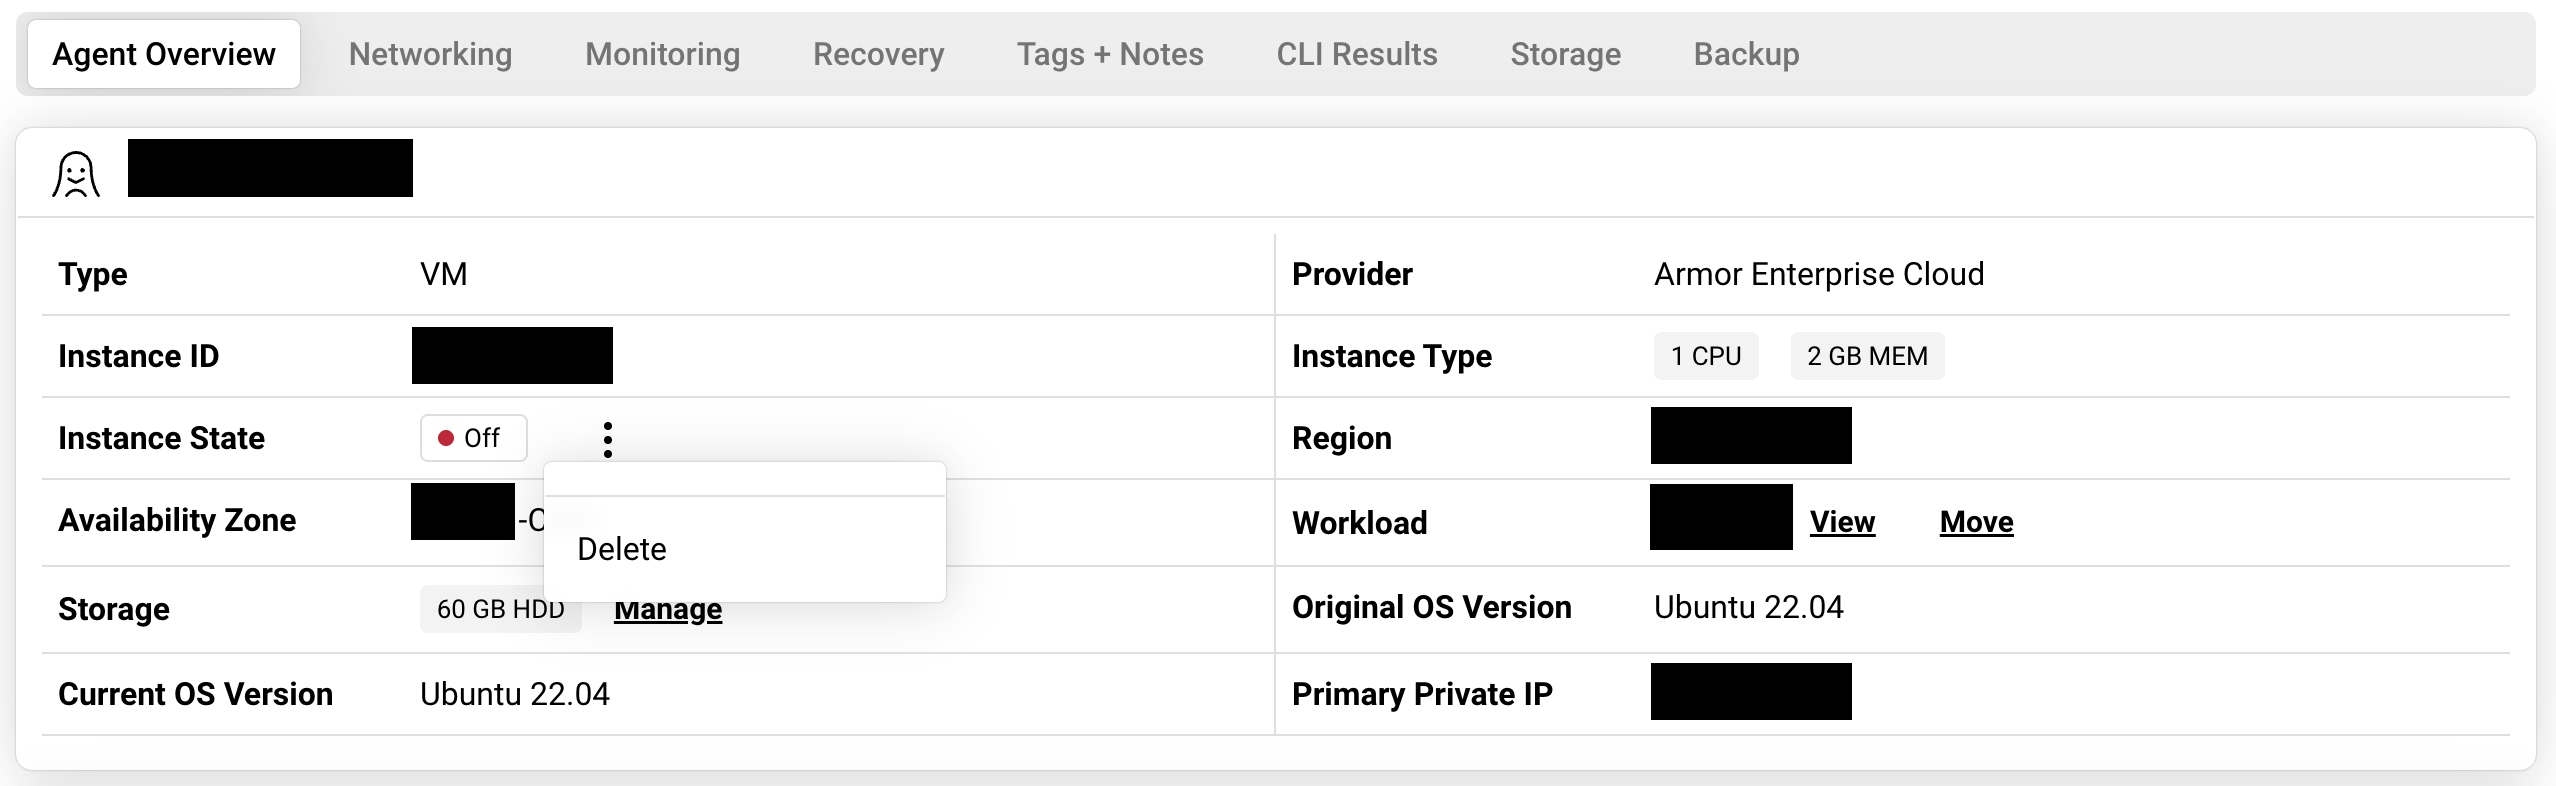
Nexus - Delete a Virtual Machine
View CPU and Memory Information
You can use the Monitoring section to view the CPU utilization (displayed in percentages) and memory utilization (measured in gigabytes) for a specified virtual machine.
In Nexus, hover over Infrastructure
in the left nav.Click Compute.
Then Virtual Machines.
Locate and select the desired virtual machine by clicking on the Name.
Click Monitoring.
(Optional) To view usage information from a particular time period, click the calendar icon, select a date range, and then click Apply.
(Optional) In the graph, hover over a particular point to view the specific usage information for a particular date and time.
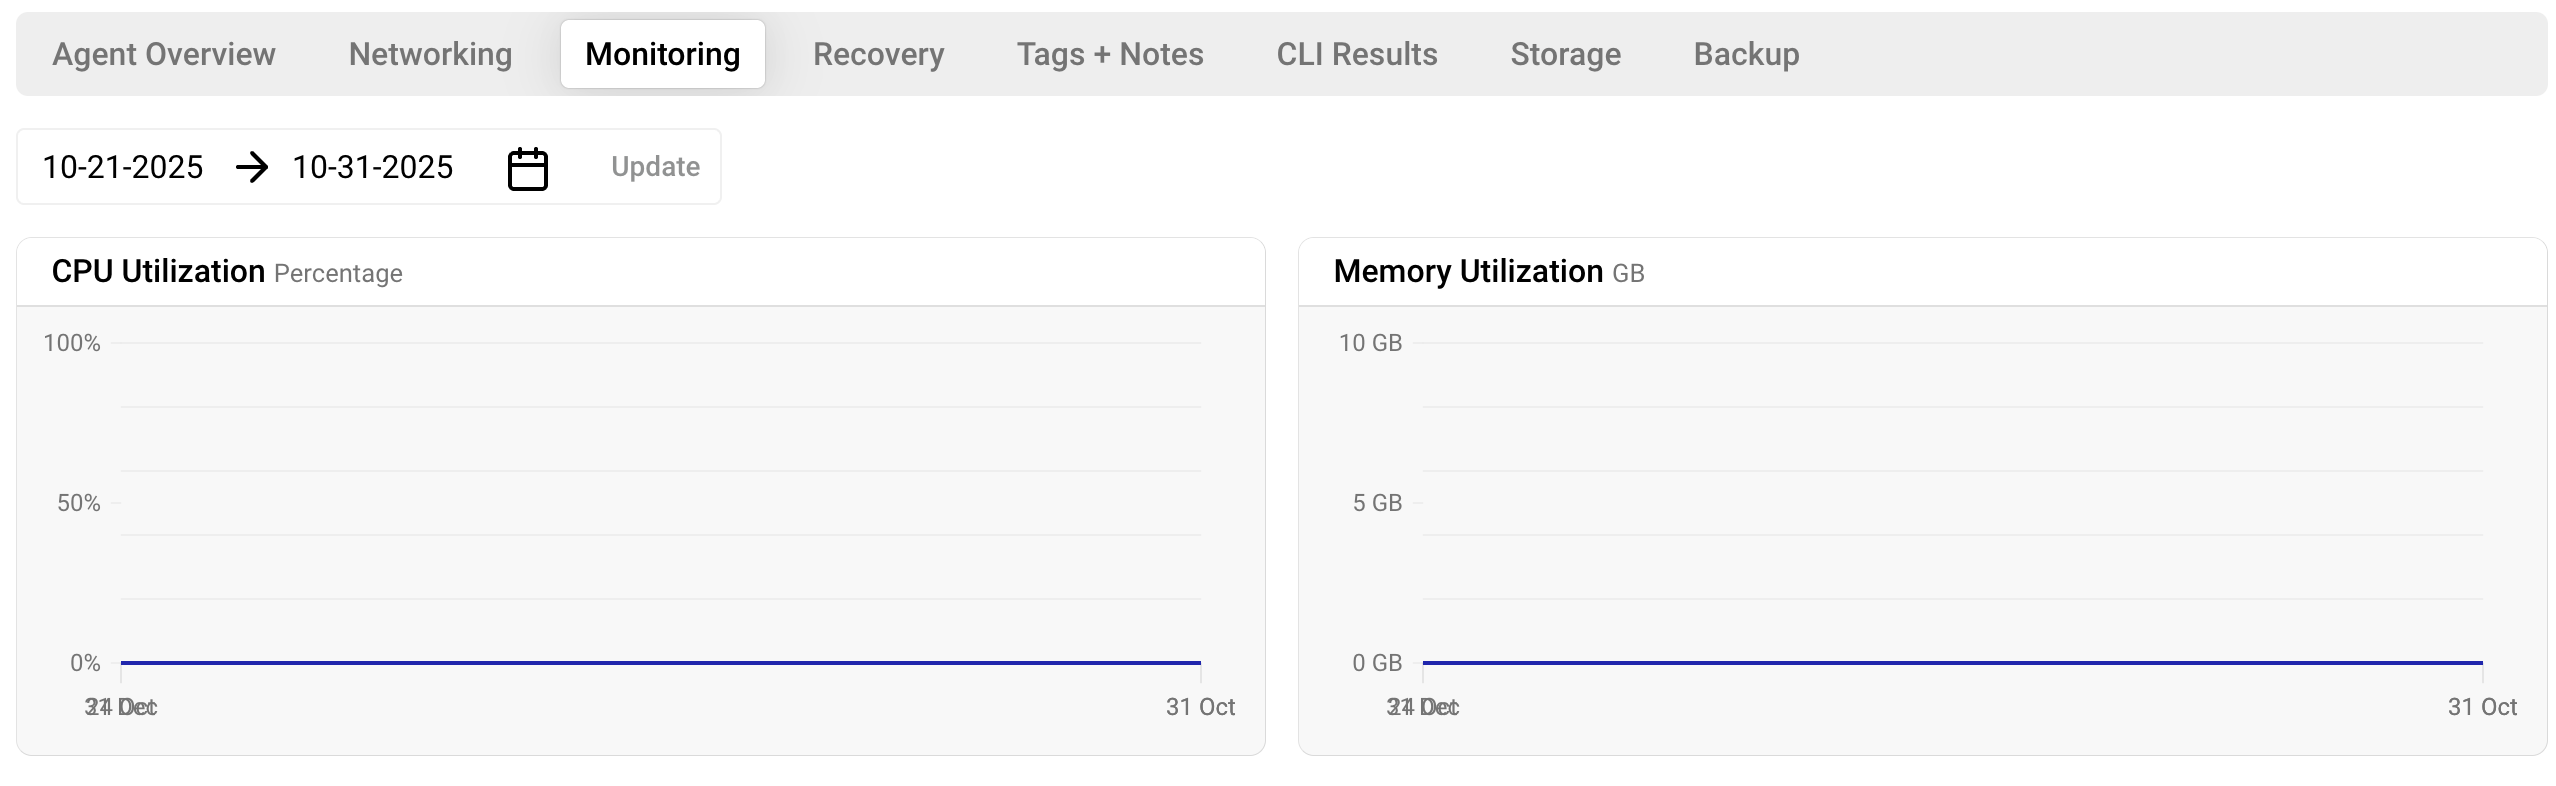
Nexus - Virtual Machine Monitoring
Based on the date and time range that you select, the display settings of the graphs will update accordingly.
Selected time range | Initial range of data returned by Nexus | Displayed interval on the x-axis |
|---|---|---|
Less than or equal to an hour | 1 hour | 1-minute intervals |
More than an hour, but less than 24 hours | 1 day | 10-minute intervals |
More than 24 hours, but less than 7 days | 1 week | 2-hour intervals |
More than 7 days, but less than 30 days | 30 days | 12-hour intervals |
More than 30 days | 1 year | 2-day intervals |
Virtual Machine Templates
Users can create Virtual Machine templates based on existing virtual machines and deploy templates within Nexus.
Create a Template
In Nexus, hover over Infrastructure
in the left nav.Click Compute.
Then Templates.
Click the Add Template button.
Complete the New VM Template Form
Field | Description |
|---|---|
Name | The name of the template |
Location | The data center where the template will be stored The deployed VM will have the same datacenter location as the template from which it was deployed from |
Source Virtual Machine | Choose the VM source from the dropdown Templates can only be made from a VM in a good state. Templates cannot be made from a VM in an offline or pending state |
Click Create VM Template.
Deploy a Template
In Nexus, hover over Infrastructure
in the left nav.Click Compute.
Then Templates.
Click the menu buttons next to the name of the template to be deployed
Click Deploy
User will be taken to the VM Configure screen. Template configuration will be auto populated
Complete the form
Click Purchase